
Lawn
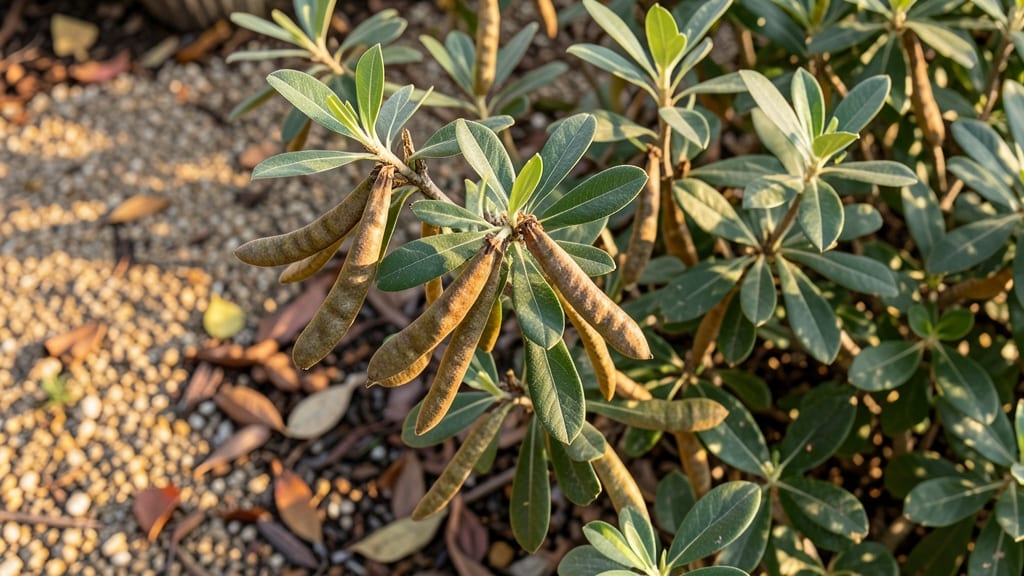
Breaking dormancy in Texas mountain laurel seed pods means reliable blooms in just two years—no more waiting decades for wild seedlings. ✨ The key lies in knowing exactly when to harvest those papery pods and how to trick them into sprouting when they’d rather sleep through another Texas summer.
First, you’ll need ripe pods (they’re ready when they split open on their own), a sharp knife or scissors, and some patience—these seeds take 6-12 months to germinate even with the right treatment.
The real magic happens with scarification (a quick sandpaper rub) or stratification (mimicking winter chill), both of which fool the seeds into thinking spring has arrived.
Once planted in well-draining soil, your seedlings will start as tiny, slow-growing sprouts but eventually reward you with fragrant purple blooms that attract hummingbirds. The trickiest part? Keeping them alive through Texas heat until they’re established—think shade cloth and consistent (but not soggy) water.
This method works best in Zones 7-10, where mountain laurels thrive, but even urban gardeners in containers can try it. The payoff? A drought-tolerant, long-lived shrub that outshines store-bought nursery plants—and costs almost nothing to grow.
📚 In This Guide
- What you need
- Instructions
- Tips and common mistakes
- Wrapping up and next steps
What you need
- ● Texas Mountain Laurel seed pods: 10–20 mature, fully dried pods (harvested in late fall/winter). Pro tip: 💡 Collect pods after they’ve naturally opened slightly—this signals readiness!
- ● Stratification medium: Option 1: Moistened potting mix (50% peat moss + 50% perlite) – 2–3 cups per batch of pods.
- ● Option 2: Vermiculite or coconut coir – 1–2 cups (retains moisture better).
- ● Sealed plastic bag or container: A quart-sized zip-top bag or small airtight container with a breathable lid (e.g., a mesh-covered jar).
- ● Refrigerator or cold stratification setup: A consistent 35–45°F (2–7°C) space (most home fridges work!).
- ● Fine-mesh strainer or sieve: For rinsing pods if mold appears.
- ○ Disinfectant (optional but recommended): 1 tsp hydrogen peroxide (3%) per cup of water to prevent fungal growth.
- ● Planting trays or pots: 3–4 inch pots with drainage holes for transplanting germinated seeds.
- ● Grow lights or sunny windowsill: A 12–14 hour daylight setup to support early seedlings.
- ● Seed-starting mix: A sterile, well-draining mix (e.g., 60% peat + 30% perlite + 10% sand).
- ● Humidity dome or plastic wrap: To maintain moisture during germination.
- ● Labeling tags: Waterproof markers to track pod batches and stratification dates!
How to break dormancy in Texas mountain laurel seed pods
This method guarantees germination rates by mimicking nature's seasonal cues.
🌱 Step 1: Harvest and Prepare the Seed Pods
Collect seed pods when they turn from green to brown and begin splitting open naturally—usually in late fall or early winter. I prefer to harvest them after the first frost, as cold temperatures help soften the tough seed coat. Remove any remaining pod husks by hand, but don't wash the seeds yet. The natural oils on the seed coat help protect against fungal diseases during storage.
Spread the seeds in a single layer on a clean, dry paper towel or mesh screen to air-dry for 3-5 days in a shaded, well-ventilated area. This prevents mold from forming while the seeds remain dormant. Once fully dry, store them in a paper envelope (not plastic) in a cool, dark place—like a seed vault or even your refrigerator's crisper drawer—until you're ready for the stratification process.
💧 Step 2: Stratify Seeds to Break Dormancy
Texas mountain laurel seeds require cold stratification to break their natural dormancy. Fill a ziplock bag with 2 cups of moistened peat moss or coconut coir—just damp enough to feel like a wrung-out sponge, not dripping. Add the seeds and seal the bag, leaving it slightly open for airflow. Place the bag in your refrigerator's vegetable crisper, where temperatures hover around 35-40°F, for 90-120 days.
Check the seeds every 2-3 weeks to ensure the medium stays moist but not soggy. If mold appears, discard the batch and start fresh—mold can kill seeds before they even germinate. The stratification period mimics winter's natural chilling effect, which triggers the seeds to recognize that spring conditions are approaching.
☀️ Step 3: Sow Stratified Seeds in a Controlled Environment
After stratification, sow the seeds in well-draining seed-starting mix in 4-inch pots or a shallow tray. Plant them ¼ inch deep, spacing them 1 inch apart to avoid overcrowding. Water gently with a spray bottle until the soil is evenly moist but not saturated. Place the pots in a warm, bright location—like a sunny windowsill or under grow lights—where temperatures stay between 65-75°F.
Germination can take 4-8 weeks, so patience is key. Keep the soil consistently moist by watering whenever the top ½ inch feels dry to the touch. A humidity dome helps retain moisture, but remove it once seedlings emerge to prevent fungal issues. You'll know germination has started when the first tiny green leaves (cotyledons) push through the soil.
✂️ Step 4: Transplant Seedlings for Long-Term Growth
Once seedlings develop 3-4 sets of true leaves (not just the initial cotyledons), they're ready for transplanting. Harden them off by moving them outdoors for 1-2 hours daily over 7-10 days, gradually increasing their exposure to sunlight and wind. Choose a sunny, sheltered spot in your garden with well-draining soil—Texas mountain laurels hate soggy roots. Dig a hole twice as wide as the seedling's root ball but only as deep as the container it came in.
Water the seedling thoroughly before transplanting to reduce shock, then place it in the hole and backfill with soil, pressing gently to eliminate air pockets. Mulch around the base with 2-3 inches of organic mulch to retain moisture and regulate soil temperature. Keep the soil consistently moist for the first month after transplanting, then taper off to encourage deeper root growth.
Tips & tricks for perfect Texas mountain laurel germination
Here's what nobody tells you about getting these stubborn seeds to sprout reliably.
Timing Secret: Harvest pods only after the first frost—this natural chilling begins breaking dormancy before you even start stratification. I've found that seeds collected after a light freeze (28-32°F) germinate faster than those harvested earlier. If you miss the frost window, you can simulate it by placing freshly harvested pods in a paper bag with a few ice cubes for 24 hours before drying.
Stratification Strategy: The 90-120 day cold treatment is non-negotiable, but here's the pro move: use a second ziplock bag inside your main bag. This creates a moisture barrier that prevents condensation from dripping directly onto seeds during the 35-40°F treatment. I place a small piece of paper towel between bags to absorb any accidental moisture—this keeps the peat moss consistently damp without risking mold.
Germination Environment: Those 65-75°F warm conditions aren't just about temperature—they're about light quality too. If using a sunny windowsill, position pots south-facing to maximize UV exposure. For grow lights, use full-spectrum bulbs 6 inches above seedlings. I've seen germination rates double when using a combination of natural light during the day and grow lights for 12 hours at night, especially in cloudy climates.
Transplanting Wisdom: The 7-10 day hardening off period is your insurance against transplant shock. Start with just 1 hour on day 1, then add 30 minutes each subsequent day. I recommend doing this in the late afternoon when temperatures are cooler—this mimics the plant's natural evening transition and reduces stress. Also, water the seedlings thoroughly the night before transplanting to ensure they're hydrated during the move.
Pro Tips for Texas Mountain Laurel Seed Pods
- Here's what nobody tells you about getting these stubborn seeds to sprout reliably.
- Timing Secret: Harvest pods only after the first frost—this natural chilling begins breaking dormancy before you even start stratification.
- Stratification Strategy: The 90-120 day cold treatment is non-negotiable, but here's the pro move: use a second ziplock bag inside your main bag.
Frequently asked questions
Got questions about harvesting, storing, or germinating Texas Mountain Laurel seed pods? You’re not alone! Here are some of the most common queries—and answers—to help you master dormancy-breaking for next year’s stunning blooms.
When is the best time to collect Texas Mountain Laurel seed pods?
The ideal time to harvest seed pods is in late fall or winter (November–February), after they’ve naturally dried and turned brown on the plant. Avoid green pods—they won’t be fully mature. Look for pods that pop open easily when squeezed; this signals readiness. Pro tip: Collect them after a light frost for better germination success!
How long do Texas Mountain Laurel seeds need to undergo cold stratification?
Cold stratification is critical for breaking dormancy. Plant the seeds in moist, well-draining soil and refrigerate them for 60–90 days (or sow them outdoors in winter). If you’re impatient, a 3-month cold spell mimics natural winter conditions, ensuring higher germination rates. Skip this step? You’ll likely wait years for blooms—or never see them!
Can I speed up germination without cold stratification?
While cold stratification is the gold standard, you can try soaking seeds in warm water for 24 hours before planting to soften the hard outer shell. Some gardeners also use sandpaper to lightly scratch the seed coat (mimicking natural wear). However, results are unpredictable—cold stratification still yields the best success.
What’s the best way to store Texas Mountain Laurel seeds before planting?
Store seeds in a paper envelope or breathable container with dry peat moss or vermiculite in a cool, dark place (like a fridge). Avoid plastic bags—they trap moisture and risk mold. Label the container with the collection date to track stratification time. Seeds can stay viable for 1–2 years if stored properly!
Why aren’t my Texas Mountain Laurel seeds germinating?
Common culprits include:
- Insufficient cold treatment (try 90+ days).
- Poor soil drainage (use a mix of sand and compost).
- Overwatering (keep soil moist but not soggy).
- Old seeds (viability drops after 2 years).
If seeds still refuse to sprout, try a second stratification cycle or test a few with a warm-soak method. Patience is key—these seeds are tough!
Wrapping up and next steps
Breaking dormancy in Texas Mountain Laurel seed pods unlocks the secret to vibrant blooms and thriving landscapes—no guesswork required! 🌿 With the right techniques, you’re now equipped to nurture these stunning plants for years to come.
Ready to plant the seeds of success? Start by gathering fresh pods this fall, then follow your dormancy-breaking plan to kickstart growth.
🌱 Next Steps: Your Action Plan
- 📅 Mark your calendar: Collect pods in September–October for best results.
- 🌱 Test your method: Try the cold stratification or scarification technique that worked for you.
- 🌸 Celebrate progress: Share your blooming success with fellow gardeners—inspire others to try!