
Lawn
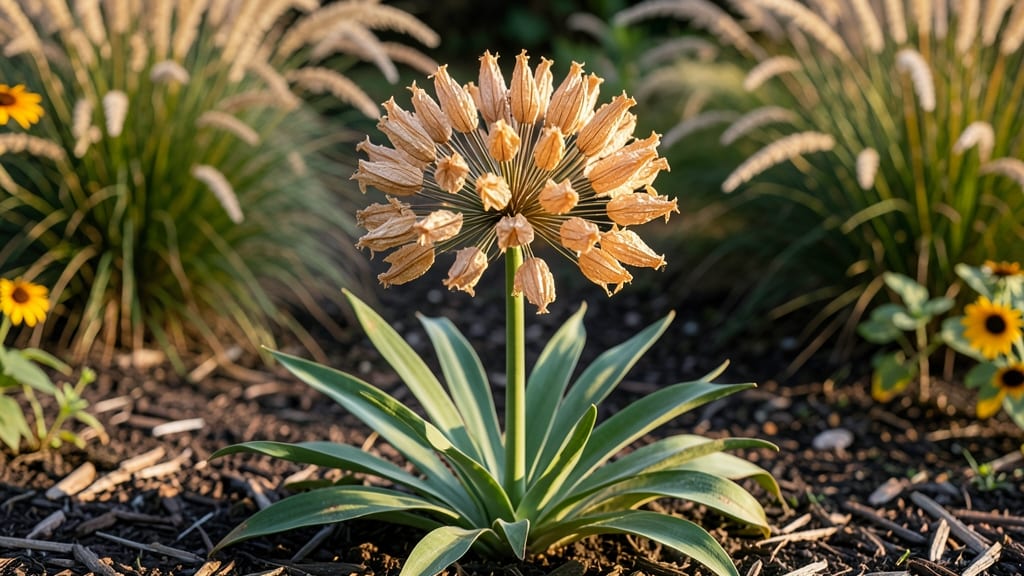
Harvesting allium seed pods turns last year’s blooms into next season’s showstoppers—if you know when and how to do it right. 🌱 I’ve saved seeds from my globe alliums for three years now, and the difference in plant vigor is night-and-day compared to store-bought bulbs.
The key? Timing the harvest so the pods are fully mature but haven’t burst open yet.
Start by identifying the right moment: seed pods should turn from green to a papery brown, and the stems will feel dry to the touch. Snip them off with clean scissors, leaving a short stem to help with drying.
For varieties like ornamental alliums or edible onions, the pods will contain tiny black seeds—each one a potential next year’s star. Just avoid varieties like chives or garlic, which don’t produce viable seeds for propagation.
Once harvested, spread the pods in a single layer on a mesh screen or paper towels in a dry, well-ventilated spot. They need 2-4 weeks to fully dry before you can gently crush them to release the seeds.
Store the dried seeds in a paper envelope labeled with the variety and date—viability lasts 2-3 years if kept cool and dry.
Watch for pests like mice or weevils that might nibble on your drying pods, and avoid humidity, which can cause mold. With proper care, you’ll end up with seeds that produce plants just as stunning (or tasty!) as their parents—ready to plant in fall for next summer’s blooms.
📚 In This Guide
- What you need
- Instructions
- Tips and common mistakes
- Wrapping up and next steps
What you need
- ● Fresh allium seed pods: Harvest when pods turn brown and papery (typically late summer to early fall). Aim for at least 10 pods for a reliable yield.
- ● Pruning shears or sharp scissors: For cleanly snipping stems (avoid tearing pods).
- ○ Paper bags or breathable mesh bags: 1–2 bags per batch (size depends on pod quantity). Optional: Label bags with the allium variety and harvest date.
- ● Drying rack or screen: Elevate pods to improve airflow (e.g., a wooden frame with chicken wire or a wire cooling rack).
- ● Permanent marker or labels: For tracking varieties and harvest dates.
- ● Air-tight containers: Glass jars, plastic bins with tight lids, or resealable bags (for long-term storage).
- ○ Desiccant packets (optional but recommended): 1–2 per container to absorb moisture and extend shelf life.
- ● Dehumidifier or fan: Speed up drying in humid climates.
- ● Food dehydrator: For faster drying (set to 95°F/35°C).
- ● Fine-mesh sieve: For separating seeds from chaff post-drying.
- ● Notebook or app: Track germination rates and storage conditions for future reference.
Step-by-Step guide to harvesting and storing allium seed pods
Here's the straightforward method I use to save seeds from allium blooms like garlic chives and ornamental onions.
🌿 Step 1: Identify and Monitor Mature Seed Pods
Wait until the flower stems turn completely brown and the seed pods feel dry and papery to the touch. At this stage, they'll rattle slightly when shaken. I check my plants every 3-5 days in late summer—don't rush it, because immature pods won't store well.
Use clean pruning shears to snip the entire stem 1-2 inches below the seed pods. This prevents moisture from the stem from spoiling your seeds during drying. Place stems in a paper bag (not plastic) to catch any loose seeds that might fall during transport.
⏰ Step 2: Dry the Seed Pods Properly
Spread the stems out in a single layer on a wire rack or clean screen in a dry, well-ventilated area with indirect sunlight. A dark closet with good airflow works well. Avoid direct sunlight, which can overheat the pods and cause them to crack open prematurely.
Turn the stems every 2-3 days to ensure even drying. The pods are ready when they're completely dry and light brown in color. This typically takes 2-4 weeks, depending on your climate's humidity levels. If your home feels damp, drying may take longer.
✂️ Step 3: Extract and Clean the Seeds
Once fully dry, gently rub the seed pods between your palms to release the seeds. I like to do this over a clean white sheet of paper—the contrast makes it easy to spot any debris or damaged seeds. Remove any blackened or shriveled seeds, as these won't germinate.
For extra cleanliness, place the seeds in a fine-mesh strainer and rinse them gently under lukewarm water. Let them air-dry completely on the strainer or a paper towel for 1-2 hours before storing. This step prevents mold during storage.
🪴 Step 4: Store Seeds for Long-Term Viability
Transfer the cleaned seeds into a small, airtight container like a glass jar or resealable plastic bag. Label it with the allium variety and the harvest year. Store in a cool, dark place—I keep mine in the back of my pantry where the temperature stays around 40-50°F.
Seeds stored this way remain viable for 3-5 years, though germination rates drop slightly after the first year. Check the seeds annually and discard any that look discolored or shriveled. Properly stored seeds will keep their shape and color for years.
💧 Step 5: Test Germination Before Planting Next Year
Before using stored seeds, do a quick germination test to ensure viability. Place 10 seeds between two damp paper towels in a ziplock bag, then seal it loosely. Keep the bag in a warm spot (around 70°F) and check for sprouts in 7-14 days. If fewer than 50% sprout, consider refreshing your seed supply.
This simple test saves you from planting dozens of seeds only to find they won't grow. If the test passes, you're ready to plant your allium seeds with confidence next spring. I always plant a few extra just in case!
Tips & tricks for perfect allium seed pod harvesting
Here's what nobody tells you about saving allium seeds—these tricks make all the difference between viable seeds and wasted blooms.
Timing Secret: The 3-5 day monitoring window in Step 1 is critical—immature pods won't dry properly, while overripe ones may shatter when harvested. I mark my calendar for late August each year because that's when my garlic chives consistently mature. If you live in a cooler climate, pods may take 5-7 days to fully dry on the plant.
Drying Strategy: For Step 2, don't skip the 2-3 day turning schedule! I've learned this the hard way after losing entire harvests to uneven drying. Use a fan on low setting near your drying area to circulate air—this cuts drying time by nearly 30% in humid climates. Place a small dish of silica gel packets nearby to absorb excess moisture during those 2-4 weeks.
Cleanliness Tip: When rinsing seeds in Step 3, use distilled water instead of tap water if your area has hard water. The minerals can leave residue that interferes with germination. After rinsing, spread seeds on a clean kitchen towel instead of paper towels—they'll dry faster and won't stick to the fibers. This simple swap prevents mold during storage.
Storage Wisdom: For Step 4, I add a small packet of rice or silica gel to my seed containers to absorb any lingering moisture. The 40-50°F range is ideal because it mimics natural winter conditions that seeds experience in the ground. If your pantry gets warmer, move containers to the refrigerator crisper drawer where temps stay consistent.
Pro Tips for Allium Seed Pods
- Here's what nobody tells you about saving allium seeds—these tricks make all the difference between viable seeds and ...
- Timing Secret: The 3-5 day monitoring window in Step 1 is critical—immature pods won't dry properly, while overripe o...
- Drying Strategy: For Step 2, don't skip the 2-3 day turning schedule! I've learned this the hard way after losing ent...
Frequently asked questions
Got questions about allium seed pods?
You’re not alone! Whether you’re a first-time gardener or a seasoned grower, harvesting and storing these unique pods can feel tricky. Here are some of the most common questions—and their answers—to help you master the process like a pro.
When is the best time to harvest allium seed pods?
Harvest allium seed pods when they turn a light tan or brown color and start to split open slightly, usually 6–8 weeks after flowering. Avoid harvesting too early—the seeds won’t be fully mature, or too late, as they may scatter or attract pests. Morning harvests are ideal since pods are dry and firm.
How do I know if my allium seed pods are ready for drying?
Ready-to-dry pods should feel lightweight and crispy when gently squeezed. If they’re still plump or green inside, they need more time on the plant. Once harvested, place them in a well-ventilated, dry spot (like a mesh bag or paper bag) for 2–4 weeks. Avoid direct sunlight to prevent overheating.
What’s the best way to store allium seeds for next year?
Store dried allium seeds in a cool (35–40°F), dark, and dry place—like a sealed glass jar or airtight container with a desiccant packet. Label them with the harvest date (they stay viable for 2–3 years) and avoid refrigeration, which can cause moisture buildup. Pro tip: Add a silica gel packet to absorb excess humidity!
Can I use allium seed pods in cooking, or are they just for planting?
While the seeds inside are edible (similar to garlic or onion seeds), they’re mild and not commonly used in cooking. However, the pods themselves are often dried and used as ornamental decor or in floral arrangements. If you’re curious, try roasting the seeds like garlic—just bake at 350°F for 10–15 minutes until fragrant!
Why are my allium seed pods rotting before they’re fully dry?
Rotting usually happens due to excess moisture or fungal issues. To prevent this:
- Harvest pods on a dry, sunny day (avoid rain or dew).
- Space pods apart in a single layer while drying to improve airflow.
- Check for pests (like slugs or snails)—remove any damaged pods immediately.
- If mold appears, discard affected pods and try drying in a dehumidifier or fan-cooled area.
What if I don’t have space to dry allium pods indoors?
No problem! Try these alternatives:
- Hang them upside down in a garage or shed with good ventilation.
- Use a seed drying screen (available at garden stores) outdoors in shade.
- Spread pods on a clean, dry towel in a well-lit but not sunny spot.
Wrapping up and next steps
Harvesting, drying, and storing allium seed pods is a rewarding way to ensure next year’s vibrant blooms—plus, it’s easier than you think! 🌱 With the right tools and timing, you’ll save money and enjoy fresh flowers season after season. Ready to put your new skills to work?
🌟 Your Next Step:
- Label and organize your stored pods clearly to avoid mix-ups.
- Mark your calendar for next year’s harvest—consistency is key!
- Experiment! Try growing different allium varieties for unique colors and heights.
Now grab those shears and get growing—your future garden will thank you! 🌸