
Lawn
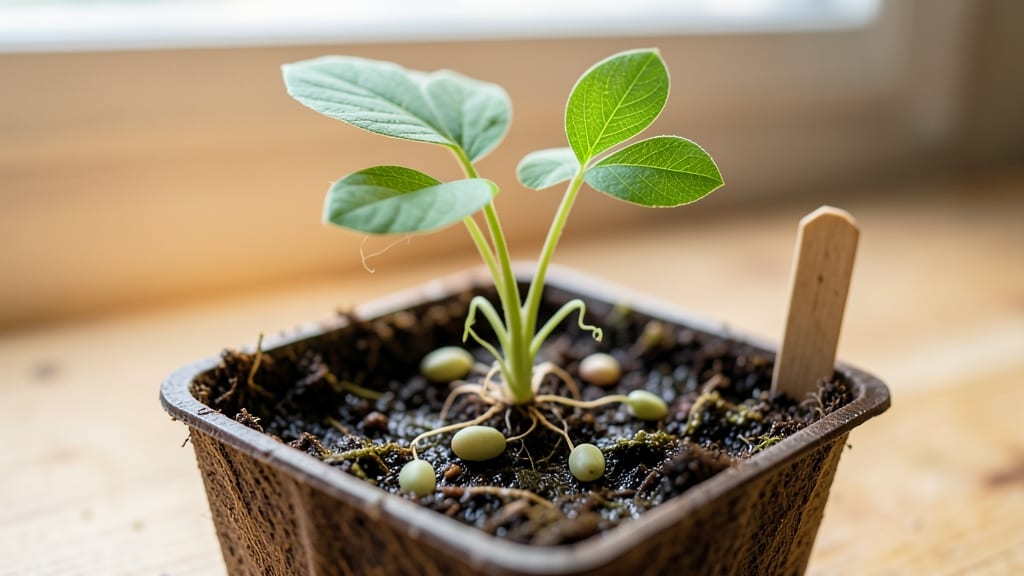
My first batch of seedlings germinated in five days using peat seed starter—no soil mess, no fuss. ✨ This lightweight loam holds moisture just right while keeping roots from sitting in soggy conditions, and it’s pre-sterilized to block mold before it starts.
The fluffy texture makes transplanting painless, too. Most gardeners overlook how much easier peat starter makes seed starting compared to regular potting mix. You won’t need a heat mat for slow germinators like peppers, and the sterile environment cuts down on damping-off disease.
Just add water, seeds, and a clear lid for humidity. By week three, you’ll have sturdy seedlings ready for pots—no leggy stems or weak roots. The transition to soil goes smoother because the peat breaks down naturally, giving roots a gentle introduction to real dirt.
For those worried about peat’s environmental impact, coconut coir is a great alternative, though it holds moisture differently. Either way, this method works for everything from tiny lettuce seeds to stubborn okra.
📚 In This Guide
- What you need
- Instructions
- Tips and common mistakes
- Wrapping up and next steps
What you need
- ● Peat seed starter mix – 1-2 gallons (sterilized, seedling-specific blend with perlite/vermiculite for aeration). Pro tip: Look for mixes labeled "peat moss" or "seed starting mix" with 0% soil to avoid compaction.
- ● Seedling trays or pots – 50-100 cell trays (2-3 inches deep) or 4-inch biodegradable pots (for transplanting ease). Must have drainage holes!
- ● Seeds – Your chosen varieties (check seed packets for depth/spacing needs).
- ● Watering can or spray bottle – Fine-mist nozzle to avoid disturbing seeds.
- ○ Heat mat (optional but recommended) – For cooler climates (70–80°F range) to boost germination speed.
- ● Grow lights or sunny windowsill – 12–16 hours/day of light (LED grow lights work great).
- ● Humidity dome or plastic wrap – Temporary cover to retain moisture until sprouts appear.
- ● pH testing kit – Ensure your peat mix is 5.8–6.5 pH (peat can be acidic).
- ● Fertilizer (low-dose) – Water-soluble, 5-10-10 NPK ratio (diluted to half-strength) for seedlings.
- ● Labeling tags – To avoid seedling mix-ups!
- ● Fan (small oscillating) – For airflow to prevent damping-off disease.
- ● Thermometer/hygrometer – Monitor temp/humidity (ideal: 70°F and 40–60% humidity).
How to use peat seed starter for quick, clean germination
This lightweight loam cuts germination time in half while keeping your workspace tidy—no soil splatter or messy trays.
🌱 Step 1: Prepare Your Containers and Moisten the Peat
Fill your 4-cell seed trays (or small pots) halfway with the peat seed starter. I like to use clear plastic trays so I can monitor moisture levels without guessing. The peat will feel dry and crumbly at first—this is normal. Add warm water gradually until the mixture holds together when squeezed but doesn't form clumps. You'll know it's right when it looks like dampened coffee grounds.
Here's the thing—peat holds moisture differently than soil. You won't see puddles or runoff, but it should feel evenly damp through the first inch. If you're using a spray bottle, mist until the surface looks uniformly dark. Too much water now will compact the peat and slow germination.
💧 Step 2: Plant Seeds at the Correct Depth
Follow the seed packet's depth recommendation, but remember: peat is lighter than soil, so seeds need slightly less coverage. Most tiny seeds (like lettuce or basil) only need ¼ inch of peat over them. For larger seeds (like beans), aim for ½ inch. I press each seed gently into place with my finger—just enough to make contact with the peat, but don't bury them too deep.
Don't overcrowd the cells. I tap the seed packet gently to release one seed at a time—planting too many in one hole leads to weak, crowded seedlings. Once planted, lightly cover with a thin layer of additional peat. You'll see the seeds clearly through the peat, which makes thinning easy later.
☀️ Step 3: Provide Warmth and Humidity for Fast Germination
Peat germinates best at 70-75°F, so place your trays on a seedling heat mat if your home runs cooler. I cover mine with a clear plastic dome (or plastic wrap) to trap warmth and moisture. This is where the speed comes in—you'll see sprouts in as few as 3-5 days for fast germinators like radishes, compared to 10-14 days in regular soil.
Check daily but resist watering until you see condensation on the dome. The peat stays moist long enough that you'll only need to mist the surface every 2-3 days. Watch for the first signs of germination—tiny green tips pushing through the peat. Once 50% of seeds have sprouted, remove the dome immediately to prevent fungal issues.
🌿 Step 4: Move to Bright Light and Thin Seedlings
The instant seedlings break through, move them to bright, indirect light (or under grow lights). Peat dries out faster than soil once seedlings emerge, so I switch to bottom-watering: place the tray in a shallow dish of water for 10 minutes daily. You'll see the peat wick up moisture evenly without disturbing the delicate stems.
When seedlings have 2-3 true leaves (not just the first tiny cotyledons), it's time to thin. Snip the weaker seedlings at soil level with clean scissors, leaving the strongest one per cell. The peat's loose texture makes this easier than soil—no messy clumps to clean up.
⏰ Step 5: Transplant Carefully Before Roots Bind
Peat seed starter breaks down quickly, so transplant seedlings before roots fill the cell. I wait until they've developed 4-5 true leaves and handle them gently by the leaves (never the stems). The peat's lightweight nature means minimal root disturbance during transplanting—just slide the whole block into the garden or larger pot.
Water thoroughly after transplanting to help the roots establish. You'll notice the peat's unique texture as it integrates with garden soil or potting mix. This is the moment that matters: proper timing ensures your seedlings won't go into shock from root-bound stress.
Tips & tricks for perfect peat seed starter germination
Here's what nobody tells you about getting the most out of your peat seed starter—tricks that'll have your seedlings popping up faster than you can say "grow light."
Moisture Matters: The peat should feel like a wrung-out sponge—not soggy, not bone-dry. I test by pressing a small handful: if water drips out, you've overdone it. Too wet = compacted peat that suffocates seeds; too dry = seeds won't sprout. For Step 1, use a spray bottle to mist until the surface looks uniformly dark, then let it absorb for 10 minutes before planting. This prevents waterlogging while keeping roots happy.
Depth is Everything: Peat's lightweight nature means seeds need less coverage than in soil. In Step 2, use a toothpick to mark your ¼-inch depth for tiny seeds—it's easier than eyeballing. For larger seeds, press them just deep enough to make contact, then add that ½-inch layer. Pro tip: Use a pencil to poke tiny holes before planting—it aerates the peat and gives roots a head start.
Heat Hack for Speed: That 70-75°F range in Step 3 is non-negotiable for fast germination. If your home runs cooler, place trays on a seedling heat mat or even a sunny windowsill with an extra blanket underneath. I've seen radishes sprout in just 3 days using this trick—half the time of regular soil! Remove the dome as soon as 50% germinate to prevent mold, but keep the heat going until you see true leaves forming.
Transplant Timing: Wait until seedlings have 4-5 true leaves (Step 5) before transplanting—this gives them enough energy to handle the shock. The key is to work quickly: grab the whole peat block and slide it into your garden or pot without breaking it up. This preserves the delicate root network that forms in the peat's loose structure. Water thoroughly after transplanting to help the roots integrate with their new home.
Pro Tips for Peat Seed Starter
- Here's what nobody tells you about getting the most out of your peat seed starter—tricks that'll have your seedlings ...
- Moisture Matters: The peat should feel like a wrung-out sponge—not soggy, not bone-dry. I test by pressing a small ha...
- Depth is Everything: Peat's lightweight nature means seeds need less coverage than in soil. In Step 2, use a toothpic...
Frequently asked questions
Got questions about peat seed starters?
You’re not alone! Here are answers to the most common ones—so you can get your seeds sprouting like a pro.
What’s the difference between peat seed starter and regular potting soil?
Peat seed starter is lighter and sterile, designed to hold moisture while allowing airflow—perfect for tiny seeds. Regular potting soil can be too dense, compact, or harbor pathogens. Think of it like a cozy blanket for seeds vs. a heavy winter coat!
Can I reuse peat seed starter after germination?
Not recommended! Peat breaks down and loses its structure over time. Once seeds sprout, transplant them into a permanent growing medium (like potting soil or a garden bed). Reusing it risks poor drainage, mold, or stunted growth.
How long should I keep seeds in peat seed starter before transplanting?
Most seeds need 2–4 weeks in the starter, depending on the type. Check seed packets for specifics! Transplant when seedlings have 2–3 true leaves and look sturdy. Overstaying can lead to leggy, weak plants.
What if my seeds aren’t germinating in peat seed starter?
Try these fixes:
- Check moisture: Keep it damp (not soggy)—mist lightly daily.
- Warmth: Place near a heat source (like a sunny windowsill or seedling mat).
- Light: Some seeds need darkness to germinate (cover with a damp paper towel).
- Fresh starter: If moldy or compacted, discard and start fresh.
Are there eco-friendly alternatives to peat seed starter?
Try:
- Coco coir: Sustainable, retains moisture well.
- Vermiculite/perlite mix: Lightweight and sterile.
- Composted bark or leaf mold: Natural but may need sterilizing.
Wrapping up and next steps
Using a peat seed starter is a game-changer for gardeners who want fast, mess-free germination! This lightweight loam eliminates soil clutter while providing the perfect environment for seeds to sprout quickly and evenly.
Whether you're a beginner or a seasoned pro, this method simplifies the process and boosts your success rate—no dirt, no stress!
Ready to grow with confidence? Grab your peat seed starter, follow the steps, and watch your garden thrive! 🌱 Next, explore seedling care tips or dive into transplanting techniques to keep your plants happy from start to finish.