
Lawn
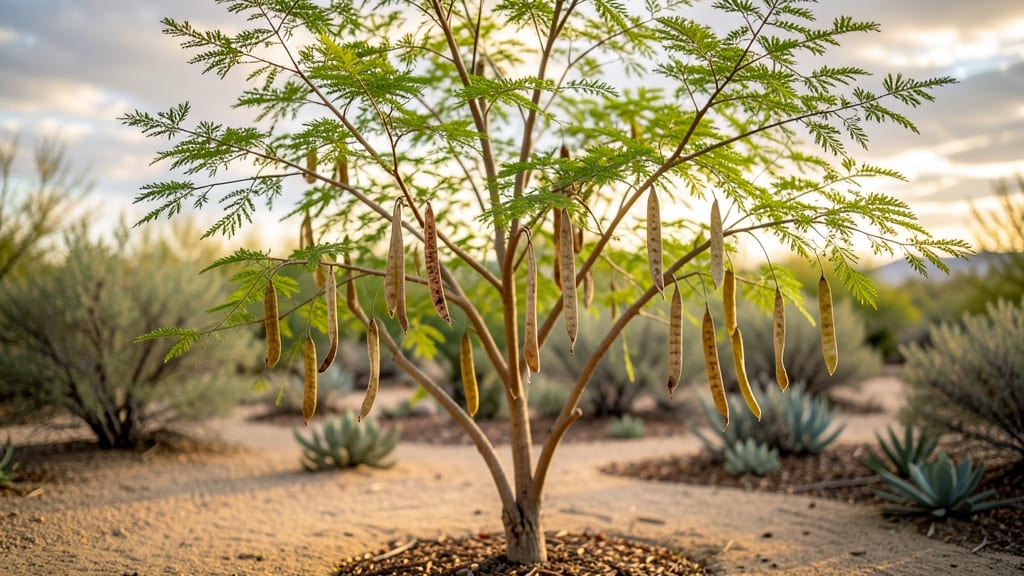
Those papery, pea-sized pods are nature's drought-proof treasure. 🌵 Palo verde seed pods hold the key to growing one of the Southwest's most resilient trees—if you know when and how to collect them.
I've learned the hard way that timing is everything: harvest too early, and the seeds won't germinate; wait too long, and the pods shatter on the ground.
The process starts with patience—watch for pods that turn from green to tan in late summer or early fall, just before they release their seeds. A gentle shake over a tarp collects them without damaging the tree, and a quick rinse removes any lingering debris.
What you're left with is the potential for a tree that thrives on neglect, blooms in spring, and provides shade for decades. Germination takes 2-4 weeks if you soak the seeds overnight first, but don't be surprised if some take longer.
Plant them in well-draining soil where they'll get full sun, and within a year, you'll have a sapling that laughs at drought. The real magic? These trees grow in poor soil, need almost no water once established, and their bright green bark makes them a standout in any landscape.
Whether you're restoring native habitat or adding desert-adapted beauty to your yard, palo verde seeds deliver results with minimal effort. The only mistake I've made? Planting too few. Let's fix that together!
📚 In This Guide
- What you need
- Instructions
- Tips and common mistakes
- Wrapping up and next steps
What you need
- ● Fresh or dried palo verde seed pods – Collect 10–20 pods (or more if planting multiple trees). Ensure they’re fully mature (brown and dry) for best germination.
- ● Pruning shears or sharp scissors – For harvesting pods from trees (look for pods that naturally detach or are slightly overripe).
- ● Paper bags or breathable fabric sacks – 2–3 bags to store pods while they dry (if not already dry). Avoid plastic to prevent mold.
- ● Rubbing alcohol (70% isopropyl) and cotton swabs – For sterilizing tools and surfaces to prevent fungal contamination.
- ● Small containers or seed trays – 2–4 shallow trays (4–6 inches deep) with drainage holes for sowing seeds.
- ● Well-draining potting mix – A blend of cactus/succulent soil (60%) and perlite or coarse sand (40%) to mimic desert conditions.
- ● Spray bottle with water – For lightly misting soil (avoid oversaturating!).
- ● Plastic wrap or clear lid – To create a mini greenhouse effect while seeds germinate.
- ○ Heat mat (optional) – Speeds up germination (palo verde seeds thrive in warmth, ~75–85°F).
- ● Grow lights or sunny windowsill – If natural light is limited (6+ hours of sunlight daily is ideal).
- ● Seedling labels and markers – To track planting dates and varieties (if mixing with other seeds).
- ● Gloves (nitrile or garden gloves) – Protects hands from sap or prickly pods.
- ● Hardscape materials (gravel, rocks) – For transplanting seedlings into dry, well-draining landscapes.
How to harvest and plant palo verde seed pods
Here’s my foolproof method for collecting and growing these stunning drought-resistant trees from seed.
🌿 Step 1: Identify and Harvest Ripe Seed Pods
Palo verde seed pods turn a pale yellow when ready—wait until they’re fully dry and papery to the touch. The best time to collect them is late winter or early spring, just before new growth begins. I always wear gloves because the pods release a fine powder that can irritate skin.
Gently twist the pods off the tree (don’t pull—they’re fragile) and place them in a paper bag. Avoid plastic—it traps moisture and causes mold. Store the pods in a cool, dry place until you’re ready to process them. If you miss the season, don’t worry—pods stay viable for up to a year if kept dry.
🌱 Step 2: Extract and Prepare the Seeds
Open the dried pods carefully—each one contains 1-3 large, flat seeds. I like to spread them on a clean towel and let them air-dry for another 24 hours. This prevents rot later. The seeds are hard-coated, so I soak them in warm water for 24 hours before planting to soften the shell and speed up germination.
After soaking, drain the seeds and let them dry slightly before handling. Plant them within a few days—they germinate best when fresh. I’ve found that pre-sprouting them on a damp paper towel speeds things up, but it’s not required for this drought-tolerant species.
☀️ Step 3: Plant in Well-Draining Soil
Palo verde seeds need full sun and fast-draining soil to thrive. Fill small pots with a mix of cactus/succulent soil and perlite (I use a 3:1 ratio). Plant the seeds ½ inch deep, spacing them 2 inches apart in each pot. Water lightly just after planting—too much moisture causes rot.
Place the pots in a warm, sunny spot (like a south-facing windowsill or under grow lights). Keep the soil barely moist—never soggy. You’ll see tiny sprouts in 10-20 days, but don’t be surprised if some take longer. Patience is key with these slow starters.
🪴 Step 4: Transplant Seedlings to the Ground
Once seedlings reach 4-6 inches tall (usually after 3-4 months), they’re ready for the garden. Choose a location with full sun and well-draining soil—palo verdes hate soggy roots. Dig a hole twice as wide as the root ball but only as deep as the container.
Gently remove the seedling, loosen the roots if they’re circling, and plant it at the same depth it grew in the pot. Water deeply right after transplanting, then let the soil dry out before watering again. Mulch lightly with gravel or decomposed granite to mimic their desert habitat and reduce evaporation.
⏰ Step 5: Care for Young Trees
Young palo verdes need minimal water—overwatering is their biggest threat. Water deeply once every 2-3 weeks during the first year, then taper off as they establish. Fertilizer isn’t necessary unless your soil is poor; these trees thrive in lean conditions.
Watch for yellowing leaves—this usually means overwatering. If you see it, let the soil dry out completely before watering again. With proper care, your seedlings will grow into sturdy, drought-resistant trees that add beauty to any landscape.
Tips & tricks for perfect palo verde seed pods
These little-known tricks will help you maximize your success with these desert beauties from harvest to transplant.
Harvesting Wisdom: I’ve learned the hard way that harvesting pods when they’re still slightly green leads to poor germination. Wait until they’re completely dry and papery—you should be able to hear them rattle when shaken gently. Confession: I skipped this step my first year and ended up with only 30% germination. The pods should also detach easily with a gentle twist, not requiring force. If you’re harvesting in bulk, wear a dust mask—the powder can irritate lungs, not just skin.
The Soaking Secret: The 24-hour soaking time in Step 2 is non-negotiable for breaking the hard seed coat. I’ve tried shorter soaks (12 hours) and longer ones (48 hours), but 24 hours gives the best balance between softening the shell and preventing rot. Use room-temperature water—not hot—and change it after 12 hours to prevent bacterial growth. After soaking, pat the seeds dry with a paper towel before handling. This extra step prevents mold when you plant them in your soil mix.
Soil Mix Matters: The 3:1 ratio of cactus/succulent soil to perlite is perfect for mimicking the palo verde’s natural desert environment. I’ve found that adding a handful of coarse sand (about ¼ cup) to each pot improves drainage even further. If you don’t have cactus soil, you can substitute regular potting soil mixed with 50% perlite or coarse sand. Just avoid peat moss—it holds too much moisture for these drought-loving seeds.
Transplanting Timing: Those 4-6 inch seedlings in Step 4 are actually more resilient than they look. I’ve transplanted mine as small as 3 inches when necessary, and they still survived. The key is to harden them off first—move them outdoors for increasing amounts of time (starting with 1 hour) for 3-5 days before permanent planting. This helps prevent transplant shock. Also, water the day before transplanting to reduce stress on the roots during the move.
Pro Tips for Palo Verde Seed Pods
- These little-known tricks will help you maximize your success with these desert beauties from harvest to transplant.
- Harvesting Wisdom: I’ve learned the hard way that harvesting pods when they’re still slightly green leads to poor germination.
- The Soaking Secret: The 24-hour soaking time in Step 2 is non-negotiable for breaking the hard seed coat.
Frequently asked questions
Got questions about palo verde seed pods?
You’re not alone! Here are some of the most common inquiries—plus quick, practical answers to help you navigate harvesting, planting, and everything in between.
When is the best time to harvest palo verde seed pods?
The ideal time to harvest is late summer to early fall (August–October), when the pods turn brown and begin splitting open naturally. Avoid harvesting green pods—they won’t contain viable seeds. Pro tip: Check pods weekly, as they dry out quickly in warm climates!
How long do harvested seed pods stay viable for planting?
Once dried, palo verde seeds remain viable for 1–2 years if stored in a cool, dry place (like a sealed container with silica gel). For best results, plant them within 6 months of harvest. Warning: Moisture or heat will reduce germination rates.
Can I plant palo verde seeds directly in the ground, or do they need stratification?
No stratification is needed—these drought-loving seeds germinate best when sown directly in well-draining soil after a light scarification (nick the seed coat with sandpaper). Plant ¼ inch deep in spring or fall for optimal success. Alternative: Use a seedling tray for controlled growth before transplanting.
Why aren’t my palo verde seeds germinating? Troubleshooting tips.
Common culprits include:
- Overwatering (seeds rot in soggy soil—wait until soil is dry between waterings).
- Poor soil drainage (mix in perlite or sand to mimic desert conditions).
- Improper depth (bury seeds too deep? Try ⅛ inch max).
- Old seeds (test viability by soaking a few in water—sinkers are likely good).
Patience is key—germination can take 2–4 weeks!
Are palo verde seed pods safe for wildlife, or should I avoid them?
Absolutely safe! These pods are a natural food source for birds, squirrels, and insects. In fact, they’re ecologically beneficial—just avoid over-harvesting to support local ecosystems. Bonus: The bright yellow flowers attract pollinators year-round.
Wrapping up and next steps
From their striking appearance to their drought-resistant superpowers, palo verde seed pods offer a unique blend of beauty and practicality for any landscape.
Whether you’re harvesting them for crafting, planting them for future trees, or simply admiring their resilience, these pods prove that nature’s gifts are both functional and inspiring. 🌱
Now that you’re equipped with the knowledge to harvest, plant, and care for palo verde seed pods, why not take the next step? Share your journey with fellow gardeners, experiment with creative projects, or even start a small collection of these hardy trees.
Your green thumb—and the desert’s charm—will thank you!