
Lawn
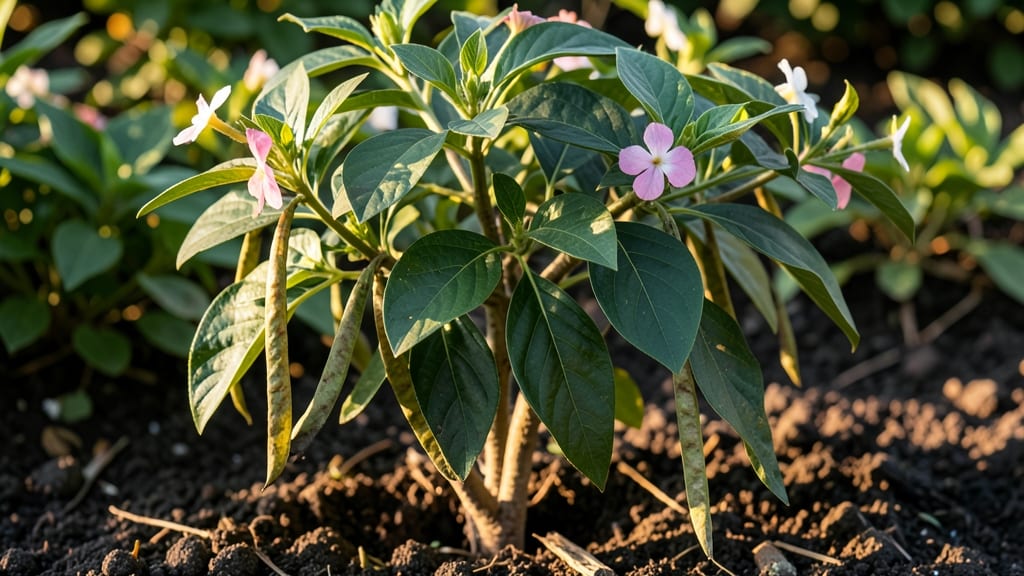
Those velvety vinca seed pods hold the secret to free, sprawling ground cover that outlasts summer heat and winter chill. 🌿 I’ve learned the hard way that timing and technique make all the difference—harvesting too early means immature seeds, waiting too long means they pop open before you can collect them.
The key? Watch for pods to turn a deep brown and split slightly along the seams, signaling they’re ready for rescue.
Once you’ve gathered them, the real magic happens in the prep: a quick soak in warm water loosens stubborn seeds from their pods, while a simple mix of sand and peat moss creates the perfect crumbly medium for germination.
Most seeds sprout within 2-3 weeks if kept consistently moist and warm, though some stubborn ones may take up to a month. Patience pays off when you see those first tiny green leaves—proof you’ve cracked the code.
Young vinca plants need gentle care: keep them shaded until they’ve rooted well, then gradually introduce them to full sun. By late spring, you’ll have a lush carpet of trailing foliage that crowds out weeds and stays vibrant through every season.
The best part? One plant can spread enough to cover 10+ square feet in just a year, turning bare spots into living green blankets.
This method works for both Vinca minor and Vinca major, though minor germinates slightly faster. If your seeds aren’t sprouting after 6 weeks, try a fresh batch—some years just produce less viable seed.
For best results, collect pods from healthy, disease-free plants in late summer or early fall, when the weather’s still mild but before frost sets in.
📚 In This Guide
- What you need
- Instructions
- Tips and common mistakes
- Wrapping up and next steps
What you need
- ● Vinca seeds: 1–2 packets (ensure they’re fresh, preferably Vinca minor or Vinca major for best results).
- ● Seed-starting mix: 2–3 gallons of sterile, well-draining potting soil (or coco coir for eco-friendly options).
- ● Seed trays or small pots: 6–12 shallow containers (3–4 inches deep) with drainage holes.
- ● Watering can or spray bottle: With a fine mist nozzle for gentle hydration.
- ● Plastic wrap or humidity dome: To create a mini greenhouse effect.
- ● Grow lights or sunny windowsill: A spot with 6–8 hours of indirect light daily.
- ● Labels & markers: To track seed varieties and planting dates.
- ○ Gloves (optional): To protect hands from soil and tiny seeds.
- ● Fine-tip tweezers: Helpful for placing seeds precisely.
- ○ Heat mat (optional): For faster germination (70–75°F ideal).
- ● Transplanting tools: Small shovel or trowel for moving seedlings.
- ● Outdoor space (later stage): A partially shaded lawn area with well-draining soil.
How to germinate vinca seed pods for stunning year-round ground cover
Here's the method I've perfected for coaxing these tough little seeds into lush, evergreen ground cover that thrives even in tough conditions.
🌱 Step 1: Collect and Prepare Mature Seed Pods
Harvest vinca seed pods when they turn from green to brown and begin splitting open naturally—usually in late summer or early fall. I wear gloves because the pods can be sticky and the seeds might irritate sensitive skin. Place the pods in a paper bag and let them dry indoors for 3-5 days until completely crisp.
Once dry, gently squeeze each pod between your fingers over a clean white surface. The seeds will pop out easily—you'll see them as tiny, dark brown ovals about 1/8 inch long. I spread them on a tray to check for any remaining chaff or empty pods. Real talk: these seeds are tiny, so don't rush this step or you'll waste good seeds mixing with debris.
💧 Step 2: Stratify for Best Germination Rates
Vinca seeds need a cold period to break dormancy, so I mix them with slightly damp sand or perlite in a sealed container. Place the container in your refrigerator's crisper drawer for 4-6 weeks. Check occasionally to ensure the mix stays barely moist—never soggy. This stratification mimics winter conditions and signals the seeds it's time to grow.
Here's the thing—don't skip this step. Without cold treatment, germination rates drop dramatically. You'll know stratification worked when you see tiny roots emerging from some seeds after about 3 weeks. If your fridge feels too humid, add a small packet of silica gel to absorb excess moisture.
☀️ Step 3: Sow in Well-Draining, Fertile Soil
Fill small seed trays or individual pots with a mix of 50% potting soil and 50% perlite or coarse sand to ensure excellent drainage—vinca hates soggy roots. Sprinkle the stratified seeds evenly across the surface, pressing them just barely into the soil with your finger. I aim for about 10-15 seeds per square inch since vinca germinates slowly.
Cover the tray with plastic wrap or a humidity dome to maintain moisture and warmth. Place the tray in a spot with bright, indirect light (like an east-facing window) and maintain soil temperature between 65-75°F. You'll see the first sprouts in 3-6 weeks, but don't be surprised if some take longer—patience is key with vinca.
🌿 Step 4: Thin and Transplant Young Seedlings
Once seedlings reach about 1 inch tall with their first true leaves, it's time to thin. Use small scissors to snip unwanted seedlings at soil level rather than pulling—this prevents disturbing the roots of your keepers. I space the remaining plants 6-8 inches apart in their trays to give them room to grow.
When seedlings have 3-4 sets of leaves (usually after 8-10 weeks), they're ready for their permanent home. Choose a location with full sun to partial shade and well-draining soil. Vinca thrives in rocky or poor soil, so don't worry if your garden isn't perfect—these plants are tough!
⏰ Step 5: Establish and Maintain Your Vinca Lawn
After transplanting, keep the soil consistently moist but not waterlogged for the first 2-3 weeks. Once established, vinca is incredibly drought-tolerant, so you can reduce watering to once weekly during dry spells. I find that mulching with 1-2 inches of shredded bark helps retain moisture and suppress weeds.
You'll see your vinca spreading and filling in beautifully within 6-12 months. The key to long-term success is minimal maintenance—just occasional trimming to keep it neat. Watch for those first flowers in late spring or early summer, signaling your vinca is truly thriving!
Tips & tricks for perfect vinca seed germination
These game-changing tips will help you turn those stubborn vinca seeds into a thriving, year-round lawn with minimal fuss.
Pod Collection Pro Tip: Harvest vinca seed pods only when they're completely brown and beginning to split naturally—this usually happens in late summer or early fall. I've learned the hard way that green pods won't produce viable seeds, so mark your calendar for this crucial window. Once collected, let them dry completely for those 3-5 days—this prevents mold and makes seed extraction much easier.
Stratification Success: The 4-6 week cold treatment is non-negotiable for high germination rates, but here's the secret: use a container with drainage holes to prevent soggy conditions. I place a small layer of pebbles at the bottom before adding my sand-perlite mix, then store it in a zip-top bag with a tiny hole punched in it. This keeps everything just barely moist while allowing excess water to escape—critical for preventing rot during those 3 weeks when roots first start to emerge.
Soil Mix Matters: That 50-50 mix of potting soil and perlite is your secret weapon against soggy roots. I always sift the perlite first to remove any fine particles that could compact the mix. For extra insurance, I add a handful of coarse sand to improve drainage further. The goal is a texture that holds moisture but drains freely—vinca will reward you with faster germination when it's happy and not waterlogged.
Lighting Hack: While bright, indirect light is ideal, I've found that placing my seed trays under a simple LED grow light for 12 hours daily speeds up germination from 3-6 weeks to just 2-4 weeks. These affordable lights create the perfect spectrum for seed starting without taking up much space. Just keep them about 2-3 inches above the trays to avoid overheating.
Pro Tips for Vinca Seed Pods
- These game-changing tips will help you turn those stubborn vinca seeds into a thriving, year-round lawn with minimal ...
- Pod Collection Pro Tip: Harvest vinca seed pods only when they're completely brown and beginning to split naturally—t...
- Stratification Success: The 4-6 week cold treatment is non-negotiable for high germination rates, but here's the secr...
Frequently asked questions
Got questions about vinca seed pods?
You’re not alone! Here are some of the most common queries—and straightforward answers—to help you master germination and keep your lawn vibrant year-round.
When is the best time to plant vinca seed pods?
Vinca seed pods thrive in spring or early fall when soil temps are between 60–75°F (15–24°C). Avoid planting in scorching summer heat or freezing winter—these extremes can hinder germination. If you’re in a mild climate, late winter (just before last frost) also works!
How long does it take for vinca seed pods to germinate?
Patience is key! Vinca seeds typically sprout in 2–4 weeks under ideal conditions (warm soil, consistent moisture, and indirect light). Slow germination? Check for overwatering or compacted soil—these can delay the process. A quick soil test ensures you’re on the right track.
Can I collect vinca seed pods from my garden?
Harvest pods when they’re dry and brown (usually late summer/fall) and store them in a paper bag in a cool, dry place. Just avoid dampness—mold can ruin your seeds. Pro tip: Label your bags to track varieties!
What’s an alternative if vinca seed pods won’t germinate?
Try cuttings instead! Snip healthy vinca stems (4–6 inches long), strip the lower leaves, and dip in rooting hormone before planting in moist soil. Cuttings root faster and often yield identical plants to the parent. For instant color, consider pre-grown vinca plugs from nurseries!
Why are my vinca seed pods rotting or moldy?
Moldy pods? Overwatering or poor airflow are usually the culprits. Ensure pods are fully dry before storing, and avoid sealing them in airtight containers. If you’re sowing directly, use well-draining soil and water lightly—think mist, not monsoon!
Wrapping up and next steps
Vinca seed pods offer a simple yet magical way to transform your lawn into a lush, year-round green carpet—without the fuss! 🌱 Whether you’re a seasoned gardener or just starting out, their hardiness and low-maintenance charm make them a dream plant.
With the right germination secrets, patience, and care, you’ll soon enjoy vibrant foliage that thrives even in tough conditions.
Ready to take the next step? Start small—test a few seed pods in a controlled spot, document your progress, and soon you’ll be confident enough to expand your vinca lawn. Happy planting! 🌿✨