
Propagation
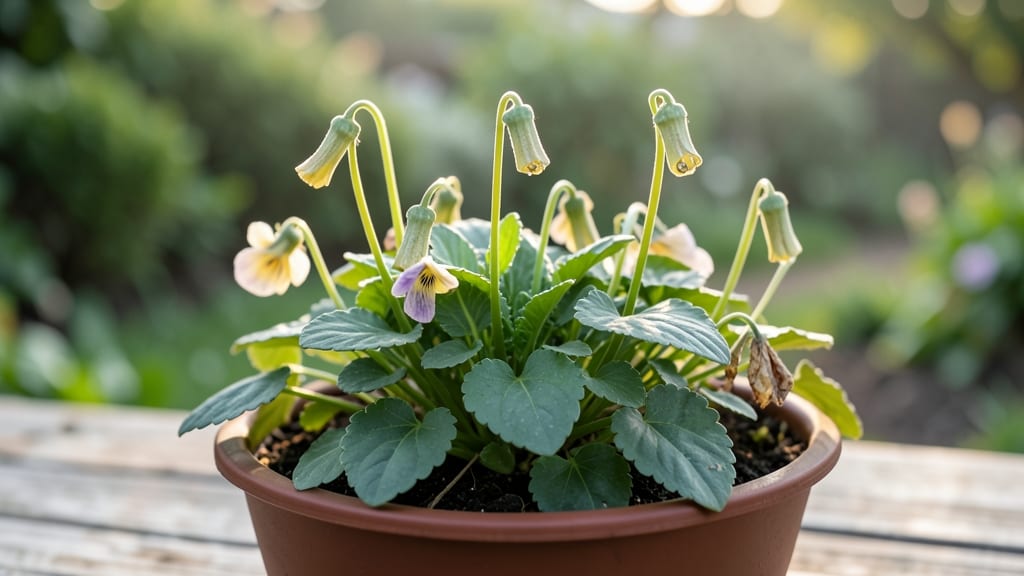
Viola seed pods are nature’s way of giving you free flowers for next year—if you know when to harvest them. 🌿 I’ve saved seeds from my violas for three seasons now, and the trick is patience: wait until the pods turn brown and papery before collecting, or you’ll end up with damp, moldy seeds that won’t sprout.
The difference between a thriving seed stash and a wasted harvest comes down to timing and drying.
You’ll need just a few simple supplies: small paper bags for airflow, a dry spot indoors, and a bit of time—about 2-3 weeks for proper drying. The pods should rattle when shaken (a sign seeds are ready) but still feel firm to the touch.
Skipping this step is how I lost my first batch of seeds to mildew, so don’t rush it. Once dried, crack open the pods to release the tiny, round seeds—each one a potential next-year bloom.
Stored in an airtight container in the fridge, these seeds stay viable for up to 2 years, giving you a head start on spring planting. The payoff?
Violas that self-sow effortlessly, filling gaps in your garden with their cheerful faces year after year. No fancy equipment, just nature’s recycling system at work.
If your violas aren’t producing pods, try deadheading spent blooms early to redirect energy into seed formation. And if you’re dealing with humidity, a silica gel packet in the storage container keeps moisture at bay.
Small adjustments make all the difference between a handful of seeds and a garden full of new violas.
📚 In This Guide
- What you need
- Instructions
- Tips and common mistakes
- Wrapping up and next steps
What you need
- ● Fresh viola seed pods: 10–20 mature pods (look for swollen, brownish pods with visible seeds inside).
- ● Sharp pruning shears or scissors: 1 pair (sterilized with rubbing alcohol for hygiene).
- ● Paper towels or newspaper: 2–3 sheets (for drying and sorting seeds).
- ● Brown paper bags or breathable seed envelopes: 1–2 (for initial drying and storage).
- ○ Small mesh bags or organza envelopes: 1–2 (for long-term storage; optional but ideal).
- ● Pencil and label tags: 1 each (to label seed varieties and harvest dates).
- ● Drying rack or flat surface: 1 (elevated, well-ventilated area away from direct sunlight).
- ● Air-tight containers (e.g., glass jars or plastic boxes): 1–2 (with desiccant packets for humidity control).
- ● Desiccant packets (silica gel or rice in a sock): 1–2 (to absorb moisture and extend shelf life).
- ● Hand lens or magnifying glass: 1 (for inspecting seed viability).
- ● Humidity monitor: 1 (to ensure storage conditions stay below 40% humidity).
- ● Seed catalog or notebook: 1 (to track viola varieties and germination notes).
- ● Spray bottle with water: 1 (for lightly misting pods if they’re too dry during harvest).
How to harvest, dry, and store viola seed pods
Violas reward patience with prolific blooms—here’s how to collect and preserve their seeds for next season’s garden.
🌿 Step 1: Identify and Harvest Mature Seed Pods
Wait until viola seed pods turn from green to tan or brown—this signals maturity. Gently twist the dried pod between your fingers until it releases the tiny seeds inside. I like to harvest on a dry morning when the pods are crisp; damp conditions can mold seeds overnight.
Don’t rush—immature pods yield weak seeds. You’ll know they’re ready when the pod splits open easily, revealing black or dark brown seeds inside. Place harvested pods in a paper bag (not plastic) to prevent moisture buildup. Label each bag with the viola variety if growing multiple types.
⏰ Step 2: Dry the Seeds Thoroughly
Spread the harvested pods on a clean, dry surface like a mesh screen or paper towel in a well-ventilated area for 5-7 days. Keep them out of direct sunlight—bright light can overheat and damage the seeds. Stir them gently every 24 hours to ensure even drying.
Seeds are dry when they feel lightweight and crispy to the touch. If you press a seed between your fingers and it crumbles, it’s ready. Store-bought seeds often have a 10-15% moisture content—home-dried seeds should match this. A small fan on low can speed up drying in humid climates.
🪴 Step 3: Extract and Store Seeds Properly
Once fully dry, crush the pods between your fingers over a white sheet of paper—the contrast makes seeds easy to spot. Viola seeds are tiny, so I use a fine-mesh sieve to separate them from pod debris. Discard any seeds that look discolored or shriveled.
Store seeds in a small, airtight container (like a glass jar or envelope) with a silica gel packet to absorb moisture. Label with the harvest date—viola seeds remain viable for 2-3 years if kept cool and dry. Place the container in a dark, cool spot (like a pantry) to prevent light exposure, which can degrade seed quality.
💧 Step 4: Test Germination Before Next Season
Before planting, test a few seeds by pressing them lightly into moist potting mix in a small pot. Cover with ¼ inch of soil and mist gently. Place the pot in a warm, bright spot (65-75°F) and check for sprouts in 10-14 days. If germination rates are low, store the remaining seeds in the freezer for another year—the cold can reset their viability.
Violas are self-seeding, but storing your own seeds ensures you’ll grow the exact colors and traits you love. I always save a few extra pods—just in case! If you notice mold or musty smells during storage, discard those seeds immediately and restart the drying process.
Tips & tricks for perfect viola seed pod preservation
Here's what I've learned after saving viola seeds for years—these little tricks make all the difference between viable seeds and wasted effort.
Timing Secret: In Step 1, harvest viola seed pods in the early morning when dew has evaporated but humidity is still low. This gives you the crispest pods with minimal moisture content right from the start. I've ruined batches by harvesting in the afternoon when pods were still damp from watering the garden earlier.
Drying Strategy: The 5-7 day drying period in Step 2 is non-negotiable for viola seeds, but here's how to make it work better: Place your drying surface near a dehumidifier or open window with good airflow. I've used a small fan on low setting in humid climates, which cut the drying time to 4 days without overheating. Just stir every 24 hours as instructed to prevent uneven drying.
Storage Wisdom: When storing your seeds in Step 3, add a small packet of rice along with the silica gel packet. The rice acts as a secondary moisture absorber and helps maintain consistent humidity levels. I've found this extra step prevents condensation buildup in my glass jars, which can happen in humid kitchens.
Germination Test: For the germination test in Step 4, use a clear plastic container instead of a pot so you can easily monitor progress without disturbing the soil. Place the container on a sunny windowsill (65-75°F) and cover it with plastic wrap to maintain humidity. This creates a mini greenhouse effect that speeds up germination checking to just 7-10 days instead of 14.
Pro Tips for Viola Seed Pods
- Here's what I've learned after saving viola seeds for years—these little tricks make all the difference between viable seeds and wasted effort.
- Timing Secret: In Step 1, harvest viola seed pods in the early morning when dew has evaporated but humidity is still low.
- Drying Strategy: The 5-7 day drying period in Step 2 is non-negotiable for viola seeds, but here's how to make it work better: Place your drying surface near a dehumidifier or open window with good airflow.
Frequently asked questions
Got questions about harvesting, drying, or storing viola seed pods? You’re not alone! Here are some of the most common queries—and their answers—to help you master the process like a pro.
When are viola seed pods ready to harvest?
Harvest viola seed pods when they turn brown and begin to split open naturally. This usually happens 4–6 weeks after flowering, depending on your climate. Avoid picking them too early—they won’t be fully mature, and the seeds may not germinate well. If left too long, they’ll scatter seeds on their own!
How long does it take for viola seed pods to dry?
Drying time varies, but most viola seed pods are ready in 1–2 weeks if hung in a well-ventilated, dry spot (like a mesh bag or paper envelope). Check daily—they’re done when the pods are crispy and crumble easily. Pro tip: Avoid heat sources (like radiators) to prevent mold.
What’s the best way to store viola seeds long-term?
Store viola seeds in a cool, dry place (like a sealed envelope or airtight container) in the fridge or freezer. They stay viable for 2–3 years if kept dry. Label them with the harvest date to track freshness! Pro tip: Add a silica gel packet to absorb excess moisture.
Can I plant viola seeds straight from the pod?
Yes! Once the pods are fully dry, gently crush them to release the tiny seeds, then sprinkle them lightly on soil (they don’t need deep planting). Viola seeds are light-sensitive, so press them just under the surface and keep the soil moist. Germination takes 2–4 weeks in warm conditions.
Why aren’t my viola seed pods opening?
If pods stay green or refuse to split, it could mean immature seeds, poor pollination, or cooler temperatures. Try hand-pollinating with a soft brush or wait a few more weeks. If they’re still stubborn, check for pests (like aphids) or fungal issues, which can hinder seed development.
Wrapping up and next steps
Harvesting, drying, and storing viola seed pods is a rewarding way to ensure next year’s vibrant blooms—without breaking the bank! 🌱 With the right tools and patience, you’ll unlock a sustainable way to propagate your favorite varieties.
Whether you’re a seasoned gardener or just starting out, these simple steps make it easy to save seeds, nurture new plants, and extend your garden’s beauty.
Ready to dive in? Start by gathering your supplies and follow the steps above—your future violets will thank you! For extra success, join a gardening community to share tips and celebrate your progress. Happy growing! 🌸