
Lawn
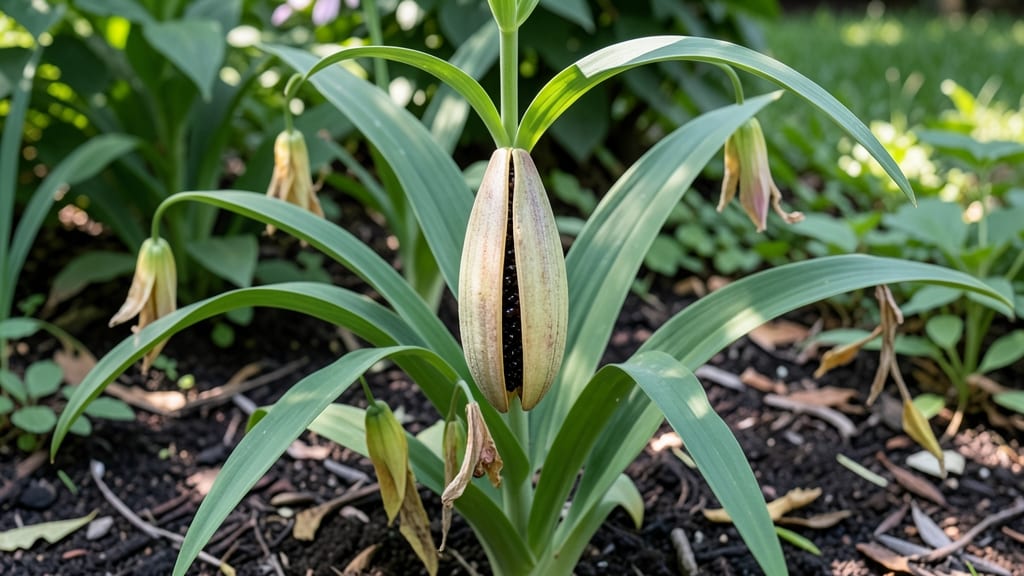
Those papery lily seed pods hold the secret to growing new plants for free—if you know how to handle them right. 🌱 I’ve learned the hard way that skipping cold stratification means waiting months (or never) for germination, but once you master this step, you’ll have reliable blooms year after year.
The process starts with harvesting pods when they’re brown and dry but before they split open—usually in late fall. Inside, you’ll find flat, black seeds that need a 6-8 week cold period to break dormancy.
Store them in a sealed bag with slightly damp peat moss in your fridge, then plant them in spring when soil temps hit 60°F.
What you’ll end up with are sturdy seedlings that emerge faster and stronger than store-bought lilies. The first blooms might take 2-3 years, but the payoff is plants that thrive exactly where you planted them—no more struggling to find the perfect lily at the nursery.
Works for hardy lilies like Tiger Lilies or Asiatic hybrids, but avoid tropical varieties—they won’t respond to cold treatment. Here’s how to troubleshoot if your seeds don’t sprout, plus creative uses for pods that don’t produce viable seeds.
📚 In This Guide
- What you need
- Instructions
- Tips and common mistakes
- Wrapping up and next steps
What you need
- ● Lilly seed pods: 10–20 fresh, fully mature pods (harvested in late summer/fall for best results). Ensure they’re dry but still pliable.
- ● Cold stratification medium: Option 1: Moistened peat moss or coconut coir (4–6 cups, pre-moistened to damp-but-not-soggy consistency).
- ● Option 2: Vermiculite or perlite (4 cups) mixed with sand (2 cups) for better drainage.
- ● Sealed plastic bag or container: A quart-sized ziplock bag or small, airtight container with a secure lid (e.g., a Tupperware or glass jar).
- ● Labeling supplies: Waterproof tape and a permanent marker to label your pods (include date and variety if known).
- ● Refrigerator space: A cold, dark spot (33–41°F / 0–5°C) for 6–12 weeks. Most home fridges work—just avoid the crisper drawer!
- ○ Pruning shears or scissors: For gently opening seed pods (if needed) to expose seeds. Optional but helpful!
- ● Spray bottle: For misting the stratification medium if it dries out during storage.
- ● Humidity tray: A small tray with water and a rack (e.g., a wire cooling rack) to maintain moisture levels. Great for larger batches!
- ● Growth chart or journal: To track stratification progress (e.g., a whiteboard or notebook).
- ○ Heat mat (optional): For post-stratification germination (if moving seeds to a warmer environment).
How to cold stratify lily seed pods for stronger blooms
Cold stratification mimics winter's natural process—here's how to trick seed pods into reliable germination.
🌱 Step 1: Harvest and Prepare Mature Seed Pods
Collect seed pods when they turn brown and begin splitting open naturally—this usually happens in late summer or early fall. Gently twist them from the stem and place them in a paper bag to dry indoors for 3-5 days until the pods open completely on their own. This prevents premature moisture damage.
Once dry, carefully remove the seeds from the pods using a small spoon or your fingers. Discard any seeds that appear shriveled or discolored—only plump, dark seeds are worth stratifying. Store the viable seeds in a sealed container with a damp paper towel to maintain moisture until stratification begins.
💧 Step 2: Moisten and Chill the Seeds
Fill a small plastic bag with 1 cup of damp peat moss or coconut coir—it should feel like a wrung-out sponge, not dripping. Add the seeds and seal the bag, leaving it slightly open for air circulation. Place the bag inside a second, fully sealed plastic bag to create a moisture trap.
Refrigerate the bag for 8-12 weeks at 35-45°F. Check the seeds weekly—if the moss dries out, mist it lightly with water. You'll know stratification is working when tiny white roots begin emerging from the seeds after 4-6 weeks. This is your signal to move them to warmer conditions.
☀️ Step 3: Transition to Warmth and Plant
After the cold period, remove the seeds from the refrigerator and plant them ½ inch deep in a well-draining potting mix. Use a small container or individual cells to avoid overcrowding—lily seedlings need space to develop strong roots. Water gently until the soil is evenly moist but not soggy.
Place the container in a warm, bright spot with indirect light for the first 2-3 weeks. You'll see the first true leaves appear in 3-4 weeks, signaling successful germination. Avoid direct sunlight at this stage—it can scorch tender new growth.
⏰ Step 4: Gradually Acclimate Seedlings
Once seedlings reach 4-6 inches tall with 3-4 sets of leaves, begin hardening them off by moving them outdoors for 1-2 hours daily in partial shade. Increase exposure gradually over 2 weeks until they can tolerate full sun. This prevents transplant shock and strengthens their stems.
Plant outdoors after the last frost date in a location with full sun and well-drained soil. Space seedlings 12-18 inches apart to allow for mature growth. Mulch around the base with 2 inches of organic matter to retain moisture and regulate soil temperature.
Tips & tricks for perfect lily seed pod stratification
These simple strategies will help you maximize your lily seed germination success without the guesswork.
Timing Secret: The 3-5 day drying period in Step 1 is crucial—don't rush it! Place your paper bag in a well-ventilated area away from direct sunlight. If you notice any mold forming, increase airflow immediately. This drying phase mimics natural conditions and prevents premature germination that would kill the seeds.
Moisture Control: When using 1 cup of damp peat moss or coconut coir, squeeze it firmly to remove excess water—it should hold moisture like a wrung-out sponge. Too much water creates anaerobic conditions that can rot seeds, while too little prevents proper hydration. I like to test by squeezing a handful: if water drips out, it's too wet; if it crumbles, add a little more moisture.
Temperature Matters: Your refrigerator's crisper drawer is ideal for maintaining 35-45°F, but check it first with a thermometer. Some fridges have cold spots—place your bag where it's consistently cool. If you notice condensation inside the bag after the first week, open it slightly to let excess moisture escape. This prevents mold while keeping the medium damp.
Root Check: In Step 2, when you see those tiny white roots after 4-6 weeks, that's your green light to plant! Gently remove seeds from the moss and rinse off any clinging particles. If roots are longer than ¼ inch, they're ready for planting immediately. For shorter roots, give them 1-2 more weeks in the fridge to develop further before planting.
Pro Tips for Lilly Seed Pod
- These simple strategies will help you maximize your lily seed germination success without the guesswork.
- Timing Secret: The 3-5 day drying period in Step 1 is crucial—don't rush it!
- Moisture Control: When using 1 cup of damp peat moss or coconut coir, squeeze it firmly to remove excess water—it should hold moisture like a wrung-out sponge.
Frequently asked questions
Got questions about growing lilly seed pods? You’re not alone! Cold stratification is key to success, and these answers will help you troubleshoot, time your planting, and maximize your blooms. Here’s what you need to know:
What is cold stratification, and why do lilly seed pods need it?
Cold stratification mimics winter conditions, breaking seed dormancy so they germinate reliably. Lilly seed pods often require this step because their tough outer shells need a chilling period (typically 6–8 weeks) to soften and encourage sprouting. Without it, seeds may stay dormant or rot.
How long should I cold-stratify lilly seed pods before planting?
Most lilly seed pods need 6–8 weeks in the fridge (34–40°F) to simulate winter. Place them in a moist paper towel or peat moss, then store in a sealed bag with a tiny air hole. Check periodically—if mold appears, reduce moisture and restart. Plant after stratification, once soil warms in spring.
Can I skip cold stratification for faster blooms?
While some seeds germinate without stratification, lilly seed pods rarely bloom reliably if you skip this step. For best results, follow the process. If you’re impatient, try soaking seeds in warm water for 24 hours before stratification—this may speed up the process slightly, but cold treatment is still critical.
What if my seeds sprout too early during stratification?
If sprouts appear before planting, don’t panic! Gently replant them in a small pot with moist soil and keep them in a cool, bright spot (like a windowsill). Avoid warmth, which can cause leggy growth. Once soil temperatures rise in spring, transplant outdoors—just handle seedlings carefully to avoid root damage.
What’s the best alternative if cold stratification fails?
If your fridge isn’t cooperating, try outdoor winter sowing: Plant seeds in clear plastic containers filled with moist soil, then place them outside in a sheltered spot (like under a tree). Nature handles the cold exposure! Just ensure containers drain well to prevent rot. This method works best in climates with cold winters.
Still stuck? Drop your specific challenge in the comments—we’re happy to help you troubleshoot!
Wrapping up and next steps
Mastering the art of lilly seed pod cold stratification unlocks the secret to vibrant, reliable blooms in your garden. 🌱 By following the right steps—from harvesting to chilling and planting—you’re not just growing flowers; you’re cultivating patience, skill, and a thriving outdoor space.
The key takeaway? Timing, consistency, and a little winter magic are your best allies for success.
Ready to turn your green thumb into a masterpiece? Start small—try stratifying a few pods this season, and soon, your garden will be bursting with color. Grab your tools and get growing!