
Propagation
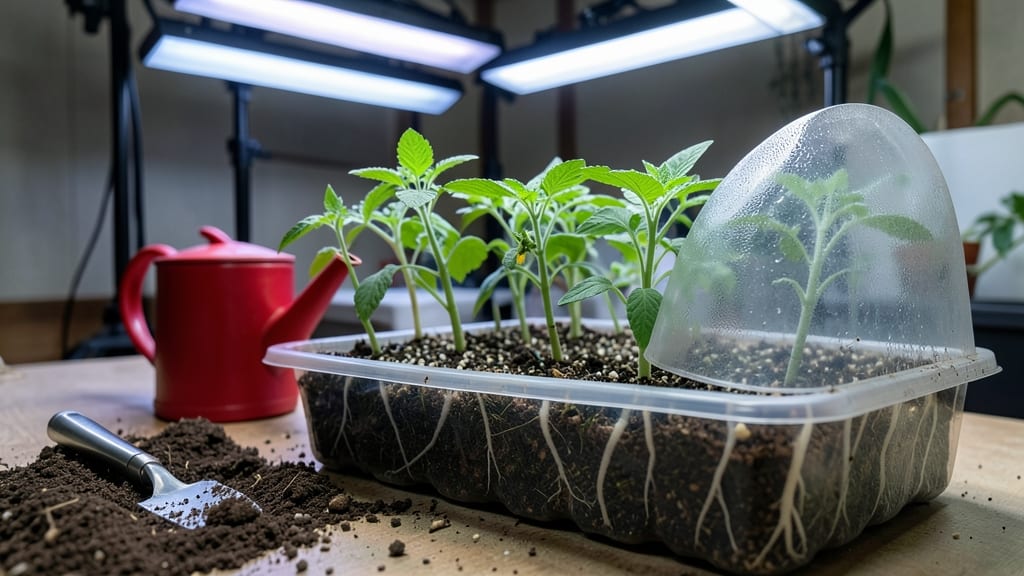
My deep root seed starting trays transformed weak, leggy seedlings into stocky, thriving plants ready for the garden. 🌱 The secret lies in giving roots the space they need to grow strong before transplanting—something shallow trays simply can’t match.
After struggling with stunted seedlings in my first attempts, I discovered these deeper containers make all the difference in early growth.
You’ll need trays with at least 4-6 inches of depth (7-9 inches is even better for heavy feeders like tomatoes or peppers), a well-draining seed-starting mix, and patience for the extra time roots take to fill the space.
The payoff? Seedlings with stronger stems, better nutrient uptake, and faster establishment once planted outdoors. No more wilting or slow recovery after transplant shock.
Start by filling trays with moistened mix, leaving ½ inch from the top, then sow seeds at the correct depth for their type. Water gently to avoid displacing soil, and keep trays in a warm spot with 12-16 hours of light daily.
Within 3-4 weeks, you’ll see roots growing through drainage holes—a sure sign your seedlings are ready for their next upgrade.
This method works best for tomatoes, peppers, eggplants, and herbs, but even flowers like petunias or marigolds benefit from the extra room. Just avoid tiny seeds like lettuce or carrots—they’ll need shallower starts.
Once roots hit the bottom, it’s time to graduate them to larger pots or the garden bed.
📚 In This Guide
- What you need
- Instructions
- Tips and common mistakes
- Wrapping up and next steps
What you need
- ● Deep root seed starting trays – Choose trays with at least 6–12 inches of depth (e.g., 72-cell trays with deep cells or modular inserts).
- ● High-quality seed starting mix – A lightweight, well-draining blend (e.g., 50% peat/coir + 50% perlite/vermiculite). 1–2 cubic feet per tray (check tray specs).
- ● Seeds – Select large or slow-germinating seeds (e.g., tomatoes, peppers, or herbs) that benefit from extra root space.
- ● Watering can or spray bottle – With a gentle, fine mist setting to avoid displacing soil.
- ○ Heat mat (optional but recommended) – For cold-starting seeds (e.g., 70–75°F for warm-season crops).
- ● Grow lights or sunny windowsill – 12–16 hours of light daily (LED grow lights work best for consistency).
- ● Humidity dome or plastic wrap – To retain moisture during germination.
- ● Small hand trowel or spoon – For gentle seed placement without compacting soil.
- ● Bottom watering tray – Keeps soil evenly moist without overwatering.
- ● pH testing kit – Ensure your mix is slightly acidic (6.0–6.8) for optimal germination.
- ● Fertilizer (low-dose) – A balanced 5-5-5 or fish emulsion (diluted to half-strength) after sprouts emerge.
- ● Seedling labels & markers – To track varieties (especially useful for deep trays with multiple seeds!).
- ● Ventilation fan – Prevents damping-off disease by improving air circulation.
How to use deep root seed starting trays for healthier transplants
Here’s my go-to method for growing seedlings with deep, strong roots that thrive after transplanting.
🌱 Step 1: Select the Right Tray and Prepare the Growing Medium
Choose a deep root tray with individual cells at least 4-6 inches deep—this gives roots room to establish before transplanting. I prefer trays with clear walls so I can monitor root growth without disturbing the seedlings. Fill each cell with a sterile seed-starting mix (never garden soil—it’s too dense and can harbor pathogens). Moisten the mix until it’s damp but not soggy, like a wrung-out sponge.
Tap the tray gently on the table to settle the soil evenly. You’ll see the surface firm up slightly, but it should still feel light and airy. This prevents compaction, which can suffocate young roots. If your mix feels too dry after settling, add a light mist with a spray bottle—just enough to restore moisture without oversaturating.
🌱 Step 2: Sow Seeds at the Correct Depth and Spacing
Plant one seed per cell, placing it at a depth of twice the seed’s diameter—this ensures it has enough energy to reach the surface without rotting. For example, tomato seeds (about ¼ inch in diameter) should go ½ inch deep. Use a pencil or toothpick to poke a small hole, drop in the seed, and cover lightly with more mix.
I like to label each cell with the variety and date—after a few weeks, identical seedlings can look confusing. Press the label gently into the soil so it stays put. Avoid pressing too hard, or you’ll compact the surface layer, which can slow germination. Water lightly after sowing to settle the seeds into place.
💧 Step 3: Provide Consistent Moisture and Warmth for Germination
Cover the tray with a clear humidity dome or plastic wrap to retain moisture and warmth. Deep root trays dry out slower than shallow ones, but seeds still need consistent dampness to germinate. Place the tray on a seedling heat mat set to 75-85°F—this accelerates germination and ensures strong root development from the start.
Check the tray daily but resist the urge to water until the soil feels dry to the touch ½ inch below the surface. Overwatering at this stage can lead to damping-off, a fungal disease that causes seedlings to collapse. Once 50% of seeds have sprouted, remove the dome to prevent excess humidity, which can weaken stems.
☀️ Step 4: Move to Bright Light and Monitor Root Growth
As soon as the first true leaves appear, move the tray to a south-facing window or under grow lights providing 14-16 hours of light daily. Deep root trays encourage vertical growth, but without enough light, seedlings will stretch toward the light source, becoming leggy and weak. Keep the lights 2-4 inches above the plants and adjust the height as they grow.
Check root growth through the clear walls every few days. You’ll see white, fibrous roots filling the cell—this is your cue that the seedlings are developing strong anchors. If roots start circling the bottom of the cell (a sign of root-bound stress), it’s time to transplant, even if the seedlings are small. Healthy roots should fill at least ⅔ of the cell’s depth before transplanting.
⏰ Step 5: Harden Off and Transplant for Maximum Success
Two weeks before your last frost date, begin hardening off the seedlings by placing the tray outside in a sheltered, shaded spot for 1-2 hours the first day. Gradually increase exposure over 10-14 days, ending with a full day in direct sunlight. This toughens the seedlings and prepares them for the garden’s conditions.
Transplant when seedlings have 3-4 true leaves and roots fill the cell. Gently squeeze the sides of the cell to loosen the root ball—deep root trays make this easier because the roots aren’t tangled. Plant at the same depth they were in the tray, and water deeply to encourage root expansion into the surrounding soil. Avoid disturbing the roots further, or you’ll set back their growth.
Tips & tricks for perfect seed starting with deep root trays
Deep root trays transform weak seedlings into hardy transplants—here's how to maximize their potential without the common pitfalls.
Tray Selection Matters: The 4-6 inch depth specification isn't arbitrary—it's designed to accommodate root systems of mature seedlings before transplanting. For larger plants like tomatoes or peppers, opt for the deeper end of the range (5-6 inches), while smaller herbs can thrive in 4-inch cells. Clear walls are non-negotiable for monitoring root development, but if you're working with opaque trays, consider cutting a small window in the side to check progress without disturbing the seedlings.
Germination Temperature Secret: That 75-85°F range on your seedling heat mat is critical for consistent germination. I've found that maintaining the lower end (75°F) works better for heat-sensitive varieties like lettuce, while warmer (80-85°F) speeds up germination for heat-lovers like peppers. Pro tip: Place an infrared thermometer on the soil surface—surface temps can run 5-10°F hotter than your mat's setting, potentially overheating delicate seeds.
Lighting Strategy: The 14-16 hours of daily light requirement might seem daunting, but you don't need expensive grow lights. Position your tray on a windowsill that gets direct sunlight for at least 6 hours daily, then supplement with a simple LED bulb (like a 6500K daylight bulb) for the remaining hours. For even coverage, rotate the tray 180 degrees every 24 hours—this prevents seedlings from leaning toward one light source, creating those weak, leggy stems we all hate.
Transplanting Timing: Waiting for roots to fill ⅔ of the cell depth ensures your seedlings have established strong anchors, but don't let them become root-bound. If you see roots circling the bottom (a classic sign of stress), it's time to transplant—even if the seedlings are small. For the 1-2 hour hardening off sessions, I've found that starting with just 30 minutes on day one works better for delicate seedlings like basil, gradually increasing by 30-minute increments rather than the full hour jump.
Pro Tips for Deep Root Seed Starting Trays
- Deep root trays transform weak seedlings into hardy transplants—here's how to maximize their potential without the common pitfalls.
- Tray Selection Matters: The 4-6 inch depth specification isn't arbitrary—it's designed to accommodate root systems of mature seedlings before transplanting.
- Germination Temperature Secret: That 75-85°F range on your seedling heat mat is critical for consistent germination.
Frequently asked questions
Got questions about deep root seed starting trays? You’re not alone—these trays are game-changers, but they do come with a few nuances! Here’s what you need to know before diving in:
What’s the best time to start seeds in deep root trays?
Timing depends on your plants! For warm-season crops like tomatoes or peppers, start seeds 6-8 weeks before the last frost. Cool-season veggies (e.g., lettuce, spinach) can go in 4-6 weeks prior. Check your local frost date—deep root trays give you a little extra leeway since seedlings establish faster with more space!
Can I reuse deep root seed starting trays?
Clean them thoroughly with a 10% bleach solution (1 part bleach to 9 parts water) to kill pathogens. Rinse well and let dry completely. Reusing trays saves money and reduces waste—just avoid reusing them for the same plant family consecutively to prevent disease buildup.
Are deep root trays worth the investment over regular seed trays?
If you’re growing deep-rooted plants (tomatoes, peppers, herbs, or even small trees), yes! They reduce transplant shock, boost root growth, and often yield healthier plants. For shallow-rooted veggies (like radishes or lettuce), standard trays may suffice—but deep root trays are versatile for any seed starting!
What if my seedlings look leggy or weak in deep root trays?
Leggy seedlings usually mean lack of light. Move trays to a sunnier spot (or under grow lights) and ensure they’re 1-2 inches from the light source. Overcrowding can also stunt growth—thin seedlings if roots are tangled. A balanced fertilizer (like 5-5-5) can help if yellowing appears.
What’s a good alternative if I don’t have deep root trays?
No problem! Try DIY solutions like:
- Repurposed yogurt cups or egg cartons (cut to 4+ inches deep).
- Plastic bottles (cut and filled with soil).
- Peat pots or biodegradable seedling pots (plant directly into the ground).
Wrapping up and next steps
Starting seeds in deep root seed starting trays is a game-changer for gardeners who want hardier, faster-growing plants from day one. By mimicking natural root environments, these trays help seedlings develop robust systems before transplanting—saving time, effort, and even water.
Whether you're a beginner or a seasoned pro, this method is a simple yet powerful way to boost your garden’s success.
Ready to give it a try? Grab your trays, gather your seeds, and watch your seedlings thrive! Start small, experiment, and enjoy the rewards of stronger, healthier plants all season long. 🌱✨