
Lawn
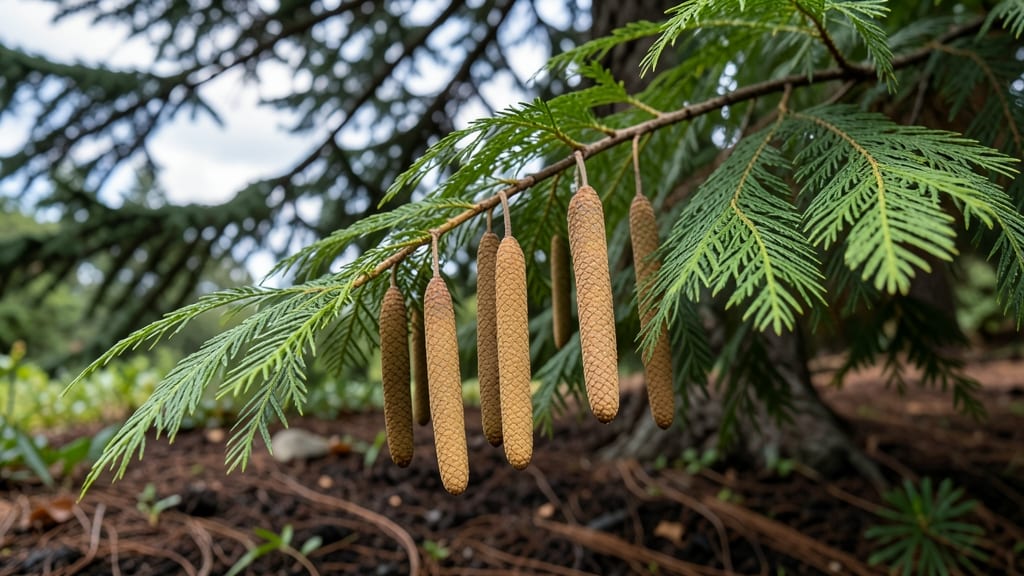
Cedar tree seed pods turn brown and papery when ready—don’t miss this 3-week window in late fall. 🌿 I’ve collected thousands of these over the years, and the key to success is knowing exactly when to harvest and how to handle them before they lose viability.
The pods should feel dry to the touch and open slightly when squeezed. Spread them on a screen or paper towel in a warm, dry spot for 1-2 weeks to finish drying.
Once fully dry, store them in a sealed container—this preserves them for up to 2 years and ensures you’ll have fresh seeds for next spring’s planting. Once you sow them, germination can take 30-90 days, but patience pays off with hardy seedlings that thrive in poor soil.
The real magic happens when you transplant them—cedars grow slowly but become stunning, low-maintenance trees that attract wildlife. This method works for Eastern red cedar, Western red cedar, and even juniper varieties.
Here’s how to avoid common pitfalls like mold or premature sprouting—so you end up with a thriving young forest in your yard.
📚 In This Guide
- What you need
- Instructions
- Tips and common mistakes
- Wrapping up and next steps
What you need
- ● Pruning shears or loppers – Choose bypass pruners (sharp, clean cuts) for precision. A 10-12 inch reach is ideal for mid-sized branches.
- ● Heavy-duty gloves – Opt for gardening gloves with reinforced palms to protect against thorns and rough bark.
- ● Large bucket or mesh bag (10+ gallon capacity) – A breathable fabric bag prevents moisture buildup and keeps pods from crushing.
- ● Newspaper or cardboard sheets – 2-3 sheets per batch for drying pods indoors.
- ● Paper towels or parchment paper – For gentle handling and separation of pods.
- ● Small paintbrush or soft-bristle brush – Helps dislodge stubborn seeds from pods.
- ● Air-tight storage containers – Mason jars (pint-sized) or resealable plastic bins with silica gel packets for long-term storage.
- ● Labeling tags & permanent marker – Mark containers with the harvest year and pod type (e.g., "Eastern Red Cedar – 2024").
- ● Ladder or step stool – For safely reaching higher branches (ensure it’s stable and rated for your weight).
- ● Magnifying glass – Useful for inspecting pods for pests or damage.
- ● Hair dryer (cool setting) – Speeds up drying time for stubbornly damp pods.
- ● Seedling trays or small pots – If you plan to germinate seeds for propagation.
- ● Disinfectant spray (70% isopropyl alcohol) – Wipe tools between uses to prevent mold or bacteria.
Step-by-Step guide to harvesting, drying, and storing cedar tree seed pods
Here’s how to collect, preserve, and store cedar seed pods for future planting—no guesswork, just reliable results.
🌱 Step 1: Identify and Harvest Mature Seed Pods
Cedar seed pods turn from green to a deep, woody brown when fully mature, usually in late fall or early winter. Look for pods that are dry to the touch and release seeds easily when gently squeezed. Avoid green or partially dried pods—they won’t store well and may spoil.
Use sharp pruning shears to snip branches bearing clusters of pods, cutting just above a leaf node. Harvest on a dry, sunny day to prevent moisture buildup, which can encourage mold. I like to work in the morning when the air is cool and dew-free—this keeps the pods in peak condition for drying.
🪴 Step 2: Clean and Prepare Pods for Drying
Spread the harvested pods on a clean, dry surface like a mesh screen or cardboard tray. Remove any debris, damaged pods, or insect-infested clusters immediately. A soft brush helps dislodge dirt without crushing the pods. If pods are still slightly damp, place them in a single layer on a paper towel-lined tray and let them air-dry for 24 hours before proceeding.
I avoid using heat sources like ovens or hair dryers—cedar pods dry best at room temperature (65-75°F) over 7-10 days. Spread them in a well-ventilated area away from direct sunlight to prevent cracking or warping. Stir them gently every few days to ensure even drying.
☀️ Step 3: Dry and Store Pods Properly
Once the pods are completely dry (they should feel brittle and light), store them in airtight containers like glass jars or resealable plastic bags. Add a small silica gel packet or a few uncooked rice grains to absorb any residual moisture. Label each container with the harvest date—cedar seeds remain viable for 1-2 years when stored correctly.
Keep the containers in a cool, dark place like a pantry or basement. Avoid refrigeration unless storing for more than two years, as temperature fluctuations can reduce seed viability. Check periodically for signs of pests or mold—if you spot any, discard the affected pods immediately.
⏰ Step 4: Test Viability Before Planting
Before using stored pods, test their viability by placing a few in a bowl of water. Viable seeds will sink within 10-15 minutes, while empty or nonviable ones will float. If fewer than 50% of seeds sink, the remaining pods may need to be discarded or replanted with fresh seeds.
For best results, sow tested seeds in late winter or early spring in well-draining soil. Plant them ¼ inch deep and keep the soil consistently moist until germination, which typically occurs in 4-6 weeks. If you’re impatient, soak the pods in warm water for 24 hours before planting to speed up germination.
Tips & tricks for perfect cedar tree seed pod preservation
These practical insights will help you maximize your harvest and ensure your cedar seed pods stay viable for planting season.
Harvest Timing Secret: The key to successful storage begins in Step 1 with proper harvesting. Cedar pods mature unevenly—some clusters may be ready while others remain green. I recommend harvesting in batches over a 2-3 week window during late fall. Check pods every 3-4 days by gently squeezing a few: if they crumble easily and release seeds, that cluster is ready. This staggered approach ensures you capture the peak harvest window without missing any.
Drying Technique That Changed Everything: In Step 2, the 7-10 day drying period at 65-75°F is non-negotiable for quality. I've learned this the hard way—rushing the process with heat sources like ovens creates brittle, cracked pods that won't release seeds properly. For even drying, I use a mesh screen over a cardboard box with small holes drilled in the bottom. This creates airflow underneath while keeping pods elevated. Stir them every 2-3 days with a wooden spoon to prevent clumping, which traps moisture.
Storage Wisdom: When storing your dried pods in Step 3, I've found that adding a small silica gel packet isn't just about moisture—it's about creating the right environment. Place the packet inside the container before adding pods, then seal tightly. For long-term storage beyond 2 years, consider vacuum-sealing bags which can extend viability to 3-4 years. I also recommend storing pods in small batches (1-2 cups per container) so you can test viability without compromising the entire harvest.
Pro Tips for Cedar Tree Seed Pods
- These practical insights will help you maximize your harvest and ensure your cedar seed pods stay viable for planting season.
- Harvest Timing Secret: The key to successful storage begins in Step 1 with proper harvesting.
- Drying Technique That Changed Everything: In Step 2, the 7-10 day drying period at 65-75°F is non-negotiable for quality.
Frequently asked questions
Got questions about harvesting, drying, or storing cedar tree seed pods?
You’re not alone! Here are answers to the most common queries—so you can master the process like a pro.
When is the best time to harvest cedar seed pods?
Harvest cedar seed pods in late fall or early winter (November–January) when they turn brown and dry out. Avoid harvesting if pods are still green or wet—they won’t store well. Look for pods that easily release seeds when gently squeezed!
How do I know if the seed pods are fully dry before storing?
Fully dried cedar seed pods should feel lightweight and brittle—almost hollow when tapped. If they’re still heavy or damp, spread them on a mesh screen in a well-ventilated, dry area for 1–2 weeks. A food dehydrator (set to 95°F) works too!
What’s the best way to store cedar seed pods long-term?
Store pods in airtight containers (like glass jars or resealable bags) with a drying agent (e.g., silica gel or rice) to prevent moisture. Keep them in a cool, dark place (like a pantry) for up to 1–2 years. Label them with the harvest date!
Can I use cedar seed pods for anything other than planting?
Beyond gardening, cedar seed pods are great for natural potpourri, homemade wreaths, or even as a fragrant filler in sachets. Just crush them lightly to release their woodsy aroma.
Why are my stored cedar seed pods moldy or smelly?
Mold or odors mean excess moisture got in. Check your storage container—if pods feel damp, re-dry them immediately in a warm, dry spot. For future batches, add a small silica packet or a chalk bag to absorb moisture.
Pro Tip:
Need extra seeds? Shake pods over a tray to release seeds naturally, then sift out debris. Save the best-looking pods for replanting—they’ll germinate faster!
Wrapping up and next steps
Harvesting and preserving cedar tree seed pods is a rewarding way to ensure next year’s vibrant blooms while connecting with nature’s cycles.
Whether you’re crafting wreaths, supporting wildlife, or simply enjoying the process, these tiny pods hold big potential. Now’s your chance to put your new skills to work—grab those pruners, dry your pods, and store them with confidence! 🌿✨
Ready to take it further? Share your cedar creations with fellow gardeners or explore local conservation tips to make the most of your harvest!