
Propagation
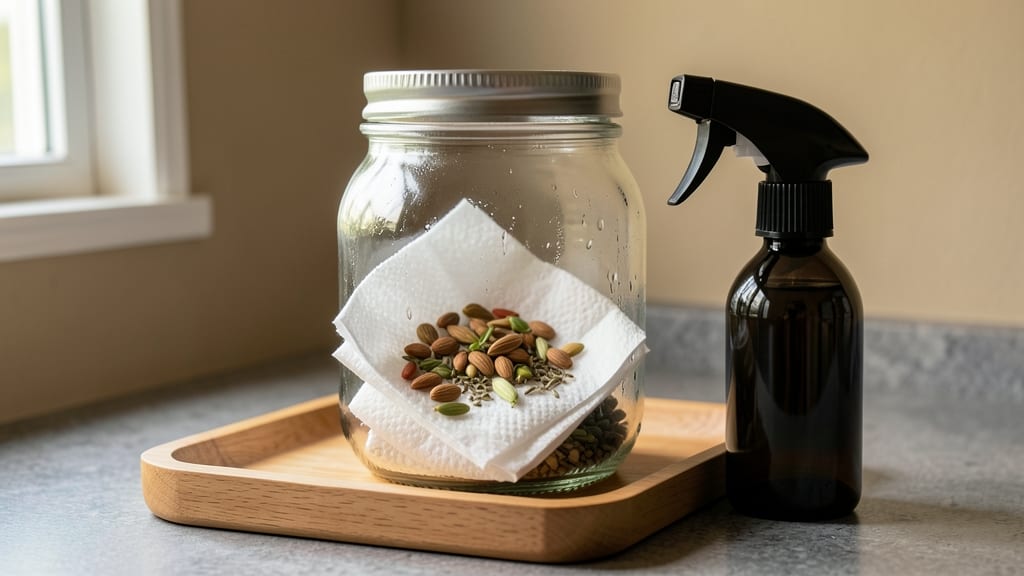
Starting seeds on paper towels saves space and speeds up germination—my peppers popped up in just 4 days last spring. 🌱 The trick is keeping that towel damp without drowning the seeds, which is where most beginners mess up.
This method works best with tiny seeds like lettuce, basil, or snapdragons, but even tomatoes respond well when you follow the moisture balance.
You only need 3 supplies: paper towels, a plastic bag, and a spray bottle. Fold the towel into quarters, dampen it lightly (wrung out but not soggy), and arrange seeds about an inch apart.
The bag creates a humid greenhouse effect, but you must check daily for mold or dried-out spots. Most seeds need warmth—place the setup on top of your fridge or near a sunny window.
By day 5, you'll see tiny roots and sprouts breaking through. That's when you gently transfer them to soil, roots-first, using a toothpick to loosen them from the towel.
The seedlings stay sturdy because they develop strong root systems in just a week. No more waiting months for germination—this method cuts that time in half.
Works for any small seeds and adapts to limited spaces. The key is patience during the transfer—rushing leads to broken stems. Once you master this, you'll never buy seedlings again. Ready to try it with your next batch?
📚 In This Guide
- What you need
- Instructions
- Tips and common mistakes
- Wrapping up and next steps
What you need
- ● Paper towels (2-3 sheets): Use unbleached or recycled paper towels (avoid printed or scented ones—seeds hate chemicals!).
- ● Seeds (any variety): Choose small seeds like herbs (basil, parsley), flowers (marigolds, sunflowers), or veggies (peppers, tomatoes). Aim for 5–10 seeds per towel.
- ● Spray bottle (4–8 oz): A fine-mist setting keeps seeds hydrated without drowning them.
- ● Plastic bag (ziplock or gallon): A sealable bag traps humidity—critical for speedy sprouting!
- ○ Plate or tray (optional but helpful): A shallow dish keeps your setup tidy and prevents messes.
- ● Ruler or measuring tape: Fold paper towels into 4–6 inch squares for consistency.
- ● Label & marker: Track seed types (especially if testing multiple varieties!).
- ● Grow lights or sunny windowsill: Seeds need 6–8 hours of light/day once sprouted.
- ○ Small fan (optional): Gentle airflow prevents mold—critical for humidity control!
Step-by-Step instructions for paper towel seed starting
Here's how to get fast, healthy sprouts without soil or trays—just a few simple supplies and patience.
🌱 Step 1: Prepare Your Seeds and Paper Towels
Start by selecting small seeds like basil, lettuce, or herbs—anything that germinates quickly. Place 4-5 seeds in a single row on a damp paper towel, spacing them about 1 inch apart. Fold the towel over them like a sandwich, ensuring the seeds are nestled between the layers. The goal is to keep them evenly moist but not soaked—think of a wrung-out sponge.
I like to use white paper towels because they’re thick enough to hold moisture without falling apart. If your seeds are particularly tiny, you might only need 2 seeds per towel to avoid overcrowding later. Place the folded towel in a sealed plastic bag or between two plates to maintain humidity. This setup mimics the cozy, damp conditions seeds love before sprouting.
💧 Step 2: Store in a Warm, Dark Place
Seal your setup and store it in a warm spot, ideally between 70-80°F. A kitchen counter near the oven or a seedling heat mat works perfectly. The darkness tricks the seeds into focusing on germination rather than reaching for light. Check the towel every 12 hours—you’ll see tiny roots peeking out in as little as 2-3 days.
Here’s the thing—don’t overwater. If the towel feels damp but not dripping, you’re golden. If it’s bone-dry, mist it lightly with a spray bottle. Too much moisture invites mold, while too little slows growth. You’ll know it’s right when the towel stays softly damp but doesn’t feel soggy to the touch.
☀️ Step 3: Transfer Sprouts to Light for Growth
Once the seeds sprout ¼-inch roots and tiny green shoots appear—usually 3-5 days in—it’s time to move them to light. Unfold the towel gently, keeping the roots intact. Place the sprouts on a fresh, damp paper towel or a small mesh screen to prevent root tangling. This step is critical: roots should stay moist but never waterlogged.
Position the sprouts under bright, indirect light (a south-facing window or grow light works). You’ll see the first true leaves emerge in 2-3 days. If the sprouts lean toward the light, rotate them daily so they grow straight. Avoid direct sun at this stage—it can scorch delicate seedlings.
🪴 Step 4: Transplant to Soil When Ready
When sprouts have 2-3 true leaves and roots reach about 1 inch long (usually 7-10 days total), they’re ready for soil. Fill small pots with your chosen growing medium and make a tiny hole with your finger. Gently place the sprout in the hole, ensuring the roots aren’t bent or tangled. Press the soil lightly around the base to secure it.
Water lightly after transplanting—just enough to settle the soil. Avoid drowning the roots, which can cause rot. Keep the soil consistently moist but not soggy for the first 5-7 days as the seedlings establish themselves. You’ll know they’re thriving when new leaves appear and the stems firm up.
Tips & tricks for perfect paper towel seed starting
These little-known tricks will help you avoid common pitfalls and grow the fastest, healthiest sprouts every time.
Moisture Management: The key to success in Step 1 is getting that damp paper towel just right—think of it like wringing out a sponge. If your towel feels like a wrung-out dishrag (not dripping but not dry), you're golden. For extra insurance, place your folded towel between two plates or in a sealed bag to trap humidity. I've ruined batches by overwatering, so remember: damp, not soaked. You'll know it's perfect when the towel stays softly damp but doesn't feel soggy to the touch.
Temperature Matters: In Step 2, maintaining that 70-80°F range makes all the difference. If your kitchen runs cooler, try placing your setup on top of the fridge or near a sunny window during the day. I've seen germination slow dramatically when temps drop below 70°F—patience is key, but don't let it get chilly. A seedling heat mat can be a game-changer if you're in a cooler climate. The warmth helps kickstart those tiny roots in as little as 2-3 days.
Light Transition: When moving sprouts to light in Step 3, be gentle with those delicate roots. I like to use a small mesh screen here—it keeps roots from tangling while still allowing airflow. Place your sprouts about 2-3 inches below your light source to prevent stretching. You'll notice the first true leaves appear in just 2-3 days, but if they start leaning toward the light, rotate them daily. This simple step prevents that leggy growth that makes seedlings weak.
Transplanting Timing: In Step 4, don't rush the transplant—wait until you see those 2-3 true leaves and roots about 1 inch long. I've made the mistake of transplanting too early, which stresses the seedlings. When you do transplant, make those holes just slightly larger than the root ball. Press the soil lightly around the base to secure it, but don't compact it too much. The first 5-7 days are critical for establishment, so keep that soil consistently moist but never soggy.
Pro Tips for Paper Towel Seed Starting
- These little-known tricks will help you avoid common pitfalls and grow the fastest, healthiest sprouts every time.
- Moisture Management: The key to success in Step 1 is getting that damp paper towel just right—think of it like wringi...
- Temperature Matters: In Step 2, maintaining that 70-80°F range makes all the difference. If your kitchen runs cooler,...
Frequently asked questions
about paper towel seed starting—because even the greenest thumbs need a little guidance! Here are answers to the most common queries to help you grow confidently.Can I use any paper towel for seed starting?
Not all paper towels work equally well! Opt for unbleached, seed-free brands (like Viva or Bounty) to avoid chemicals or contaminants. Bleached towels may contain chlorine or dyes that could hinder germination. If you’re unsure, check the label for "100% recycled" or "unbleached."
How do I know when seeds are ready to transplant?
Seeds are ready for transplant when they’ve developed 2-3 true leaves (not just the initial seed leaves). For most veggies/herbs, this takes 7–14 days. Gently tug on the sprouts—if roots are 1–2 inches long and the stem is sturdy, they’re ready to move to soil. Avoid letting them get root-bound in the towel!
What if my seeds aren’t germinating after a week?
Don’t panic! First, check if your seeds need light (like lettuce) or darkness (like beans). If they’re dry, mist the towel again—consistency is key. Some seeds (e.g., tomatoes) take 10–14 days. If nothing sprouts, test viability by soaking a few in water for 24 hours; if they sink, they’re likely still good.
Can I reuse paper towels for multiple seed batches?
Reusing towels is possible, but it’s not ideal. After the first use, towels can harbor fungus or bacteria, which may stunt new sprouts. If you must reuse, sterilize them by boiling for 10 minutes or baking at 200°F (93°C) for 30 minutes. Fresh towels are always the safest bet!
What’s a good alternative if I don’t have paper towels?
No paper towels? No problem! Try these germination-friendly swaps:
- Coffee filters: Biodegradable and breathable (just keep them damp).
- Jiffy peat pellets: Pre-moistened and ready for direct planting.
- Dampened paper napkins: Works in a pinch, but avoid printed designs (ink can be toxic).
- Seedling trays with moistened soil: Skips the towel step entirely.
Will paper towel seeds get enough nutrients?
Paper towels provide moisture and support, but zero nutrients. Once sprouts have true leaves, transplant them into nutrient-rich soil (or a hydroponic setup) to prevent deficiencies. For faster growth, add a light fertilizer (like fish emulsion) when transplanting.
Wrapping up and next steps
Starting seeds in paper towels is a fast, fuss-free, and eco-friendly way to kickstart your gardening journey! With just a few supplies and a week of patience, you’ll have sturdy seedlings ready to transplant—no mess, no stress.
Whether you’re a beginner or a seasoned gardener, this method proves that great things grow from small beginnings.
Now that you’re armed with the know-how, why not try it this weekend? Grab your seeds, a cozy spot, and a little enthusiasm—your future plants (and your future harvest) will thank you! 🌱✨