
Lawn
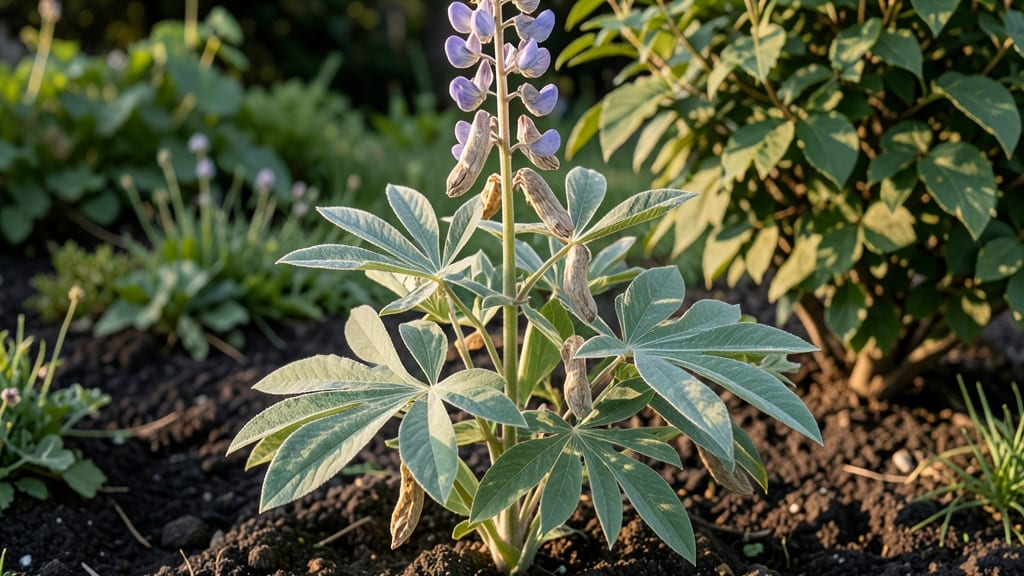
Lupine seed pods hold the key to growing these striking perennials from scratch—if you crack their dormancy first. 🌱 I’ve struggled with slow germination until I learned the simple trick of pre-treating seeds to bypass nature’s built-in delay.
The payoff? Strong, healthy seedlings that emerge in just 2-3 weeks instead of months.
Harvesting pods at the right stage is everything—wait too long and they’ll burst open, leaving you with empty shells. Aim for when pods turn brown but haven’t split yet, usually late summer in most climates.
Store them in a cool, dry place until you’re ready to break dormancy, which prevents mold and keeps seeds viable for 2-3 years.
Once you’ve scarified the seeds (a quick nick with sandpaper) and soaked them overnight, germination becomes shockingly reliable. You’ll watch tiny green shoots push through the soil within days, giving you a head start on growing lupines that’ll reward you with vibrant purple blooms next season.
This method works for both ornamental varieties and wild lupines, whether you’re restoring a prairie garden or just want to grow these nitrogen-fixing powerhouses. The secret’s in the prep—skip it, and you’ll be waiting forever for those first sprouts.
📚 In This Guide
- What you need
- Instructions
- Tips and common mistakes
- Wrapping up and next steps
What you need
- ● Lupine seed pods: Freshly harvested or store-bought (ensure they’re fully mature and dry). Aim for at least 50 pods for reliable results.
- ● Scarification tools: Sandpaper (medium-grit, 80-120 grit)
- ● OR a file or knife (for careful nicking)
- ● Water: Room-temperature or slightly warm (avoid cold water).
- ● Containers: Small glass jars or bowls (with lids for stratification)
- ● OR paper towels (for cold stratification)
- ● Plastic wrap or damp cloth: To maintain moisture during stratification.
- ● Refrigerator: For cold stratification (must reach 35–40°F (2–4°C)).
- ● Planting pots or trays: Small containers (2–3 inches deep) with drainage holes.
- ● Potting mix: Well-draining, seed-starting blend (avoid garden soil).
- ● Spray bottle: For gentle watering post-stratification.
- ● Hydrogen peroxide (3%) – For sterilizing seeds (mix 1 part peroxide to 10 parts water).
- ● Grow lights or sunny windowsill – To provide 12–16 hours of light post-germination.
- ● Heat mat – Speeds up germination in cooler climates (70–75°F (21–24°C) ideal).
- ● Label markers – To track stratification dates and seed varieties.
- ● Humidity dome – Keeps seedlings cozy until they’re sturdy enough.
Step-by-step guide to breaking lupine seed dormancy
Here's how to jumpstart germination and get those tough lupine seeds sprouting in record time.
🌱 Step 1: Harvest and Dry the Seed Pods Properly
Collect mature lupine pods when they turn brown and begin splitting open naturally. The seeds inside must be fully dry before storage—any moisture left behind will trigger mold. Spread pods on a paper towel in a dry, shaded spot for 1-2 weeks, turning them daily to ensure even drying.
Test for readiness by gently squeezing a pod: if it crumbles easily and seeds rattle inside, they're ready. Store the dried pods in a paper envelope (not plastic) in a cool, dark place. Lupine seeds can remain viable for 5-10 years when stored properly, but fresh seeds germinate faster.
💧 Step 2: Apply Cold Stratification for Dormancy Break
Lupine seeds require cold stratification to break their natural dormancy. Place seeds in a sealed plastic bag with a moist paper towel—just damp, not soaking wet. Seal the bag and refrigerate for 4-6 weeks at 34-40°F. Check weekly to ensure the towel stays evenly moist; condensation on the bag walls means it's too wet.
This cold treatment mimics winter conditions, signaling the seed that spring has arrived. After 4 weeks, transfer the bag to a warm spot (65-75°F) for 2-3 days to simulate temperature fluctuations. You'll see tiny cracks in the seed coats—this is your cue that stratification worked.
☀️ Step 3: Sow Stratified Seeds in Warm, Moist Medium
Fill biodegradable seed pots with a sterile seed-starting mix (never garden soil—it's too dense). Plant seeds ½ inch deep, spacing them 1 inch apart in rows. Lupine seeds are large, so handle them gently to avoid damage. Water lightly with a spray bottle until the soil surface looks damp but not glistening.
Cover the pots with clear plastic wrap to retain moisture and warmth. Place them in a bright, indirect light spot (no direct sun yet—it overheats the soil). Germination typically occurs in 7-21 days, but some seeds may take longer. Patience is key—don’t disturb the soil until 50% of seeds sprout.
⏰ Step 4: Transplant Seedlings to Permanent Growing Space
Once seedlings develop 2-3 sets of true leaves (not the initial seed leaves), they're ready for transplanting. Harden them off by placing pots outside in partial shade for 3-4 hours daily, gradually increasing exposure over 7-10 days. Lupine seedlings are delicate—avoid transplanting on windy days.
Choose a sunny location with well-draining soil (lupines hate soggy roots). Dig holes twice as wide as the root ball but the same depth. Space plants 12-18 inches apart for full-grown lupines. Water deeply after planting to settle the soil, then reduce watering to once weekly once established.
✂️ Step 5: Maintain for Fast, Healthy Growth
Lupines thrive in full sun but appreciate afternoon shade in hot climates. Mulch around the base with 2 inches of organic mulch to retain moisture and suppress weeds. Fertilizer isn't needed—lupines are nitrogen-fixers, meaning they improve soil health as they grow.
Watch for aphids or spider mites on new growth. A strong spray of water usually dislodges them, but severe infestations may require neem oil. Deadhead spent flowers to encourage more blooms, but leave some seed pods if you want next year's crop. With proper care, lupines reward you with stunning blooms in just 60-90 days from sowing.
Tips & tricks for breaking lupine seed dormancy
Here's what nobody tells you about getting lupine seeds to sprout reliably—these tricks cut germination time in half.
Timing Secret: The 1-2 weeks for drying pods might seem long, but rushing this step risks moldy seeds. I learned this the hard way after ruining three batches—now I set a timer and turn pods every 12 hours to speed up drying without sacrificing quality. Look for seeds that rattle when pods are squeezed; that's your perfect signal.
Cold Stratification Precision: While 4-6 weeks is standard, I've found that 5 weeks at 34-40°F works best for most lupine varieties. The key is consistency—use a refrigerator's crisper drawer where temps stay stable. After 4 weeks, the warm-up period (2-3 days at 65-75°F) mimics spring's temperature shifts perfectly. Watch for those tiny cracks in seed coats; that's when you know the magic's working.
Sowing Strategy: Planting lupine seeds ½ inch deep might seem shallow, but their large size and hard coats require this precise depth. I use a toothpick to make small holes—this prevents damaging the seeds while ensuring proper placement. Space them 1 inch apart to avoid overcrowding later. The clear plastic wrap trick is a game-changer for moisture retention, especially in dry climates.
Transplanting Wisdom: The 3-4 hours of hardening off might feel short, but lupine seedlings are surprisingly delicate. Start with just morning sun exposure, then gradually add afternoon light. I've found that transplanting on overcast days reduces shock—your seedlings will thank you with faster establishment. Remember, lupines hate soggy roots, so choose that well-draining spot carefully.
Pro Tips for Lupine Seed Pods
- Here's what nobody tells you about getting lupine seeds to sprout reliably—these tricks cut germination time in half.
- Timing Secret: The 1-2 weeks for drying pods might seem long, but rushing this step risks moldy seeds. I learned this...
- Cold Stratification Precision: While 4-6 weeks is standard, I've found that 5 weeks at 34-40°F works best for most lu...
Frequently asked questions
Got questions about working with lupine seed pods? You’re not alone! Here are answers to the most common queries—from dormancy tricks to troubleshooting—so you can grow these stunning perennials with confidence.
How do I break lupine seed dormancy?
Lupine seeds often need stratification to germinate. Mix seeds with moist sand or peat moss, then refrigerate in a sealed bag for 2–3 months (or use a hot/cold water soak for 24 hours). This mimics winter conditions and tricks seeds into sprouting faster!
How long does it take for lupine seeds to germinate?
With proper dormancy-breaking, germination usually takes 2–6 weeks at 60–70°F. Patience is key—some seeds may wait up to 3 months! Keep soil consistently moist (not soggy) and avoid direct sunlight until sprouts appear.
Can I plant lupine seed pods directly in the ground?
Yes, but success depends on your climate. In cold regions, sow pods in fall for natural winter stratification. In warmer areas, stratify seeds indoors first (see above) or plant in late winter/early spring for best results.
Why aren’t my lupine seeds sprouting?
Try these fixes if germination stalls:
- Insufficient dormancy: Extend cold treatment by 1–2 months.
- Wrong moisture: Seeds need consistent dampness—not dry or waterlogged soil.
- Temperature issues: Ideal range is 50–70°F; avoid heat mats if temps exceed 75°F.
- Pests/fungus: Check for mold or insects; use a fungicide if needed.
Are there alternatives to growing lupine from seed?
If seeds prove tricky, consider:
- Transplants: Buy young lupine plants from nurseries (check hardiness zones!).
- Division: Split mature clumps in early spring for instant growth.
- Wild collection: Harvest pods from local, non-invasive lupine plants (ensure no pesticides were used!).
Pro tip: Lupine thrives in poor soil—great for reclaiming neglected lawns!
Wrapping up and next steps
Lupine seed pods may seem tricky at first, but with the right dormancy-breaking techniques—like scarification, stratification, or soaking—they can sprout with ease! 🌱 Whether you’re restoring a wildflower meadow or adding a pop of color to your lawn, these steps unlock their full potential.
Ready to transform your outdoor space?
Your next step? Grab those pods, follow the guide, and watch your garden thrive! Happy planting—your lupines are waiting!