
Size
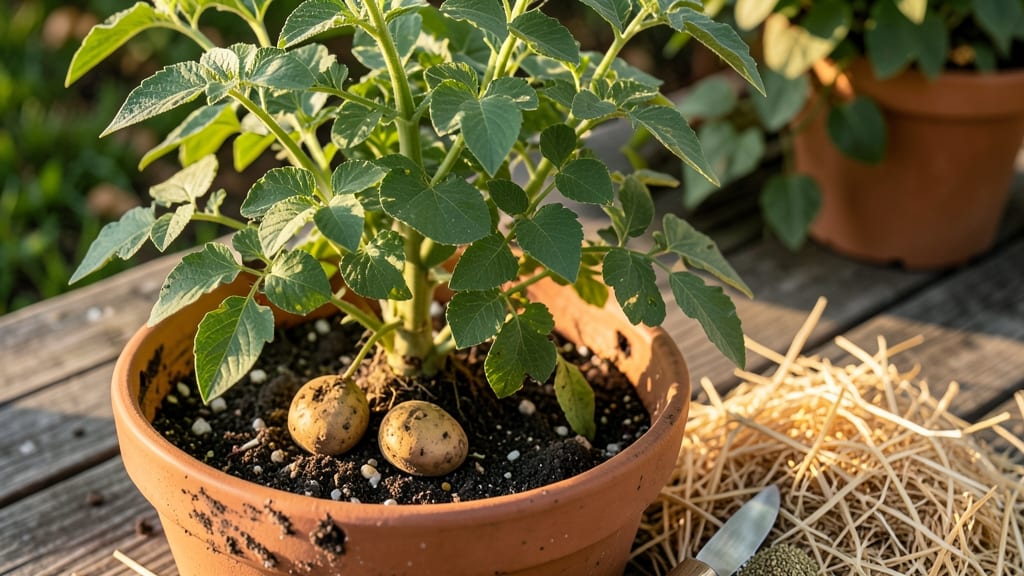
Growing seed potatoes in pots lets you harvest crisp, homegrown spuds without a backyard—just a sunny spot and a few containers. 🌱 I've turned my balcony into a potato patch, and the results are shockingly productive: enough for meals with leftovers by late summer.
The secret is mimicking the loose, well-draining soil potatoes love in the wild, but in a controlled space that keeps pests and rot at bay.
You'll need just three things: a container at least 12 inches deep (bigger is better), lightweight potting mix, and certified seed potatoes (not grocery store spuds). Plant them 4-6 inches deep in early spring, and as they sprout, add more soil to encourage those knobby tubers to form underground.
Most people overlook the "hilling" step, but it's what turns a few eyes into a full harvest.
By harvest time, you'll have a compact, high-yield crop that outperforms store-bought potatoes in both flavor and freshness. The plants stay contained, so you skip the weeding and soil-borne diseases that plague in-ground gardens.
Plus, you can grow multiple varieties in small spaces—no more choosing between fingerlings and russets at the store.
This method works for apartments, patios, or even a sunny windowsill with grow lights. The only real challenge is patience—those tubers need 90-120 days to reach full size—but the payoff is worth every week of waiting. Let's get those potatoes growing!
📚 In This Guide
- What you need
- Instructions
- Tips and common mistakes
- Wrapping up and next steps
What you need
- ● Seed potatoes: 3–5 certified disease-free seed potatoes (choose varieties like Yukon Gold, Red Pontiac, or Fingerlings for pots). Pro tip: Look for "seed potatoes" (not grocery-store potatoes) for better success!
- ● Containers: 1–2 large pots (10–12 inches deep, 12–18 inches wide) per seed potato. Use fabric grow bags, plastic pots with drainage, or even buckets with holes drilled in the bottom. 💡 Ensure pots have drainage holes to prevent root rot!
- ● Potting mix: A high-quality, well-draining potato-specific mix or a blend of 60% potting soil and 40% perlite/vermiculite/sand. ✨ Avoid garden soil—it compacts and holds too much moisture.
- ● Drainage material: Small rocks, pebbles, or broken pottery pieces (1–2 inches) to place at the bottom of pots.
- ● Fertilizer: Balanced organic fertilizer (10-10-10 or 5-5-5) or compost. 🌡️ Add a slow-release fertilizer at planting time for steady nutrition.
- ● Watering can or hose with gentle spray: For even moisture without disturbing the soil.
- ● Garden twine or chicken wire: To create a "cage" for hilling soil as plants grow (encourages more tubers).
- ● Mulch: Straw or grass clippings to retain moisture and regulate temperature.
- ● Grow lights or sunny windowsill: If growing indoors (seed potatoes need 6–8 hours of sunlight daily).
- ● Potato grow bags with built-in supports: Convenient for vertical growing and easy harvesting.
Step-by-Step instructions for growing seed potatoes in pots
Here's how I turn small spaces into a bountiful potato harvest—no yard required.
🪴 Step 1: Choose the Right Containers and Drainage
Use 5-gallon buckets or 12-inch deep pots with drainage holes—seed potatoes need room to grow and water to escape. I like fabric grow bags because they let excess moisture evaporate through the walls, preventing rot. If using plastic, drill extra holes near the bottom to avoid soggy soil.
Place a 2-inch layer of gravel or broken pottery shards at the bottom before adding soil. This creates space for roots to spread downward while keeping the drainage system intact. The key here is preventing waterlogged roots, which is the #1 killer of container-grown potatoes.
🌱 Step 2: Layer Soil and Potatoes for Maximum Yield
Fill the container halfway with lightweight potting mix—avoid garden soil, which compacts and suffocates roots. Place 2-3 seed potatoes (each with at least one "eye") on top, spacing them evenly. Cover with 2 inches of soil, leaving the top of the potatoes exposed to light.
Here's the trick: as the stems grow 4-6 inches tall, add another 2-inch layer of soil, burying the stems up to the leaves. Repeat this process every 2 weeks until the pot is full. This encourages more tuber formation underground. I use a small shovel to gently pile soil around the stems without disturbing the roots.
☀️ Step 3: Position for Sunlight and Water Correctly
Place your pots in a spot with full sun (6-8 hours daily). A south-facing window or balcony works, but if you're using grow lights, position them 6-12 inches above the plants for 12-14 hours of light daily. Without enough light, your potatoes will grow small and green—definitely not what you want.
Water when the top inch of soil feels dry. I use a watering can with a narrow spout to direct moisture to the roots without splashing soil onto the stems. Overwatering is worse than underwatering—potatoes rot faster than they grow in soggy conditions. A moisture meter helps if you're unsure.
⏰ Step 4: Wait for Harvest Signals and Prepare for Digging
When the potato plants flower, stop adding soil—they're ready to focus on tuber growth. Harvest 1-2 weeks after the flowers fade by carefully emptying the pot onto a tarp. Gently sift through the soil with your hands to find the potatoes, which will vary in size from marbles to golf balls.
Let the potatoes cure in a dark, dry place for 1-2 weeks before storing. This toughens their skins and prevents bruising. I place mine on a wire rack in my garage, away from direct light. If you harvest too early, the skins stay thin and they bruise easily when handled.
🌿 Step 5: Maintain Healthy Plants Through the Season
Fertilize lightly with a balanced 10-10-10 fertilizer when you see the first true leaves appear. Too much nitrogen makes plants grow lush tops but few tubers. I mix a ½ teaspoon per pot every 4-6 weeks** to keep them happy without overfeeding.
Watch for pests like Colorado potato beetles—they love container potatoes. I use neem oil spray weekly as a preventative. If you see holes in the leaves or yellowing, act fast. A healthy plant produces the best yield, and prevention is easier than treating an infestation later.
Tips & tricks for growing seed potatoes in pots
Real talk: Container potatoes can be tricky if you don't know these game-changing details.
Container Depth Matters: The 12-inch depth mentioned in Step 1 isn't arbitrary—potatoes need that full depth to grow properly. Shallower containers (under 10 inches) will produce smaller, stunted tubers. I've seen people use 5-gallon buckets successfully, but if you're growing larger varieties like Yukon Golds, aim for the deeper end of the range. The 2-inch gravel layer at the bottom isn't just for drainage—it creates essential air pockets for root development.
Soil Layering Secret: When you reach Step 2 and start adding those 2-inch soil layers every 2 weeks, here's what nobody tells you: Use your fingers to gently press the soil around the stems rather than piling it on top. This prevents stem breakage while still encouraging tuber formation. I've ruined entire batches by being too rough with the soil—don't make my mistake! Also, keep the soil loose and fluffy; compacted soil restricts root growth and reduces yield.
Lighting Hack: The 6-8 hours of sunlight in Step 3 is non-negotiable, but here's how to maximize it: If you're using grow lights, position them just 6 inches above the plants initially. As your potato plants grow toward the 12-14 inch height, raise the lights to maintain that distance. This prevents leggy growth while ensuring proper photosynthesis. I've had the best results with full-spectrum LED grow lights on a timer—no need to babysit them!
Harvest Timing: That 1-2 week window after flowers fade in Step 4 is critical, but here's how to know exactly when to harvest: Gently tug on the stems. If they come out of the soil easily, your potatoes are ready. If they resist, wait another week. I've learned the hard way that harvesting too early means small potatoes, while waiting too long can lead to cracked skins. The curing period of 1-2 weeks is just as important—it develops the skin's natural protective layer, making them last longer in storage.
Pro Tips for Grow Seed Potatoes In Pots
- Real talk: Container potatoes can be tricky if you don't know these game-changing details.
- Container Depth Matters: The 12-inch depth mentioned in Step 1 isn't arbitrary—potatoes need that full depth to grow ...
- Soil Layering Secret: When you reach Step 2 and start adding those 2-inch soil layers every 2 weeks, here's what nobo...
Frequently asked questions
Got questions about growing seed potatoes in pots?
You’re not alone! Here are answers to the most common concerns—whether you’re a first-timer or a seasoned container gardener.
Can I use any pot for seed potatoes?
Not all pots work! Choose containers with drainage holes (critical to prevent rot) and at least 10–12 inches deep per potato. Fabric grow bags or plastic bins are great, but avoid shallow planters—they’ll stunt root growth. Pro tip: Drill extra holes if your pot lacks them!
How long does it take to harvest potatoes in pots?
With the right care, you can harvest new potatoes in 8–10 weeks (small, tender spuds) or wait 12–16 weeks for full-sized tubers. Check for readiness by gently brushing soil away from the pot sides—if you see potatoes, it’s time! Bonus: Harvest in stages for a continuous supply.
What if my seed potatoes sprout but don’t produce tubers?
No tubers? Likely culprits: too little light (move to sunnier spot), overcrowding (thin sprouts to 1–2 per potato), or poor soil (amend with compost). Fix it: Bury pots deeper in soil for stability (roots love darkness!) and fertilize lightly with potato-specific feed.
Can I grow seed potatoes indoors?
Yes, but with caveats! You’ll need a sunny windowsill (6+ hours of light daily) or grow lights (12–16 hours). Pots near cold drafts (like AC vents) will struggle—keep temps 50–70°F. Alternative: Try microgreens or sprouts indoors; they’re faster and easier!
What’s the best potato variety for pots?
Stick to compact, early-maturing varieties like ‘Yukon Gold,’ ‘Red Pontiac,’ or ‘Fingerling’ potatoes—they thrive in small spaces. Avoid giant varieties (e.g., ‘Russet’) unless you’re using large containers (20+ gallons). Pro move: Buy certified seed potatoes (not grocery-store spuds) for disease-free starts!
Wrapping up and next steps
Growing seed potatoes in pots is a rewarding way to enjoy fresh, homegrown spuds—even in tiny spaces! With the right containers, quality seed potatoes, and a little patience, you’ll soon be harvesting crisp, flavorful potatoes for meals all season. Start small, experiment with varieties, and watch your green thumb grow!
Ready to take the next step? Try planting a few more pots with different potato types—like red or purple varieties—to expand your harvest and enjoy the fun of gardening year after year. 🌱✨