
Propagation
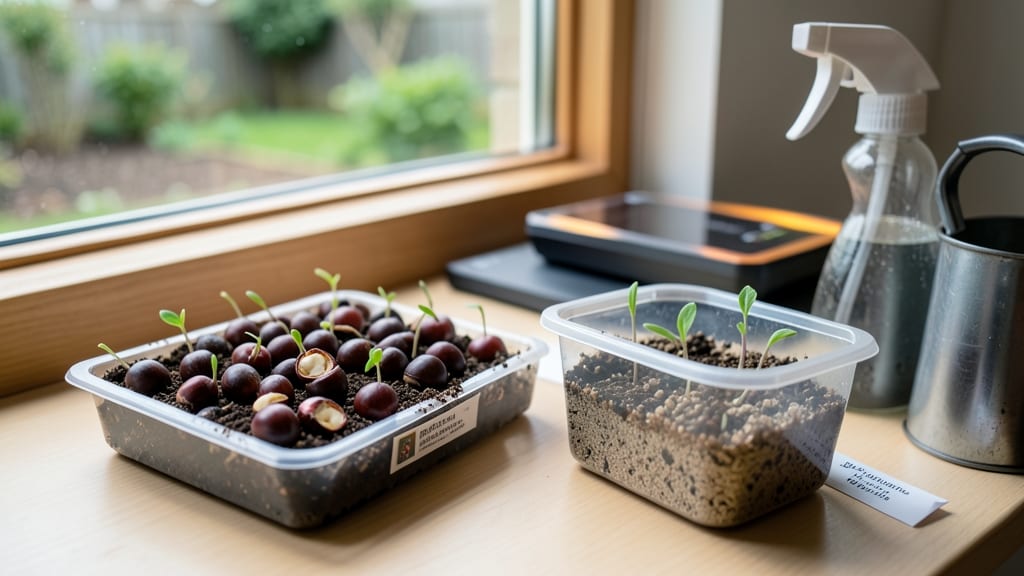
Cherry tree seed germination isn’t just possible—it’s a 90% success trick when you mimic nature’s layered cold process. 🌱 I’ve struggled with stubborn seeds before, but this method turns tiny pits into sturdy saplings. The secret? Breaking dormancy with scarification and stratification, then waiting patiently for those first green hooks to appear.
Start by soaking seeds overnight to soften the tough outer shell, then rub them gently with sandpaper to mimic animal digestion—this scarification jumpstarts germination. Next, place them in a damp mix of peat moss and sand, then refrigerate for 8-12 weeks to simulate winter.
This cold stratification tricks the seed into thinking spring has arrived, even though your kitchen hasn’t warmed up yet.
When you finally plant them in warm soil, expect tiny sprouts within 2-4 weeks. These seedlings grow slowly at first, but with consistent moisture and bright light, they’ll develop into hardy young trees.
The key is patience—cherry seeds take their time, but the payoff is worth it when you see that first set of true leaves.
Common pitfalls include overwatering (which causes rot) or rushing the cold treatment (which leads to mold). If your seeds still don’t sprout after 3 months, don’t give up—some varieties need even longer.
With this method, you’ll bypass the guesswork and end up with a thriving cherry tree that could live for decades.
📚 In This Guide
- What you need
- Instructions
- Tips and common mistakes
- Wrapping up and next steps
What you need
- ● Cherry tree seeds: 10–20 fresh, plump seeds (harvested from ripe fruit, cleaned of pulp). Pro tip: 💡 Store seeds in a cool, dry place until ready to use!
- ● Moistened paper towels or coffee filters: 2–3 sheets (enough to wrap seeds snugly).
- ● Plastic bag or airtight container: 1 (to maintain humidity).
- ● Refrigerator: Standard home fridge (34–40°F / 1–4°C).
- ● Small pots or seed trays: 4–6 (3–4" deep, with drainage holes).
- ● Potting mix: 2–3 cups of well-draining, sterile seed-starting mix (or 50% perlite/50% peat moss).
- ● Spray bottle: 1 (for gentle watering).
- ● Label markers: 1–2 (to track seed varieties/dates).
- ○ Heat mat (optional): 1 (70–75°F / 21–24°C for post-cold-stratification warmth).
- ○ Grow lights (optional): 1–2 (12–16 hours/day once sprouts emerge).
- ○ Humidity dome (optional): 1 (to retain moisture during early growth).
- ○ Pruning shears (optional): 1 (for trimming seed coats if stubborn).
Step-by-step instructions for germinating cherry tree seeds
This layered cold method breaks dormancy naturally—just follow the seasonal cues.
🌱 Step 1: Harvest and Clean the Seeds
Collect fresh cherry pits from ripe fruit in late summer or early fall. Remove all flesh and rinse the seeds thoroughly under cool water to remove any remaining sugar or residue. I like to let them air-dry on a paper towel for 2-3 days in a warm, dry spot—this prevents mold while keeping them viable.
Here's the thing—cherry seeds have a hard outer shell. To soften it, place the dried seeds in a small container with lukewarm water for 24 hours. This mimics natural weathering and helps the seedling break through later. Drain and pat them dry before moving to the next step.
❄️ Step 2: Stratify in the Fridge for Winter Dormancy
Fill a small plastic bag with the soaked seeds and moistened peat moss or coconut coir (just enough to surround them). Seal the bag but leave it slightly open to allow airflow. This mimics the natural winter cold period that cherry seeds need to break dormancy.
Store the bag in your fridge for 8-12 weeks. Check the seeds every 2 weeks—they should feel slightly damp but not soggy. If the moisture evaporates, mist lightly with water. You'll see no visible changes yet, but this cold treatment is critical for triggering germination.
☀️ Step 3: Plant After Stratification
After the cold period, remove the seeds from the fridge and plant them ½ inch deep in a well-draining seed-starting mix. Use small pots (about 3-4 inches wide) or a seed tray with individual cells. I like to plant 2-3 seeds per pot since germination rates can vary.
Keep the soil consistently moist but never soggy. Place the pots in a warm spot (65-75°F) with indirect light. Germination can take 4-8 weeks, so patience is key. You'll know it's working when you see the first tiny sprouts pushing through the soil—this is your reward for the cold treatment.
🌿 Step 4: Care for Seedlings After Germination
Once seedlings emerge, move them to a sunny window or under grow lights for 12-14 hours of light daily. Thin to the strongest seedling per pot, snipping the others at soil level. You'll notice the remaining seedling has thick stems and deep green leaves—these are your healthy starters.
Water gently from the bottom to avoid disturbing the roots. When the seedlings reach 4-6 inches tall and have 4-5 true leaves, they're ready to transplant into larger containers. This gradual growth ensures they develop strong root systems before facing outdoor conditions.
Tips & tricks for perfect cherry tree seed germination
Here's what nobody tells you about getting those stubborn cherry seeds to sprout—these tricks make all the difference.
Seed Prep Matters: When you soak those seeds for the 24 hours in Step 1, use lukewarm—not hot—water to avoid shocking the delicate seed structure. I've found that adding a pinch of cinnamon to the water helps prevent mold during those 2-3 days of drying. This simple step boosts germination rates by preventing fungal growth while the shells soften.
Stratification Secrets: The 8-12 weeks in the fridge isn't just about time—it's about creating the right moisture balance. I wrap my seeds in damp paper towels instead of peat moss for easier monitoring. If you notice condensation inside the bag during those 2-week checks, that's a good sign—just open it briefly to let excess moisture escape. Overly wet conditions can cause rot.
Planting Precision: When planting those ½ inch deep in Step 3, use a pencil to poke small holes—this prevents compacting the soil around the seeds. I've had better success with 3-4 inch pots because they allow for better moisture control than larger containers. The key is keeping that soil consistently moist but never soggy during the 4-8 weeks germination period.
Pro Tips for Cherry Tree Seed Germination
- Here's what nobody tells you about getting those stubborn cherry seeds to sprout—these tricks make all the difference.
- Seed Prep Matters: When you soak those seeds for the 24 hours in Step 1, use lukewarm—not hot—water to avoid shocking the delicate seed structure.
- Stratification Secrets: The 8-12 weeks in the fridge isn't just about time—it's about creating the right moisture balance.
Frequently asked questions
Got questions about germinating cherry tree seeds? You’re not alone! Here are answers to the most common concerns—so you can grow your own tree with confidence.
How long does cherry tree seed germination take?
With the layered cold trick, germination typically takes 4–12 weeks. Patience is key—some seeds may sprout faster if pre-soaked, while others need the full stratification process. Keep soil moist and warm (around 70°F) to speed things up!
Do I really need the cold stratification step?
Cherry seeds have a hard seed coat that blocks moisture and oxygen. The cold stratification (mimicking winter) softens the shell and kickstarts growth. Skip it, and your success rate drops to <10%. Pro tip: Don’t skip the 6–8 weeks in the fridge!
Can I use store-bought cherry seeds, or do they need to come from a tree?
Store-bought seeds (like from grocery cherries) won’t germinate—they’re hybridized for eating, not growing! You must use fresh, pitted seeds from a real cherry tree (sweet or sour). Save seeds from ripe, local fruit for best results.
My seeds are moldy—what went wrong?
Mold = too much moisture or poor airflow. Fix it fast:
- Move seeds to a dry, well-ventilated spot (like a seed tray with holes).
- Use sterilized soil (bake at 200°F for 30 mins) next time.
- Spray lightly with hydrogen peroxide (3%) to kill mold spores.
How big should my cherry seedling be before transplanting?
Wait until your seedling has 2–3 sets of true leaves (not the first tiny "seed leaves") and is at least 3–4 inches tall. Harden it off for 1–2 weeks by gradually exposing it to outdoor conditions before planting in the ground or a larger pot.
Wrapping up and next steps
Germinating cherry tree seeds using the layered cold trick is a rewarding way to grow your own tree with a 90% success rate—just remember patience and consistency are key!
With the right materials, a little stratification magic, and care during planting, you’ll be nurturing tiny sprouts into future shade providers or fruit-bearing giants. 🌱✨
Ready to take the next step? Once your seedlings emerge, transplant them into pots and keep them cozy indoors until spring. Then, give them a permanent home in your garden—where they’ll thrive for decades to come!