
Planting
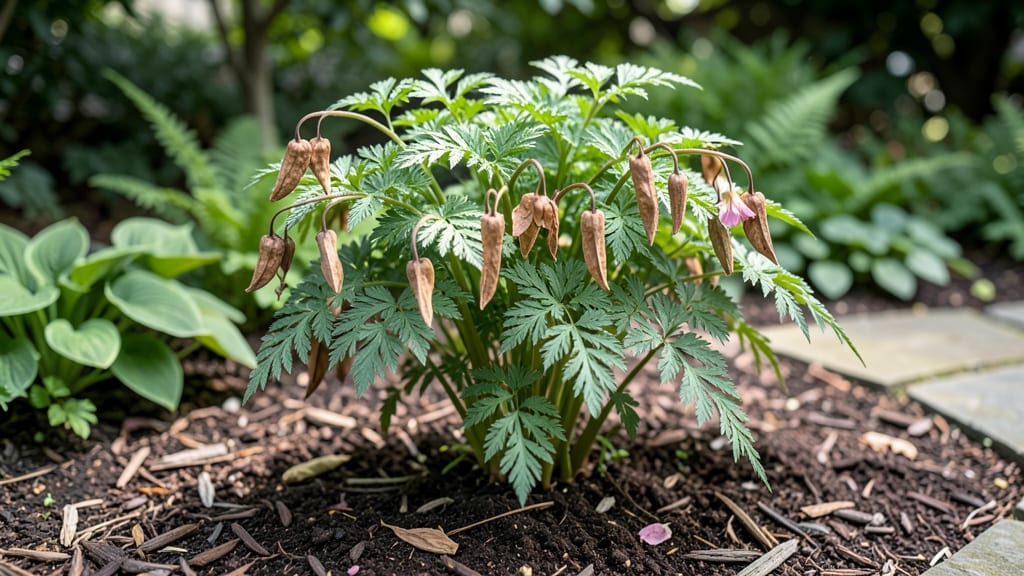
Harvesting bleeding heart plant seed pods in late summer unlocks next year’s dreamy pink blooms. 🌸 I’ve learned the hard way—waiting too long means the pods shatter and scatter seeds everywhere, while harvesting too early gives you immature seeds that won’t germinate.
The key is timing: collect pods when they’re brown and dry but just before they split open.
Once you’ve gathered them, drying is simple—just spread the pods in a single layer on a screen or paper towel in a warm, dry spot for 2-3 weeks. Avoid plastic bags (they trap moisture), and check weekly for mold.
After drying, crack open the pods to reveal tiny, wrinkled seeds—each one holds the potential for a new plant. Store them in an envelope labeled with the variety and date.
Here’s where patience pays off: bleeding heart seeds need cold stratification to break dormancy. Mix them with damp sand in a sealed bag, refrigerate for 3-4 months, then plant in spring.
Germination takes 4-6 weeks, and seedlings grow slowly at first—don’t rush them. The payoff? Plants that’ll bloom in 2-3 years, filling your shady garden with heart-shaped flowers.
Mistakes happen: overwatering dried pods or skipping stratification are common pitfalls. If seeds don’t sprout, try a second round of cold treatment. For faster results, consider layering seeds in moist peat moss in pots and refrigerating them over winter—this mimics natural conditions and often yields better germination rates.
📚 In This Guide
- What you need
- Instructions
- Tips and common mistakes
- Wrapping up and next steps
What you need
- ● Mature bleeding heart plant (Dicentra spectabilis) – Ensure it has fully ripened seed pods (usually late summer to fall).
- ● Sharp pruning shears or scissors – For cleanly snipping seed pods without damaging the plant.
- ● Paper bags or breathable mesh bags – 2–3 medium-sized bags (10x12 inches) to collect pods and allow airflow.
- ○ Newspaper or seed-starting trays – For drying pods (optional but helpful for organization).
- ● Plastic zip-top bags or small containers – For storing stratified seeds (quart-sized or larger).
- ● Moistened paper towels or sphagnum moss – To create a damp, cold-stratification environment.
- ● Refrigerator with a crisper drawer – Ideal for cold stratification (35–40°F / 2–4°C).
- ● Labeling tags or masking tape + marker – To label seed bags/containers with the date and plant variety.
- ● Fine-mesh sieve or colander – For gently separating seeds from dried pods (if needed).
- ● Humidity dome or plastic wrap – To maintain moisture during stratification (if not using a sealed bag).
- ● Planting tray with soil mix – For sowing seeds after stratification (if starting indoors early).
- ● Gloves – To protect hands from prickly pods or soil.
How to harvest, dry, and cold-stratify bleeding heart seed pods
Here's the method I swear by to turn this year's fading blooms into next spring's vibrant plants.
🌿 Step 1: Harvest Seed Pods at Peak Maturity
Wait until the seed pods turn a deep brown and begin splitting open naturally—this usually happens in late summer to early fall, about 8-10 weeks after flowering. Harvest them on a dry morning when they're fully mature but before they burst open and scatter seeds. I gently twist each pod from the stem, being careful not to damage the plant's remaining foliage.
You'll know they're ready when the pods feel dry and papery to the touch. If you harvest too early, the seeds won't be fully developed. Place the pods in a paper bag (not plastic) to prevent moisture buildup, and label them with the variety name and harvest date. Store the bag in a cool, dry place like a basement or garage until you're ready to process them.
💧 Step 2: Dry the Seed Pods Completely
Spread the harvested pods in a single layer on a clean, dry towel or paper towels in a well-ventilated area. Place them where they'll receive indirect sunlight—direct sun can overheat and crack the pods. Let them dry for 2-3 weeks, turning them occasionally to ensure even drying. You'll see the pods darken further and feel completely dry when you gently squeeze them.
This drying process is critical because any remaining moisture can cause mold or rot during cold stratification. I check daily during the first week, then every few days after that. If you notice any pods developing mold, remove them immediately and discard them to prevent contamination of the rest.
☀️ Step 3: Extract and Clean the Seeds
Once the pods are completely dry, open them carefully with your fingers or a small knife. You'll find 1-3 seeds per pod, each encased in a thin, papery coating. Remove the seeds and place them in a small bowl. Use a fine-mesh sieve or sieve to remove any chaff or debris, but be gentle—bleeding heart seeds are delicate and can break easily.
I like to count the seeds at this stage to track my yield. Store them in a small envelope or paper bag labeled with the variety and harvest date. Keep them in a cool, dry place until you're ready for cold stratification. The seeds will remain viable for 1-2 years if stored properly.
⏰ Step 4: Cold-Stratify for Germination Success
Bleeding heart seeds require cold stratification to break dormancy. Place the seeds in a ziplock bag with a damp paper towel—just enough moisture to keep the towel damp, not soaking wet. Seal the bag and place it in the refrigerator for 4-6 weeks. Check the towel weekly and mist it with water if it starts to dry out.
This cold treatment mimics winter conditions, signaling the seeds that it's time to germinate. After 4-6 weeks, remove the seeds from the refrigerator and plant them in moist potting mix in small containers. Keep the soil consistently moist but not soggy, and place the containers in a bright, indirect light location. Germination can take 4-8 weeks, so be patient.
🌱 Step 5: Plant Stratified Seeds for Spring Growth
Once the seeds have germinated, transplant them into individual pots filled with well-draining potting mix. Keep the soil moist and provide bright, indirect light until the seedlings are strong enough to handle. In early spring, after the last frost date, you can transplant them outdoors to a shady to partially shaded location in your garden.
Here's the thing—bleeding heart seedlings grow slowly at first, so don't rush them. They'll reward your patience with lush foliage and stunning heart-shaped blooms the following spring. I always mark the location of newly planted seedlings with a small stake to avoid disturbing them during the growing season.
Tips & tricks for perfect bleeding heart seed pod preservation
Here's what I learned the hard way after struggling with inconsistent germination—these details make all the difference.
Timing Secret in Step 1: The 8-10 week window after flowering is critical, but don't wait until the pods are completely dry on the plant. Harvest when they're just beginning to split—this ensures maximum seed viability while preventing premature seed dispersal. I've found that harvesting on a dry morning between 9-11am gives me the best results, as morning dew has evaporated but humidity hasn't peaked yet.
Drying Strategy for Step 2: The 2-3 week drying period might seem long, but rushing this step is where most people go wrong. I've seen pods develop mold within 48 hours if humidity isn't controlled properly. Place a small fan nearby to create gentle airflow—this speeds up drying without creating heat that could crack the pods. Also, use a humidity indicator card near your drying area; aim for 40-50% humidity to prevent moisture buildup.
Seed Handling Technique in Step 3: When extracting seeds, I've discovered that using a small butter knife instead of fingers gives me more control without damaging the delicate seeds. The key is to make a shallow cut along the pod's natural seams rather than forcing it open. After extraction, I store seeds in small glass vials rather than paper bags—they maintain better air circulation and prevent condensation buildup that could cause mold during storage.
Cold Stratification Precision in Step 4: The refrigerator's crisper drawer is actually better than the main compartment for cold stratification. It maintains more consistent 35-40°F temperatures that mimic natural winter conditions. I also place a small thermometer in the bag to monitor temperature—anything above 45°F can break dormancy prematurely. When checking moisture weekly, I use a spray bottle with room temperature water to avoid shocking the seeds with cold water.
Pro Tips for Bleeding Heart Plant Seed Pods
- Here's what I learned the hard way after struggling with inconsistent germination—these details make all the difference.
- Timing Secret in Step 1: The 8-10 week window after flowering is critical, but don't wait until the pods are completely dry on the plant.
- Drying Strategy for Step 2: The 2-3 week drying period might seem long, but rushing this step is where most people go wrong.
Frequently asked questions
Got questions about harvesting, drying, or storing bleeding heart plant seed pods? You’re not alone! Here are answers to the most common queries to help you succeed in growing these delicate beauties next season.
When is the best time to harvest bleeding heart seed pods?
Harvest seed pods when they turn light brown and begin to split open naturally—usually late summer to early fall (August–October, depending on your climate). Avoid harvesting too early (green pods) or too late (scattered seeds). Morning harvests prevent seeds from drying out in the sun.
How long does it take for bleeding heart seeds to dry?
Spread pods in a single layer on a mesh screen or paper towel in a warm, dry, and well-ventilated spot (60–70°F). Drying takes 2–4 weeks, depending on humidity. Seeds are ready when pods crumble easily and seeds rattle inside. Pro tip: Avoid direct sunlight to prevent overheating!
What’s the cold-stratification process for bleeding heart seeds?
Cold-stratification mimics winter conditions to break seed dormancy. Place dried seeds in a moist paper towel or sand inside a sealed bag, then refrigerate for 4–8 weeks at 34–40°F. Plant after stratification—no need to soak! Fun fact: Some gardeners skip stratification and plant immediately, but success rates improve with this step.
Can I save seeds from store-bought bleeding heart plants?
Yes, but results may vary! Store-bought plants are often hybrids (e.g., ‘David’ or ‘Gypsy Hill’), which may not reproduce true to type. For consistent blooms, choose open-pollinated varieties or ask local nurseries for seed sources. If you’re experimenting, label pods by parent plant to track traits!
What do I do if my seed pods mold or attract pests?
Mold or pests (like aphids) can ruin your harvest. To prevent issues:
- Harvest promptly when pods show signs of splitting.
- Store pods in a dry, cool place (not humid basements).
- Use diatomaceous earth or neem oil if pests appear.
- Discard any pods with dark spots or foul odors.
If mold strikes, try drying pods in a dehumidifier or fan-cooled area.
How do I know if my bleeding heart seeds are still viable?
Test viability by placing a few seeds in warm water for 24 hours. If they sink, they’re likely good! For a quick check, gently squeeze a dry pod—plump, firm seeds are viable, while shriveled ones are past their prime. Store seeds in a paper envelope in the fridge for up to 2 years.
Wrapping up and next steps
Growing bleeding heart plant seed pods into thriving new blooms is a rewarding journey—one that connects you to nature’s cycles and the joy of propagation.
By mastering the harvest, drying, and cold-stratification process, you’re not just preserving seeds; you’re nurturing the potential for next year’s hearts of beauty to grace your garden. 🌱
Ready to take the next step? Start by labeling your dried seed pods clearly and storing them in a cool, dry place until stratification. Once the timing is right, dive into the cold treatment—your future garden will thank you!