
Lawn
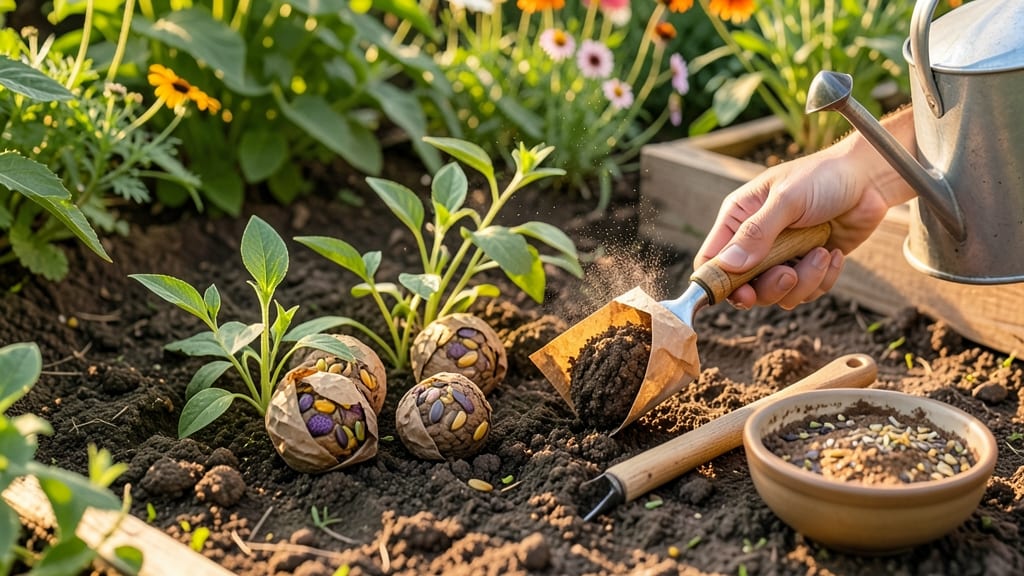
Turn bare patches into lush green surprises with paper seed bombs—these guerrilla gardening powerhouses sprout fast and transform neglected spaces. 🌱 I first tried them after seeing a cracked sidewalk explode with wildflowers overnight, and now I make them for every empty corner in my neighborhood.
The magic is in the mix: clay holds the soil and seeds together while biodegrading, letting nature take over with minimal effort. You’ll need just three simple ingredients: air-dry clay, potting soil, and wildflower or grass seeds—plus a bowl and water to bind it all.
Roll into ping-pong-sized balls, let them dry completely, and toss them where you want life to return. Perfect for sidewalks, medians, or even your own lawn’s thin spots. Within 7-14 days, you’ll see tiny green shoots pushing through concrete or soil, outcompeting weeds with their speed.
The results aren’t just pretty—they’re practical too, reducing erosion and inviting pollinators back into urban areas. Best part? These seed bombs are legal in most places (check local laws) and work year-round where frost allows. Start small—one patch at a time—and watch how quickly your community (or garden) transforms.
📚 In This Guide
- What you need
- Instructions
- Tips and common mistakes
- Wrapping up and next steps
What you need
- ● Native wildflower or grass seeds – Choose fast-growing varieties (e.g., clover, creeping thyme, or ryegrass). Aim for 1–2 tbsp per batch (adjust for larger projects).
- ● Compost or potting soil – ½ cup per batch. Opt for organic, nutrient-rich soil to boost germination.
- ● Water – Just enough to bind ingredients (about 1–2 tbsp). Avoid over-saturating!
- ● Newspaper or junk mail – 2–3 sheets (recycled paper works best). Tear into 1–2 inch strips.
- ● A spoon or small bowl for mixing.
- ● Plastic wrap or a damp cloth to keep seed bombs moist while drying.
- ● Gloves (if handling large quantities of soil/seeds).
- ● Labels or markers to note seed types (e.g., "Sunny Patch Mix").
How to make fast-germinating paper seed bombs
Here's the quick method I use to create seed bombs that sprout within days—not weeks.
🌱 Step 1: Mix the Base and Add Clay
Start by combining 1 cup of native soil (collected from your garden) with 1 cup of compost in a large bowl. This gives your seed bombs the nutrients they need to germinate fast. I add ½ cup of native clay next—this is the binding agent that holds everything together. The clay should be powdery; if it's lumpy, break it up with your fingers until smooth.
Moisten the mixture with ¼ cup of water and stir until it forms a thick, moldable paste. It should hold together when squeezed but not be sticky enough to drip. If it's too dry, add a few drops more water; if too wet, sprinkle in a pinch of dry clay. This is your foundation—get it right, and your seed bombs will stay intact until planting.
🌿 Step 2: Incorporate Seeds and Mulch
Now it's time to add the ¼ cup of native wildflower or clover seeds—these are the fast germinators that will transform bare spots into green in days. Sprinkle them into the bowl and stir gently to distribute evenly. I like to add 2 tablespoons of shredded coconut coir next; it helps retain moisture and acts as a natural mulch. Mix everything together with your hands until the seeds are fully coated.
Here's the thing—don't overmix. You want the seeds to stay visible on the surface so they can catch light and germinate quickly. If you bury them too deep in the mix, they'll struggle to break through. A quick once-over with your fingers is enough to ensure even distribution.
💧 Step 3: Shape and Dry the Seed Bombs
Using your hands, roll the mixture into 1-inch diameter balls—about the size of a golf ball. Press gently to ensure they hold their shape, but don't compact them too tightly. I place each seed bomb on a baking sheet lined with parchment paper to dry. This prevents them from sticking together and ensures even curing.
Let them dry for 24-48 hours in a warm, dry place—somewhere with good airflow but no direct sunlight. Direct sun can cause them to dry too quickly and crack. You'll know they're ready when they feel firm to the touch and no longer leave a damp print when pressed. Store them in a cool, dry place until you're ready to toss them into your lawn.
⏰ Step 4: Plant and Water for Fast Germination
The magic happens when you throw these seed bombs onto bare soil. I like to do this after a light rain or right before a forecasted downpour—this ensures the moisture triggers germination immediately. Press each seed bomb gently into the soil so it makes contact with the earth. You don't need to bury them; just tuck them into the surface.
Water the area lightly after planting to help the clay absorb moisture and break down. Within 3-7 days, you'll see tiny green sprouts pushing through the soil. The key to fast germination is keeping the area moist but not soggy. A light misting every 2-3 days is all it takes to encourage rapid growth. Avoid heavy watering, which can wash away the loose soil and expose the seeds.
☀️ Step 5: Maintain for Rapid Lawn Revival
Once the seedlings emerge, they'll need full sun (6+ hours daily) to thrive. If you're planting in shady spots, choose shade-tolerant seeds like creeping charlie or microclover instead. I find that thinning the seedlings after they reach 2 inches tall gives them more room to grow and prevents competition for nutrients.
Watch for weeds creeping in—this is where guerrilla gardening gets tricky. Pull them out as soon as they appear, or they'll outcompete your new seedlings. Within 4-6 weeks, your seed bombs will have transformed bare patches into lush, green ground cover. The best part? You've done it without tilling, chemicals, or heavy equipment—just a little patience and a handful of seed bombs.
Tips & tricks for perfect paper seed bombs
These guerrilla gardening secrets will help you create seed bombs that sprout faster and stay intact longer.
Clay Consistency is Key: For the ½ cup of native clay in Step 1, I recommend using a powdery, non-expanding clay like bentonite. If your clay is lumpy, break it down completely before mixing—any remaining clumps can create weak spots in your seed bombs that'll crumble when planted. Test the consistency by squeezing a small amount: it should hold together without sticking to your fingers. This ensures your seed bombs maintain their shape during the 24-48 hour drying process.
Seed Placement Strategy: In Step 2, when adding the ¼ cup of seeds, focus on distributing them evenly across the surface rather than mixing them deeply. I sprinkle seeds first, then fold the mixture just enough to coat them lightly—this creates a "seed blanket" that catches sunlight for faster germination. The coconut coir helps keep these surface seeds moist while preventing them from washing away during the 2-3 day misting routine.
Drying Conditions Matter: The 24-48 hour drying period is where most seed bombs fail. Place your baking sheet near a fan or in a breezy spot to ensure even airflow—this prevents one side from drying too quickly while the other stays damp. I've found that a dehumidifier-free area with temperatures between 65-75°F works best. If your kitchen is humid, extend drying to the full 48 hours or use a small fan to speed up the process without cracking the bombs.
Pro Tips for Paper Seed Bombs
- These guerrilla gardening secrets will help you create seed bombs that sprout faster and stay intact longer.
- Clay Consistency is Key: For the ½ cup of native clay in Step 1, I recommend using a powdery, non-expanding clay like bentonite.
- Seed Placement Strategy: In Step 2, when adding the ¼ cup of seeds, focus on distributing them evenly across the surface rather than mixing them deeply.
Frequently asked questions
Got questions about paper seed bombs?
You’re not alone! Here are answers to the most common ones to help you launch your guerrilla gardening project with confidence.
What’s the best time of year to plant seed bombs?
Seed bombs thrive in spring or early fall when temperatures are mild (50–75°F) and soil is moist. Avoid extreme heat or frost—they need consistent moisture to germinate. If planting in summer, do it in the early morning or late evening to reduce water loss.
How often should I water seed bombs after planting?
Keep the soil consistently damp (not soggy) for the first 2–3 weeks. Water daily if rain is scarce, focusing on the base of the bomb. Once sprouts appear, reduce to every other day. Overwatering can cause mold—let the top inch dry slightly between waterings.
What if birds or pests eat my seed bombs before they sprout?
Seed bombs are highly attractive to critters! To deter them:
- Plant in shady or hard-to-reach spots (e.g., under trees or near fences).
- Use wildflower or native seed mixes—birds are less likely to peck them.
- Apply a light mulch layer (straw or leaves) to hide them temporarily.
Can I make seed bombs without paper?
Swap paper for:
- Compost (mix with clay and seeds for a slower-release bomb).
- Coffee grounds (adds nutrients but dries faster—use with clay).
- Egg cartons (cut into squares, fill with seed-clay mix).
What do I do if my seed bombs don’t sprout?
Don’t panic! Try these fixes:
- Check moisture—dry soil is the #1 killer. Water deeply and mulch.
- Verify seed viability —test a few seeds in damp paper towels for 3–5 days.
- Adjust light exposure —some seeds (like clover) need sun; others (like ferns) prefer shade.
- Replant fresh bombs in a new spot—soil quality matters!
Wrapping up and next steps
Paper seed bombs are a game-changer for transforming barren patches into lush, vibrant greenery—fast! 🌱 Whether you're a seasoned guerrilla gardener or a curious beginner, these eco-friendly projectiles make it easy to breathe life into overlooked spaces.
The best part? You’re not just beautifying your lawn; you’re fostering biodiversity and sustainability, one seed at a time.
Ready to take action? Grab your supplies, follow the steps, and start planting seeds of change today. Share your blooming success with the community—your green thumb might inspire others to join the movement! 🌿✨