
Propagation
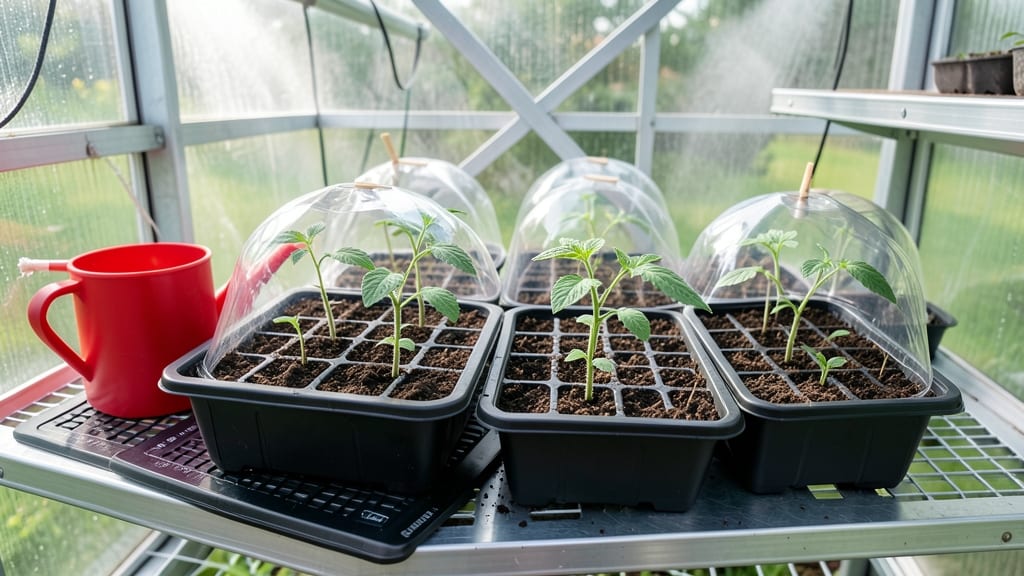
Growing from seed in a greenhouse turns winter into prime growing season. 🌱 I’ve watched trays of petunias and tomatoes burst into life in February—something impossible in my unheated garage.
The secret isn’t just the controlled environment, but how you prep seeds and manage that space like a tiny, climate-controlled ecosystem.
Start with seeds suited for early sowing—cool-season crops like lettuce or snap peas thrive at 60-65°F, while tomatoes need 70-75°F to germinate. A simple setup with a seedling heat mat, grow lights, and a humidity dome cuts germination time from weeks to days.
My first greenhouse year, I lost half my seedlings to mold—until I cracked the vents and swapped plastic domes for breathable fabric.
By transplanting at the right stage (when seedlings have 2-3 true leaves), you’ll avoid the shock of moving them to the garden later. The payoff? Four-month head starts on flowers and veggies, and the ability to grow heat-loving plants like peppers year-round.
No more waiting for spring—just steady, predictable growth under your control.
This method scales from a $20 plastic cloche to a full greenhouse, but the principles stay the same. Whether you’re growing for cut flowers, fresh herbs, or showy blooms, the key is balance: light, warmth, and airflow working together. Let’s get those seeds started right.
📚 In This Guide
- What you need
- Instructions
- Tips and common mistakes
- Wrapping up and next steps
What you need
- ● Greenhouse: A climate-controlled greenhouse (4’x6’ to 8’x12’ recommended for beginners). Ensure it has: Clear polycarbonate or glass panels for UV protection
- ● Ventilation system (roof vents + side louvers)
- ● Shade cloth (30-50% coverage for heat management)
- ● Growing Medium: Seed-starting mix (sterilized, peat-based or coconut coir blend)
- ● Potting soil (lightweight, well-draining mix for transplanting)
- ● Containers: Seed trays (with drainage holes, 72-cell or 200-cell packs)
- ● Grow pots (3-4” diameter for seedlings, 6”+ for mature plants)
- ● Seeds: Choose disease-resistant varieties suited for your climate zone.
- ● Watering Supplies: Mister or spray bottle (for gentle watering)
- ● Watering can with a fine rose (for larger pots)
- ● Lighting: LED grow lights (full-spectrum, 12-16 hours/day for seedlings).
- ● Thermometer/Hygrometer: Digital probe to monitor temperature (ideal: 65-75°F) and humidity (40-70%).
- ● Fertilizer: Balanced liquid fertilizer (5-10-5 or 10-10-10, diluted to half-strength).
- ● Heating mat (for cool climates, maintains 65-75°F for germination)
- ● Automatic ventilation system (for precise climate control)
- ● Drip irrigation kit (for hands-off watering)
- ● Reflective mulch or aluminum foil (to boost light for seedlings)
- ● Grow tent or propagation dome (to retain humidity)
Step-by-Step instructions for starting seeds in a greenhouse
Here's how I turn a greenhouse into a seed-starting powerhouse—consistent warmth, humidity, and light mean stronger plants from day one.
🌱 Step 1: Prep Trays and Seed Starting Mix
Fill clean seed trays with a sterile seed-starting mix (never garden soil—it's too dense and may carry diseases). I press the mix down lightly so it's firm but not compacted, then moisten it until it feels like a damp sponge—squeeze gently and it holds shape without dripping. This ensures even moisture without waterlogging.
Use the 4 trays you have, spacing them about 1 inch apart to allow airflow. I like to label each tray with the seed variety and planting date—after a few weeks, identical seedlings can look confusing. Place the trays on a flat, stable surface where they won't tip over when you water or check on them.
🌱 Step 2: Sow Seeds at the Right Depth and Spacing
Follow the seed packet's depth guidelines (usually 2-3 times the seed's diameter), but never deeper than ½ inch—deeper planting slows germination. I use a small spoon to make tiny holes and drop seeds in one at a time, spacing them ¼ inch apart in rows. This prevents overcrowding later.
Cover seeds lightly with the same mix, then mist the surface with a spray bottle until the soil looks evenly damp. Avoid heavy watering—it can wash seeds too deep or create muddy clumps. If you're sowing multiple varieties, keep a separate tray for each to avoid cross-contamination.
💧 Step 3: Maintain Ideal Humidity and Warmth
Cover the trays with a clear plastic dome or row cover to trap humidity—seeds need 70-80% humidity to germinate. Place a thermometer near the trays; most seeds germinate best at 70-75°F. If your greenhouse runs cooler, a seedling heat mat underneath will speed things up significantly.
Check the trays daily but only water when the soil surface feels dry to the touch. Overwatering now causes damping-off, a fungal disease that collapses seedlings overnight. Once you see 50% germination, remove the dome immediately—too much humidity after sprouting encourages mold.
☀️ Step 4: Provide Consistent Light
Seedlings need 12-16 hours of light daily to grow strong. If your greenhouse lacks natural light, supplement with a grow light positioned 2-4 inches above the plants. Raise it as seedlings grow to maintain that distance. Leggy seedlings (long, pale stems) mean they're stretching for light—this is a red flag to adjust immediately.
Rotate trays a quarter turn daily so plants grow straight toward the light source. You'll notice them leaning toward the window or grow light if you skip this. Strong seedlings have thick stems, dark green leaves, and compact spacing between nodes.
⏰ Step 5: Harden Off Before Transplanting
Two weeks before your last frost date, start hardening off seedlings by placing them outside in a shaded, sheltered spot for 1-2 hours the first day. Gradually increase outdoor time by 1 hour daily over 10-14 days, exposing them to more sun and wind each time. This toughens their cell walls and prevents transplant shock.
Watch for wilting or leaf scorch—these are signs you're moving too fast. Once seedlings tolerate a full day outside without stress, they're ready for the greenhouse's main growing area or the garden. Transplant on an overcast afternoon to reduce stress further.
Tips & tricks for perfect greenhouse seed starting
Transforming your greenhouse into a seed-starting haven takes more than just following steps—it's about creating the right environment where every tiny seed has the best chance to thrive. Here's what I've learned after years of trial and error to help you avoid common pitfalls and maximize success.
Seed Mix Texture Matters: In Step 1, when you're pressing down the seed-starting mix, aim for a consistency like a damp sponge—it should hold its shape when squeezed but not be so wet that it drips. I've found that adding a handful of perlite to the mix (about 10% by volume) improves drainage without sacrificing moisture retention. This prevents both waterlogging and drying out, which are the two biggest enemies of young seedlings.
Precision in Planting Depth: When following the seed packet's depth guidelines in Step 2, remember that "2-3 times the seed's diameter" is a general rule—but some seeds like lettuce need to be barely covered while others like beans can handle slightly deeper planting. For tiny seeds, I use a toothpick to make the planting hole and drop seeds one at a time. This precision prevents overcrowding and ensures each seedling gets enough nutrients as it grows.
Humidity Timing is Critical: In Step 3, the moment you see 50% germination, that's your cue to remove the plastic dome immediately. I've seen many gardeners leave it on too long, which creates the perfect conditions for mold to take over. Instead, I gradually lift the dome for increasing periods each day to acclimate seedlings to normal humidity levels. This gradual approach prevents shock while still maintaining enough moisture for root development.
Light Source Strategy: For Step 4, if you're using a grow light, position it just 2-3 inches above the seedlings initially. As they grow, raise it incrementally—about 1 inch per week—to maintain that distance. I've noticed that seedlings grow straighter when the light source moves with them. Also, consider using LED grow lights; they're energy-efficient and emit less heat, which prevents leggy growth that comes from excessive heat near the plants.
Pro Tips for Growing From Seed In A Greenhouse
- Transforming your greenhouse into a seed-starting haven takes more than just following steps—it's about creating the ...
- Seed Mix Texture Matters: In Step 1, when you're pressing down the seed-starting mix, aim for a consistency like a da...
- Precision in Planting Depth: When following the seed packet's depth guidelines in Step 2, remember that "2-3 times th...
Frequently asked questions
Got questions about maximizing your greenhouse seed-starting success? Here are answers to the most common queries—so you can grow confidently, season after season!
What’s the best time of year to start seeds in a greenhouse?
In a greenhouse, you can start seeds year-round! However, most gardeners begin in early spring (Feb–March) for warm-season crops (tomatoes, peppers) and late winter (Jan–Feb) for cool-season veggies (lettuce, spinach). Adjust timing based on your last frost date—use a heat mat for faster germination if needed.
Do I need to worry about temperature fluctuations in a greenhouse?
Yes! Greenhouses can overheat or cool too quickly. Use vents, shade cloth, and a thermometer to monitor temps. Ideal ranges:
- Seedlings: 65–75°F (day) / 55–65°F (night)
- Germination: 70–85°F (varies by plant)
Is a greenhouse more expensive than starting seeds indoors?
Upfront costs are higher, but greenhouses save money long-term. They extend growing seasons, reduce energy bills (with passive solar design), and let you grow more varieties than a windowsill. Start small with a low-cost poly tunnel or repurpose a shed—budget options exist!
How do I prevent pests and diseases in a greenhouse?
Greenhouses trap pests—stay proactive!
- Ventilation: Reduces humidity (fungus magnet).
- Beneficial insects: Ladybugs or lacewings eat aphids.
- Cleanliness: Remove debris and disinfect tools.
- Soil sterilization: Solarize soil or use pasteurized potting mix.
Can I grow everything from seed in a greenhouse, or are some plants better propagated differently?
Most annuals, vegetables, and herbs thrive from seed, but some plants (like orchids, avocados, or citrus) prefer grafting or air layering. For perennials (e.g., asparagus), divide roots instead. Check seed packets—slow germinators (like parsley) may need a stratification trick (cold treatment).
What’s the fastest way to troubleshoot stunted seedlings?
Check these first:
Issue
Fix
Leggy seedlings
Move closer to light (or add grow lights) and use a fan for strength.
Yellow leaves
Overwatering? Let soil dry slightly. Or check for nutrient deficiency (add diluted fish emulsion).
Moldy soil
Improve airflow and reduce moisture (use perlite in mix).
Wrapping up and next steps
Growing from seed in a greenhouse is a rewarding journey that unlocks year-round blooms and thriving plants with minimal guesswork. With the right climate-controlled setup, you’ll enjoy faster germination, healthier growth, and stunning results—no matter the season! 🌱✨
Ready to take the next step? Start small with a few easy-to-grow seeds, like basil or marigolds, and let your greenhouse confidence grow. Soon, you’ll be expanding your plant family with bold, vibrant greens and flowers—all thanks to your newfound greenhouse mastery!