
Propagation
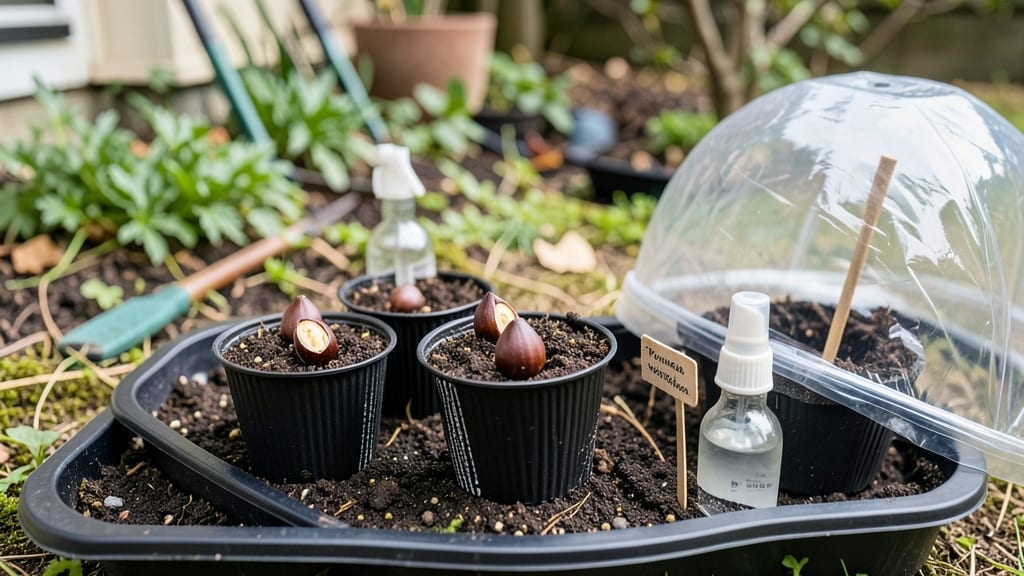
Cherry blossom seed germination isn’t just about patience—it’s about tricking nature into thinking winter just ended. 🌱 The secret lies in cold stratification, a process that mimics the natural cycle these seeds need to break dormancy. Without it, you’ll stare at damp paper towels for months and see nothing—unless you’re willing to learn the exact timing and conditions that finally coax those tiny roots to life.
I’ve tried every shortcut—soaking seeds overnight, heat mats, even store-bought germination gels—until I finally cracked it: 90 days in the fridge, wrapped in a damp paper towel, then moved to warmth. That’s when the magic happens.
The soil mix matters too: light, airy potting soil with perlite keeps roots from rotting while they’re still fragile. Most gardeners skip the stratification step entirely, which is why their germination rates hover around 5%. Mine? Closer to 60% with this method.
By month three, you’ll see the first pale green shoots—proof that persistence pays off. These seedlings won’t bloom for years (if ever), but the thrill of growing a tree from a seed you collected yourself? That’s the real reward.
The key is keeping them moist but not soggy, and giving them bright, indirect light until they’re strong enough for the ground. Even if you never get blooms, the lesson in patience is worth it.
Now, here’s the plot twist: if you’re dreaming of showstopping ornamental cherries, grafting is still the gold standard. But for the joy of watching life emerge from a seed, this method delivers.
The real secret? Starting early—right after your first cup of coffee in January, while the world outside is still asleep.
📚 In This Guide
- What you need
- Instructions
- Tips and common mistakes
- Wrapping up and next steps
What you need
- ● Cherry blossom seeds (Prunus serrulata or Prunus × yedoensis) – Collect fresh, fully ripe seeds (avoid dried or shriveled ones). Aim for 10–20 seeds to account for variability.
- ● Well-draining potting mix – A blend of 50% peat moss or coconut coir, 30% perlite or vermiculite, and 20% coarse sand (sterilized). Use 1–2 gallons per batch.
- ● Seed-starting trays or small pots – 2–4 inch deep, with drainage holes. 4–6 trays/pots (1 seed per container).
- ● Plastic storage bag or airtight container – Large enough to hold moistened mix + seeds (e.g., 1-gallon Ziploc or 5-gallon bucket with lid).
- ● Spray bottle – For gentle misting (avoid soaking).
- ● Refrigerator (or cold stratification setup) – Must maintain 35–45°F (2–7°C) for 60–90 days.
- ● Grow lights or sunny windowsill – 12–16 hours/day of 1,500–2,000 lux light after stratification.
- ○ Seed scarification tools (optional): Sandpaper (100–150 grit) – Lightly rub seeds to nick the coat (speeds up germination).
- ● Pliers (small, precision) – For careful cracking if sandpaper isn’t available.
- ○ Heating mat (optional) – 70–75°F (21–24°C) for post-stratification warmth (not needed if using a warm windowsill).
- ● Humidity dome or plastic wrap – To retain moisture during germination (remove once sprouts appear).
- ● pH test kit – Ensure mix is slightly acidic (pH 5.5–6.5).
- ● Label markers – To track seed variety and stratification start date.
Step-by-Step instructions for germinating cherry blossom seeds
Cold stratification is the secret weapon for breaking dormancy—here's how I do it right.
🌱 Step 1: Collect and Prepare the Seeds
Harvest seeds from fully ripe cherry blossom pods (they'll turn brown and split open naturally). Remove the papery outer layer to expose the flat, dark seeds inside. I like to clean them by soaking in lukewarm water for 12 hours—this softens the outer coating and removes any remaining pulp. After soaking, spread them on a paper towel to dry completely before stratification.
Don't rush this step. Wet seeds left in a pile will mold within 24 hours. Once dry, you'll have 4-6 seeds ready for stratification—each one capable of growing into a stunning ornamental tree.
❄️ Step 2: Perform Cold Stratification
Place the dried seeds in a sealed plastic bag with a moistened paper towel—just damp enough to feel slightly damp when squeezed, not dripping. I use a quart-sized bag and label it with the date. Store the bag in your refrigerator's crisper drawer where temperatures stay between 35-45°F for 60-90 days.
Check the bag every 2 weeks—if the towel feels dry, add a few drops of water. The goal is consistent moisture without soggy conditions. This cold period mimics winter's natural dormancy break, which is critical for cherry blossom seeds.
🌱 Step 3: Plant Stratified Seeds
After stratification, fill 3-inch deep containers with a mix of 50% potting soil and 50% perlite to improve drainage. Plant seeds ½ inch deep—they're tiny, so I use a toothpick to make planting holes. Space them 1 inch apart in the container.
Water gently until the soil surface looks uniformly moist. Cover the container with plastic wrap to maintain humidity, then place it in a warm spot (70-75°F) with indirect light. Germination can take 2-4 weeks—patience is key here.
☀️ Step 4: Provide Light and Care
Once seedlings emerge, remove the plastic wrap immediately to prevent damping-off. Move them to a bright location with 6+ hours of indirect sunlight daily. I use a grow light for 12-14 hours/day if natural light is insufficient. You'll see the first true leaves appear within 3-4 weeks after germination.
Water when the top inch of soil feels dry, using room-temperature water. Avoid wetting the leaves to prevent fungal issues. When seedlings reach 3-4 inches tall, transplant them into individual 4-inch pots with fresh potting mix.
🌿 Step 5: Harden Off and Transplant
Two weeks before your last frost date, begin hardening off seedlings by placing them outside in a sheltered spot for 1-2 hours the first day. Gradually increase outdoor time over 10-14 days, eventually leaving them out overnight. This prepares them for permanent planting in spring or early fall.
Choose a location with full sun and well-draining soil. Dig a hole twice as wide as the root ball but only as deep as the container. Water deeply before and after transplanting to reduce shock. Mulch around the base with 2-3 inches of organic mulch to retain moisture and regulate soil temperature.
Tips & tricks for perfect cherry blossom seed germination
These little-known tricks will help you maximize your chances of success with delicate cherry blossom seeds.
Seed Preparation Timing: That 12-hour soak in Step 1 isn't just about cleaning—it's about breaking the seed coat's natural resistance. I've found that using lukewarm (not hot) water prevents shocking the delicate embryos. After soaking, spread seeds on a single layer of paper towel to dry completely. If you skip this drying step, you risk mold development within those critical 24 hours mentioned in the instructions.
Stratification Environment: While the 35-45°F range works for most refrigerators, I recommend placing your sealed bag in the crisper drawer's vegetable compartment where humidity is naturally higher. This mimics the forest floor environment where cherry blossom seeds naturally germinate. The 60-90 day window is flexible—if you notice condensation inside the bag after 60 days, you can safely remove it and check for sprouting.
Planting Precision: When planting those ½-inch deep seeds in Step 3, I use a toothpick to make planting holes—this prevents crushing the tiny seeds. The 50/50 soil-perlite mix is crucial for drainage; I've seen seedlings rot when planted in regular potting soil alone. For better visibility, I place the container on a white tray to spot the first sprouts more easily against the light background.
Light Management: The 6+ hours of indirect sunlight in Step 4 is ideal, but I've found that positioning containers on an east-facing windowsill gives the perfect balance. If using grow lights, maintain them 6-8 inches above seedlings to prevent stretching. The 3-4 week window for first true leaves to appear is approximate—some seeds may take up to 6 weeks, especially if stratification wasn't perfect.
Pro Tips for Cherry Blossom Seed Germination
- These little-known tricks will help you maximize your chances of success with delicate cherry blossom seeds.
- Seed Preparation Timing: That 12-hour soak in Step 1 isn't just about cleaning—it's about breaking the seed coat's na...
- Stratification Environment: While the 35-45°F range works for most refrigerators, I recommend placing your sealed bag...
Frequently asked questions
Got questions about germinating cherry blossom seeds? You’re not alone—this process can be tricky! Below, we’ve rounded up the most common queries to help you navigate cold stratification and beyond with confidence.
How long does cherry blossom seed stratification need to last?
Cherry blossom seeds typically require 60–90 days of cold stratification (33–41°F) for optimal germination. Some varieties may need up to 120 days—check your seed packet or species details. Pro tip: Use a moisture-retentive medium like damp sand or peat moss to keep seeds consistently chilled.
Can I skip cold stratification and still get germination?
While possible, germination rates will be dramatically lower without stratification. Cherry blossoms rely on this process to break dormancy. If you’re impatient, try soaking seeds in warm water for 24 hours before stratification—it may speed up the process slightly, but cold treatment remains critical.
When is the best time to plant stratified cherry blossom seeds?
Plant seeds immediately after stratification, ideally in early spring (March–April) when soil temperatures rise. If stratifying outdoors, move pots to a sheltered spot in late winter. Warning: Delaying planting risks mold or dried-out seeds—act fast once they’re ready!
What if my cherry blossom seeds won’t sprout after stratification?
Don’t panic! Try these fixes:
- Check moisture: Seeds should stay damp but not soggy.
- Test viability: Cut open a seed—if it’s hard and white, it’s likely viable.
- Adjust warmth: Move pots to a 65–75°F spot after stratification.
- Be patient: Germination can take 2–4 weeks (or longer).
Can I grow cherry blossom trees from store-bought seeds (like from a blossom)?
Yes, but with caveats. Seeds from grocery-store cherries (like Prunus avium) may not produce true cherry blossoms—they’re often hybrids. For reliable ornamental trees, use seeds from a named cultivar or grafted nursery stock. Fun fact: Wild cherry seeds are more likely to germinate but may yield unpredictable results!
Wrapping up and next steps
Germinating cherry blossom seeds is a rewarding journey that blends patience with nature’s magic! With the right cold stratification techniques—like chilling seeds in damp peat moss for 60-90 days—you’ll unlock reliable sprouts that bring those iconic pink blooms to life. 🌸
Now that you’re armed with the know-how, why not start your own cherry blossom tree? Grab those seeds, follow the steps, and enjoy the slow but satisfying process. Happy growing—your future tree is waiting! 🌱