
Pests
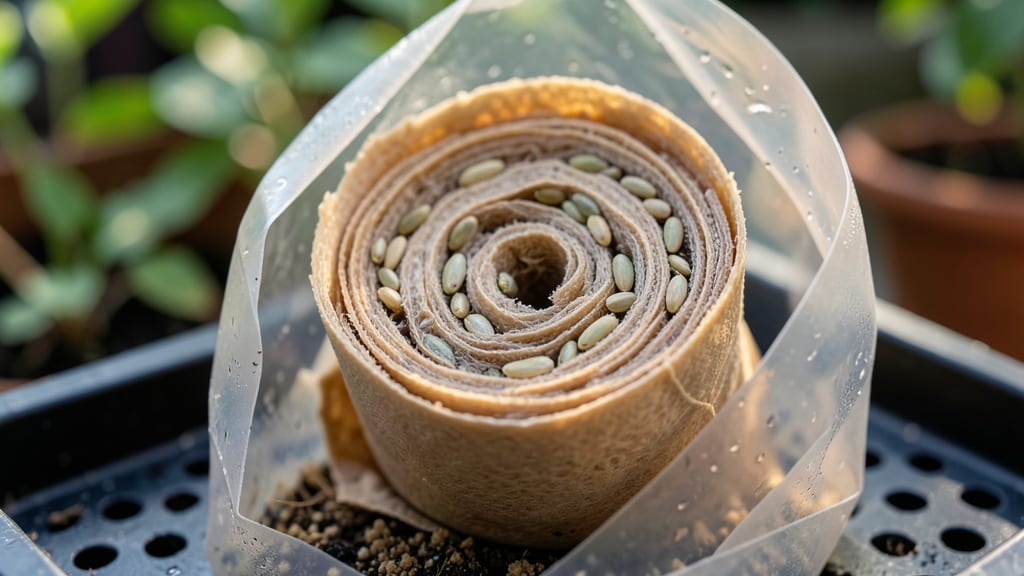
My snail roll seed starting method saved my first batch of tomato seedlings from damping-off last spring. 🌱 The secret lies in that simple rolled paper technique that keeps roots moist without drowning them—no fancy equipment, just a roll of paper towels and a plastic bag.
You’ll need just three supplies: seed-starting paper towels, a plastic bag with a twist tie, and your seeds. The process takes about 10 minutes to set up, and you’ll see roots emerge in 3-5 days—faster than traditional methods.
This method works especially well for tomatoes, peppers, and eggplants, which benefit from early root development.
What you end up with is a compact, organized seedling that’s ready to transplant without shock. The roots stay healthy, the soil stays moist, and you avoid the heartbreak of leggy or rotting seedlings. By the time you’re ready to move them outside, they’ll be stocky and ready to thrive.
Perfect for small spaces, busy gardeners, or anyone tired of losing seeds to mold. Here’s how to get started—and why this method might just become your new favorite way to begin the growing season.
📚 In This Guide
- What you need
- Instructions
- Tips and common mistakes
- Wrapping up and next steps
What you need
- ● Seeds: Choose fresh, high-quality seeds (e.g., tomatoes, peppers, or herbs). Aim for 10–20 seeds per roll, depending on size.
- ● Newspaper or seed-starting paper: 1–2 sheets (8.5" x 11" or larger). Avoid glossy paper—it repels moisture!
- ● Water: Room-temperature (not cold) to avoid shocking seeds. A spray bottle (8 oz) works best for gentle hydration.
- ● Plastic wrap or clear plastic bag: 1 sheet (larger than your newspaper) to create a humid microclimate.
- ● Scissors: Sharp pair for clean cuts—avoid tearing the paper!
- ● Pencil or pen: For labeling your rolls (e.g., seed type + date).
- ● Container or tray: Shallow and wide (e.g., baking sheet, seed tray, or even a repurposed takeout container) to hold your snail rolls.
- ○ Grow lights or sunny windowsill: Seeds need 6–8 hours of light daily. A LED grow light (optional but ideal for consistency).
- ● Seedling heat mat: Keeps soil warm (70–85°F) for faster germination.
- ● Humidity dome: A clear plastic clamshell to maintain moisture without plastic wrap.
- ● pH test kit: Ensures your water is neutral (6.0–7.0) for optimal seed health.
- ● Fertilizer (diluted): A balanced 10-10-10 or fish emulsion (1 tsp/gallon) for post-germination boosts.
- ● Twine or rubber bands: To secure rolls if they unravel during chitting.
How to master snail roll seed starting for stronger plants
This method transforms weak seedlings into sturdy, vibrant plants—here's how I do it every season.
🌱 Step 1: Select and Prepare Your Seedlings
Start with seedlings that are 2-3 inches tall and have 2-3 true leaves—they need enough energy to survive the process. Choose healthy, straight stems without signs of disease. I like to work with 4-6 seedlings at a time so I can focus on precision.
Gently remove each seedling from its pot, being careful not to damage the roots. Shake off excess soil to expose the root ball. If roots are tangled, tease them apart lightly with your fingers. This ensures they'll spread properly once wrapped.
💧 Step 2: Create the Moisture-Retaining Wrap
Soak a 4-inch strip of sphagnum moss in water until it's damp but not dripping. Wring out any excess water—you want it moist, not soggy. This moss will act as both a protective layer and a moisture reservoir for the roots.
Lay the seedling on a flat surface and wrap the moss strip around the stem from the base upward, overlapping the edges slightly. Leave the top 2 inches of the stem exposed—this prevents suffocation and allows new growth to emerge. Secure the wrap with a small rubber band or twist tie.
⏰ Step 3: Position for Optimal Growth Conditions
Place the wrapped seedlings in a humidity dome or clear plastic bag to maintain moisture while they root. Keep them in a location with indirect light—too much direct sun can overheat the moss and damage the stems. I use a seedling heat mat set to 65-70°F to encourage faster root development.
Check the moss daily and mist lightly if it feels dry to the touch. You'll see new root growth within 7-10 days, visible through the moss as tiny white tendrils. Once roots fill the moss completely, your seedlings are ready for transplanting.
🌿 Step 4: Transplant with Care
Gently unwind the moss from the stem and place the seedling in its new pot or garden bed. The moss will break down over time, releasing nutrients directly to the roots. Fill the container with moistened potting mix and water lightly to settle the soil around the roots.
Keep the transplanted seedlings in partial shade for the first 3-5 days to reduce stress. Gradually introduce them to full sun as they adjust. You'll notice stronger, more resilient plants compared to traditional seedlings—this method builds root systems that can handle transplant shock like pros.
☀️ Step 5: Monitor and Maintain
After transplanting, water deeply every 2-3 days, allowing the top 1-2 inches of soil to dry between waterings. Avoid overhead watering to prevent fungal issues. Watch for signs of stress like yellowing leaves—this usually means the roots need more time to establish.
Once your plants are fully established, you'll see thicker stems, darker leaves, and faster growth compared to unwrapped seedlings. This method is especially useful for delicate plants like geraniums, impatiens, and begonias, which often struggle with traditional transplanting.
Tips & tricks for snail roll seed starting
Here's what I've learned after perfecting this technique for delicate seedlings every growing season.
Seedling Selection Matters: In Step 1, focus on seedlings with straight stems and vibrant leaves—these are the ones that'll thrive through the wrapping process. I've found that seedlings with slightly thicker stems (around 1/8-inch diameter) handle the wrapping better than ultra-thin ones. If your seedlings are leggy, give them a few days under brighter light before wrapping to strengthen them.
Moss Preparation is Key: When soaking the 4-inch sphagnum moss in Step 2, don't skip the wringing step—excess water creates anaerobic conditions that can rot the roots. I like to roll the damp moss between paper towels to test consistency: it should feel like a well-wrung sponge, not a dripping washcloth. This moisture balance is what protects roots while allowing oxygen flow.
Temperature Consistency: The 65-70°F heat mat in Step 3 is non-negotiable for root development. If you don't have a heat mat, place your seedlings on top of your refrigerator (the coils create gentle warmth) or use a seedling heat cable. Just avoid placing them near vents or direct heat sources—consistent warmth is what triggers root growth, not extreme heat.
Transplant Timing Tip: In Step 4, wait until you see roots completely filling the moss wrap before transplanting. I check by gently tugging on the moss—if roots resist slightly, they're ready. Transplanting too early can shock the delicate new roots, while waiting too long may cause the moss to dry out or compact.
Pro Tips for Snail Roll Seed Starting
- Here's what I've learned after perfecting this technique for delicate seedlings every growing season.
- Seedling Selection Matters: In Step 1, focus on seedlings with straight stems and vibrant leaves—these are the ones t...
- Moss Preparation is Key: When soaking the 4-inch sphagnum moss in Step 2, don't skip the wringing step—excess water c...
Frequently asked questions
about snail roll seed starting—here’s what you need to know to troubleshoot and optimize your method!What’s the best time to start snail rolls for outdoor planting?
Timing depends on your climate and crops! For cool-season veggies (like lettuce or spinach), start snail rolls 4–6 weeks before the last frost. Warm-season plants (tomatoes, peppers) need rolls 6–8 weeks before transplanting. Check your frost dates and seed packets for specifics—patience pays off!
Why aren’t my seeds sprouting in the snail rolls?
Common culprits: moisture (too dry or soggy), temperature (too cold—aim for 60–75°F), or seed viability. Check humidity levels (aim for 80–90%) and ensure rolls aren’t moldy. If seeds are old, test viability by soaking a few in water—floaters are duds!
Can I reuse snail roll materials (like toilet paper or paper towels) for multiple batches?
Nope! Reused materials risk fungal growth or bacterial contamination from old seeds. Always use fresh, sterile rolls or towels. Pro tip: Keep a stash of unopened rolls handy to save time and hassle!
Are snail rolls better than other chitting methods (like peat pots or direct sowing)?
Snail rolls excel for small seeds (herbs, greens, flowers) and space efficiency. Peat pots are better for delicate roots (like tomatoes), while direct sowing works for hardy crops. Snail rolls are a low-cost, compact alternative—great for beginners or urban gardeners!
What if my snail rolls get moldy or develop pests?
Act fast! Mold: Increase airflow (unroll slightly) and reduce moisture. Pests (fungus gnats, mold): Spritz with neem oil or hydrogen peroxide (1:10 ratio). Prevent future issues by sterilizing tools and using sterile water—cleanliness is key!
Bonus Tip: Label your rolls with the seed type and date! A sharpie on a toothpick works perfectly—no more mystery sprouts.
Wrapping up and next steps
Mastering the snail roll seed-starting method is your ticket to stronger, healthier plants with fewer surprises!
By chitting seeds in a controlled, damp environment, you’re giving them the perfect head start—no more weak sprouts or wasted seeds. 🌱✨ Whether you’re a seasoned gardener or just starting out, this technique builds confidence and consistency in your blooms.
Ready to level up your garden game? Try this method with your next batch of seeds, then experiment with different varieties. Track your progress and share your wins—your future plants (and fellow gardeners!) will thank you.