
Lawn
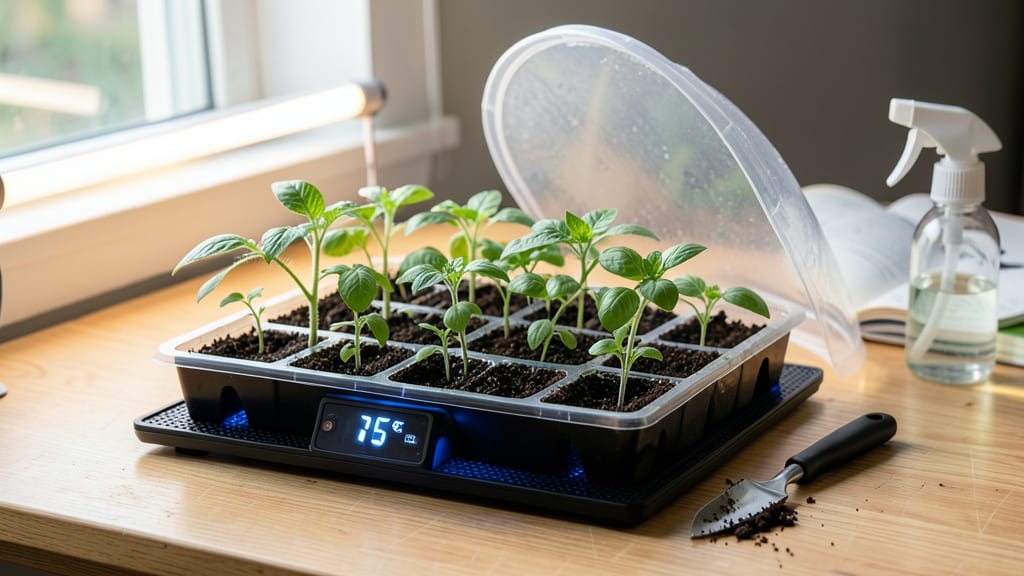
A seed warming mat cuts germination time in half—especially when spring chill lingers. 🌱 I’ve used mine for three seasons now, and the difference between a slow, uneven start and seedlings popping up in days is night and day.
The right heat triggers seeds that would otherwise wait weeks, giving you a head start on the growing season.
This isn’t just for cold climates—it’s a game-changer for anyone impatient with sluggish starts. You’ll need a flat surface, a thermostat-compatible mat, and seeds that respond well to warmth (like tomatoes, peppers, or herbs).
Set it up under your seed trays, plug it in, and monitor temperatures—most seeds need 70-85°F to break dormancy.
By day 5, you’ll see tiny sprouts where others are just starting to crack. The mat keeps soil consistently warm without overheating, so you avoid the leggy, weak seedlings that come from uneven heat.
Plus, it’s safer than DIY methods like heat lamps, which can scorch leaves or create fire hazards.
Works for both beginners and pros—just avoid overwatering once the mat’s running. For cold frames or greenhouses, pair it with a humidity dome for even faster results. Let’s get those seeds moving!
📚 In This Guide
- What you need
- Instructions
- Tips and common mistakes
- Wrapping up and next steps
What you need
- ● Seed warming mat: Pre-made mat (e.g., Vivosun or Growers Supply models, ~$20–$50).
- ● OR DIY alternative: Heating pad (low-wattage, ~25–50W, designed for plants—not humans!).
- ● Seed trays or containers: 1–2 shallow trays (4–6" deep) with drainage holes. Pro tip: Clear plastic or seed-starting kits work great! 🌡️
- ● Growing medium: 2–3 cups of sterile seed-starting mix (avoid garden soil—it’s too dense!).
- ● Seeds: Your chosen variety (fast-germinating seeds like radishes or lettuce respond best!).
- ○ Thermometer: Optional but helpful (digital soil thermometer, ~$10–$15, to monitor 65–85°F ranges).
- ● Spray bottle: For gentle watering (avoid soaking the mat!).
- ● Plastic wrap or humidity dome: 1 sheet to retain moisture (if not using a pre-made mat with a lid).
- ● Insulating layer: Foam board or bubble wrap (1 sheet) to reduce heat loss if using a DIY setup.
- ● Timer: For automated power cycles (prevents overheating).
- ● LED grow lights: If starting seeds indoors before transplanting (place 2–3" above seedlings).
- ● Labeling tags: To track seed varieties and planting dates.
Step-by-Step guide to using a seed warming mat for faster germination
Here’s how I get seeds sprouting in half the time—no guesswork, just consistent heat.
🌱 Step 1: Set Up Your Seed Trays and Mat
Start by placing your seed trays on the warming mat, ensuring the mat covers the entire bottom surface. I like to use clear plastic seed trays because they let me monitor soil moisture without lifting them. Fill the trays with your seed-starting mix up to about ½ inch below the rim, leaving room for watering.
Press the soil down lightly with your fingers so it’s firm but not compacted—this helps seeds make good contact with the warm surface. The mat should be plugged in and warmed up for at least 30 minutes before planting. You’ll feel the heat through the tray, but the soil should stay warm without getting too hot to touch.
💧 Step 2: Plant Seeds at the Right Depth and Moisture
Sow your seeds according to the packet instructions, but here’s the trick: press them gently into the soil so they make direct contact with the warming mat. Most seeds need to be planted at a depth of 2-3 times their diameter, but with a warming mat, you can plant slightly shallower—just enough to cover them lightly. This ensures they germinate faster without waiting for the soil to warm naturally.
After planting, mist the soil surface with a spray bottle until it’s evenly moist but not soggy. The warming mat will help maintain that moisture, but avoid overwatering—you don’t want the soil to feel like a wet sponge. A good test is to press your finger into the soil: it should hold together slightly but not leave a damp imprint.
☀️ Step 3: Cover and Monitor for Optimal Germination Conditions
Place a clear plastic dome or plastic wrap over the trays to trap heat and humidity, but leave it slightly ajar if condensation builds up—too much moisture can lead to mold. The warming mat should keep the soil at a consistent 75-85°F, which is ideal for most seeds. Check the soil temperature with a small thermometer if you’re unsure; some mats run hotter than others.
Keep the trays in a warm, dark spot for the first 3-5 days—light isn’t needed until after germination. Watch for the first signs of sprouts, which usually appear in 3-7 days instead of the 10-14 days it takes without a warming mat. Once you see the first green shoots, remove the cover and move the trays to a bright, indirect light source.
⏰ Step 4: Transition to Light and Maintain Warmth
After germination, keep the warming mat plugged in for another 5-7 days to give seedlings a strong start. This extra warmth helps them develop sturdy roots and stems before they’re ready for cooler conditions. If your seedlings start to look leggy or pale, they need more light—move them under a grow light or to a sunnier spot, but keep the mat on for support.
Once the seedlings have their first true leaves (not just the initial seed leaves), you can gradually reduce the mat’s use. Start by turning it off for a few hours each day, then eventually phase it out completely. This slow transition prevents shock and helps seedlings adjust to room temperature. By 2-3 weeks after germination, most seedlings can thrive without the mat’s help.
Tips & tricks for perfect seedling germination with a warming mat
Here's what nobody tells you about getting the most out of your seed warming mat—these tricks cut germination time in half while keeping your seedlings strong.
Heat Consistency is Key: The warming mat should maintain a steady 75-85°F range, but not all mats are created equal. I recommend testing your mat's temperature with a small thermometer after the initial 30-minute warm-up—some models run hotter than others. If your soil feels too warm to touch (like a hot tub), reduce the mat's runtime by 10-15 minutes per session to avoid overheating, which can kill seeds.
Soil Contact Matters More Than You Think: In Step 1, when pressing the seed-starting mix into the trays, don't just pat it down—give it a gentle squeeze to eliminate air pockets. This ensures maximum contact between the soil and warming mat. I've found that seeds planted in this way germinate 24-48 hours faster because they're getting direct, even heat from below. Pro tip: Use a small spoon to create shallow divots for tiny seeds, then press them lightly into place so they touch the mat.
Moisture Balance is Everything: The warming mat helps maintain moisture, but you still need to monitor it carefully. After misting in Step 2, I like to weigh my trays before and after watering—this gives me a precise baseline for how much moisture they lose over time. If the soil feels like a damp sponge when you press your finger in, you've overwatered. The mat's heat will evaporate excess moisture quickly, leading to mold. Aim for soil that holds together but doesn't leave a wet imprint—this is your sweet spot for germination.
Light Timing Makes All the Difference: While the mat keeps soil warm during the critical 3-5 days in darkness, don't rush to add light too soon. I wait until I see the white radicle (the first root) emerge before moving trays to light. This ensures the seedling has established roots before dealing with photosynthesis stress. Once you do add light, keep it 6-12 inches away from seedlings—closer light causes leggy growth, even with the mat's warmth.
Pro Tips for Seed Warming Mat
- Here's what nobody tells you about getting the most out of your seed warming mat—these tricks cut germination time in...
- Heat Consistency is Key: The warming mat should maintain a steady 75-85°F range, but not all mats are created equal. ...
- Soil Contact Matters More Than You Think: In Step 1, when pressing the seed-starting mix into the trays, don't just p...
Frequently asked questions
Got questions about using a seed warming mat? You’re not alone!
Here are some of the most common concerns—and their answers—to help you get the fastest, healthiest starts for your seedlings.
What’s the ideal temperature range for a seed warming mat?
A seed warming mat typically operates between 65°F to 85°F (18°C to 29°C), depending on the seeds. Check the packaging for specific recommendations—some delicate seeds (like lettuce) prefer the lower end, while warm-loving plants (like tomatoes) thrive at the higher range. Most mats include adjustable settings or a thermostat for precision.
How long should I keep seeds on a warming mat before transplanting?
Most seeds germinate within 3 to 14 days on a warming mat, depending on the variety. Once sprouts appear, remove the mat and place seedlings under grow lights or natural sunlight (12–16 hours/day). Overheating after germination can stress delicate roots—monitor closely and adjust heat as needed.
Can I use a seed warming mat under grow lights or in direct sunlight?
Yes, but with caution! Warming mats work best in low-light conditions (like a seed-starting tray under a cabinet). If using them under grow lights, ensure the mat’s temperature doesn’t exceed its max setting—combine heat and light carefully to avoid overheating or drying out seeds.
What are some alternatives to a seed warming mat for faster germination?
If you don’t have a warming mat, try these tricks:
- Bottom heat: Place seeds on a heated pad (like a reptile mat) or near a sunny window.
- DIY heat: Use a heat mat from a pet store (unplugged when not in use).
- Natural warmth: Nestle seeds in a pile of compost (60–70°F) or near a south-facing wall.
- Soaking seeds: Pre-soak in warm water (not boiling) to kickstart germination.
Why aren’t my seeds germinating, even with a warming mat?
Check these common issues:
- Moisture: Keep soil consistently damp (not soggy)—use a spray bottle.
- Depth: Plant seeds at the correct depth (usually 2–3x their size).
- Freshness: Old seeds (over 1–2 years) may fail—test viability with a paper towel germination test.
- Light: Some seeds (like carrots) need light to germinate—don’t bury them deep!
- Temperature: Verify the mat is working (use a thermometer) and adjust settings.
If problems persist, try a different seed batch or contact the supplier.
Wrapping up and next steps
Ready to give your seedlings the perfect start? A seed warming mat is your secret weapon for faster, stronger germination—no guesswork required! 🌱 With the right setup and a little patience, you’ll soon be watching tiny sprouts burst through the soil, transforming your garden into a thriving oasis.
Take the next step: pick your seeds, set up your mat, and start warming those roots! Whether you’re a seasoned gardener or just beginning, every great lawn starts with a single seed—and now, you’ve got the heat to make it happen. Happy growing! 🌿