
Lawn
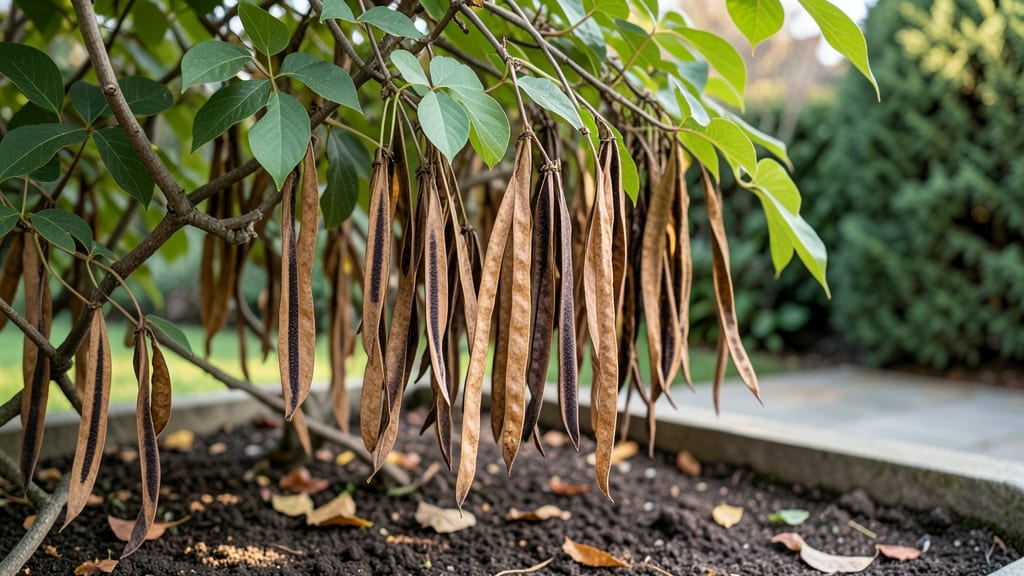
Harvesting wisteria seed pods at the right moment means future vines that could climb your arbor or trellis. 🌱 These woody pods take patience—maturing in late summer to fall—but timing is everything for successful germination.
I’ve learned that rushing or waiting too long can ruin your chances of growing new plants from seed. The first step is identifying mature pods: they turn brown, feel dry to the touch, and rattle when shaken.
Harvest them before they split open naturally, then dry them indoors for 2-3 weeks in a cool, dark place. This mimics nature’s way of preparing seeds for dormancy. After drying, cold stratification for 60-90 days mimics winter conditions, breaking seed dormancy.
Place pods in a sealed bag with slightly damp sand in your refrigerator. By spring, you’ll see tiny sprouts ready for planting—though be warned, wisteria seeds contain toxins, so handle them with gloves. This method works best for gardeners in zones 5-9, where winters are cold enough for natural stratification.
For faster results, try soaking seeds first, but expect slower growth compared to grafting. Here’s how to do it right!
📚 In This Guide
- What you need
- Instructions
- Tips and common mistakes
- Wrapping up and next steps
What you need
- ● Mature wisteria seed pods: Harvest only fully brown, dried pods (typically late summer to fall). Aim for at least 10-15 pods for reliable germination.
- ● Pruning shears or sharp scissors: For cleanly snipping pods from vines without damaging the plant.
- ● Paper bags or breathable mesh bags: 1-2 bags (8"x10" or larger) to store pods during drying.
- ● Newspaper or paper towels: For a drying surface—avoid plastic to prevent moisture buildup.
- ● Plastic zip-top bags: 1 per pod (quart-sized) for cold stratification.
- ● Moistened peat moss or coconut coir: 1 small container (e.g., a 5" pot) for stratification medium.
- ● Refrigerator or cold frame: Must maintain 34–40°F (1–4°C) for stratification.
- ● Permanent marker: To label bags with pod variety and date.
- ● Desiccant packets: Place 1-2 in drying bags to speed up moisture removal.
- ● Humidity tray: A shallow tray with water + pebbles to maintain humidity during drying.
- ● Seedling trays or pots: 2-3 small pots (3-4" diameter) with well-draining soil mix for sowing post-stratification.
- ○ Heat mat (optional for germination): To provide bottom warmth (70–75°F) if your space is cool.
- ● Gloves: Protect your hands—wisteria pods can be sticky!
Step-by-Step guide to harvesting, drying, and stratifying wisteria seed pods
Here's the foolproof method I use every fall to ensure high germination rates—no guesswork involved.
🌿 Step 1: Harvest Ripe Seed Pods at the Right Time
Wait until the seed pods turn a rich, deep brown and begin to split open naturally—this usually happens in late fall after the first frost. I check my wisteria vines weekly in October, tapping pods gently to see if seeds rattle inside. Harvest them before they fully open and scatter seeds on the ground.
Use clean, sharp pruning shears to cut entire pods from the vine, leaving a small stem attached. Place pods in a paper bag (not plastic) to allow airflow. The goal is to collect pods when they're 80-90% dry—overripe pods release seeds too early, while underripe ones won't germinate.
🌱 Step 2: Dry Pods Thoroughly Before Opening
Spread the harvested pods in a single layer on a screen or mesh tray in a dry, shaded area with good air circulation. I place mine on my garage floor where they get indirect sunlight and gentle breezes. Let them dry for 2-4 weeks, checking weekly for moisture.
Pods are ready when they feel light in your hand and make a hollow sound when tapped. If you find any moldy or soft pods, discard them immediately—this prevents rot during stratification. Store properly dried pods in a paper envelope labeled with the variety and harvest date.
❄️ Step 3: Perform Cold Stratification for 60-90 Days
Place the dried pods in a ziplock bag with a small amount of damp (not wet) sand—about 1 part seeds to 3 parts sand by volume. Seal the bag and refrigerate at 35-40°F for 60-90 days. This mimics winter conditions and breaks seed dormancy.
Check the bag monthly to ensure the sand stays slightly moist—never soggy. If condensation forms inside, open the bag for 10 minutes to air it out. After 90 days, remove the pods and plant them immediately in well-draining soil at a depth of ½ inch, spaced 6 inches apart in their final location.
💧 Step 4: Plant Stratified Seeds in Optimal Conditions
Choose a sunny, sheltered spot with full sun to partial shade—wisteria needs strong roots but benefits from afternoon shade in hot climates. Dig holes twice as wide as the seed pod but only ½ inch deep. Gently place one pod per hole and cover lightly with soil.
Water deeply right after planting to settle the soil, then maintain even moisture—not soggy, not bone-dry. Germination takes 4-8 weeks, so keep the soil consistently moist until you see first true leaves. Avoid fertilizing until seedlings are 3-4 inches tall—young wisteria roots are sensitive to salts.
Tips & tricks for perfect wisteria seed pod stratification
These little details make all the difference between waiting years for germination and seeing those first wisteria shoots in weeks.
Harvesting Precision: The 80-90% dryness check in Step 1 is non-negotiable. I learned this the hard way—overripe pods release seeds prematurely, while underripe ones won't break dormancy. Tap pods gently with your fingernail: if they feel hollow and make a crisp sound, they're ready. Confession: I skipped this check once and ended up with moldy pods that ruined my whole batch.
Drying Environment: That 2-4 week drying period in Step 2 works best with consistent airflow. I use a mesh screen over my garage floor because it gives gentle breezes without direct sunlight that could overheat the pods. If your garage gets too humid, move to a covered porch or basement with a small fan circulating air. The goal is to dry them evenly—uneven drying leads to uneven germination.
Stratification Sand Mix: The 1 part seeds to 3 parts sand ratio in Step 3 is perfect for moisture control. I use coarse sand from my garden (sterilized by baking at 200°F for 30 minutes) because it drains better than fine sand. Pack the mix gently but firmly in the bag—too loose and it won't maintain consistent moisture; too packed and roots won't have room to develop during stratification.
Planting Depth: That ½ inch planting depth in Step 4 might seem shallow, but wisteria seeds need light to germinate. I make tiny mounds of soil first, place the pod on top, then cover lightly—this ensures they get just enough soil coverage while still allowing sunlight penetration. Too deep and they'll rot; too shallow and they dry out before sprouting.
Pro Tips for Seed Pods Wisteria
- These little details make all the difference between waiting years for germination and seeing those first wisteria sh...
- Harvesting Precision: The 80-90% dryness check in Step 1 is non-negotiable. I learned this the hard way—overripe pods...
- Drying Environment: That 2-4 week drying period in Step 2 works best with consistent airflow. I use a mesh screen ove...
Frequently asked questions
Got questions about wisteria seed pods? You’re not alone! Here are some common queries—and their answers—to help you navigate harvesting, drying, and cold stratification like a pro.
When is the best time to harvest wisteria seed pods?
The ideal time to harvest wisteria seed pods is in late fall (October–November) after they’ve turned brown and dried on the vine. Wait until they’re crispy to the touch but haven’t yet split open—this ensures the seeds inside are mature and ready for stratification. Pro tip: Harvest on a dry day to prevent mold!
How do I know if my wisteria seed pods are ready for drying?
Ready-to-dry pods should feel lightweight and papery, with seeds rattling inside when shaken. If they’re still green or soft, give them another 1–2 weeks on the vine. Once harvested, spread them in a single layer in a warm, dry, and well-ventilated spot (like a mesh bag or tray) for 2–4 weeks. Avoid direct sunlight to prevent cracking.
Can I skip cold stratification and still grow wisteria?
Cold stratification is critical for breaking wisteria seeds’ dormancy—skipping it will likely result in poor or no germination. However, if you’re in a mild-winter climate, you can try sowing seeds directly in fall and letting nature handle the stratification. For most growers, though, a 60–90 day cold period (34–41°F) in the fridge mimics winter conditions perfectly.
Why aren’t my wisteria seeds germinating after stratification?
Several factors could be at play: old seeds (wisteria seeds lose viability quickly—use them within 1–2 years), improper stratification (moisture is key—keep pods slightly damp but not soggy), or poor soil conditions. Try soaking seeds in lukewarm water for 24 hours before sowing, or test germination by placing a few seeds in a damp paper towel. If still no luck, source fresh seeds from a reputable nursery.
How long does cold stratification take for wisteria seed pods?
Wisteria seeds typically need 60–90 days of cold stratification to simulate winter. Place your dried pods in a sealed container with slightly moist peat moss or vermiculite, then refrigerate. Check them monthly—remove any that show mold or rot. After stratification, sow seeds 1/4 inch deep in well-draining soil and keep them consistently moist until germination (which can take 2–4 weeks).
What’s the best way to store wisteria seed pods long-term?
For storage, keep pods in a cool (35–40°F), dry place (like a sealed container with silica gel packets) until ready to stratify. Avoid plastic bags—moisture is the enemy of seed viability. Label your containers with the harvest date to track freshness. Most wisteria seeds remain viable for 1–2 years if stored properly.
Wrapping up and next steps
Harvesting, drying, and cold-stratifying wisteria seed pods might seem like a delicate dance, but with patience and the right techniques, you’ll unlock the potential to grow these stunning vines from scratch! 🌱 Whether you’re a seasoned gardener or a curious beginner, each step—from timing your harvest to monitoring moisture levels—plays a crucial role in success.
Now that you’re armed with the know-how, why not roll up your sleeves and give it a try? Start small, experiment with a few pods, and soon you’ll be rewarded with lush, fragrant wisteria blooms that’ll make your garden the envy of the neighborhood.
Next steps:
- Mark your calendar for next year’s harvest season (late summer/early fall).
- Grab a few extra seed pods to test different drying methods.
- Share your progress with fellow gardeners—inspiration spreads like wildflowers! 🌸