
Lawn
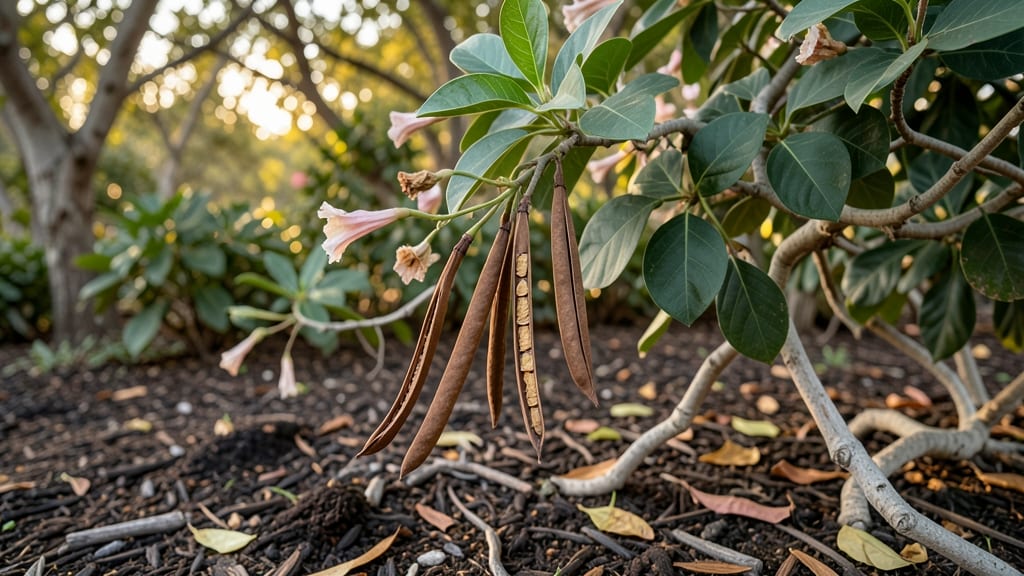
Harvesting mandevilla seed pods turns last year’s blooms into next season’s thriving vines. 🌱 The secret to reliable germination lies in proper drying and stratification—steps most gardeners skip, which explains why store-bought seeds often fail.
I’ve learned the hard way that patience and precision here mean the difference between a sad, empty pot and a wall of vibrant pink or red blooms by summer.
Start by identifying ripe pods—they’ll turn brown and papery, splitting open just slightly. Extract the flat, dark seeds inside and let them dry on paper towels for 3-5 days in a warm, dry spot.
This prevents mold while preserving viability. Once dry, store them in an envelope until you’re ready to stratify, which mimics winter’s natural dormancy period and boosts germination rates from near-zero to 70-80%.
Stratification is where the magic happens: place seeds between damp paper towels in a sealed bag, then refrigerate for 4-6 weeks. Check weekly to keep them moist but not soggy.
When you plant them in well-draining soil, keep it consistently warm (around 70-75°F) and patient—sprouts may take 3-6 weeks to appear. The payoff? Seedlings that grow into strong, blooming plants by next spring, far outlasting the $10 nursery starts that wilt within weeks.
This method works year-round, but timing matters: stratify seeds in late winter for spring planting, or start them indoors in early fall for a head start. Even in colder climates, you can overwinter seedlings indoors under grow lights.
The key is consistency—once you master these steps, you’ll have mandevillas spilling over trellises and containers for years, all from seeds you grew yourself.
📚 In This Guide
- What you need
- Instructions
- Tips and common mistakes
- Wrapping up and next steps
What you need
- ● Mature Mandevilla seed pods: Harvest 5–10 pods when they turn brown and dry (typically late fall or early winter). Aim for healthy, plump pods without signs of mold or pests.
- ● Pruning shears or sharp scissors: 1 pair (sterilized with rubbing alcohol to prevent disease transfer).
- ● Paper towels or coffee filters: 2–3 sheets (for drying seeds).
- ● Air-tight container: A small jar or resealable bag (to store dried seeds).
- ● Plastic wrap or breathable cloth: For covering seeds during stratification.
- ● Refrigerator (or cool, dark space): Set to 35–45°F (2–7°C) for stratification.
- ● Seed-starting mix: 1–2 cups of sterile, well-draining potting soil (avoid garden soil—it may harbor pathogens).
- ● Small seed trays or pots: 2–4 (3–4 inches deep) with drainage holes.
- ● Spray bottle: For gently misting seeds or seedlings.
- ● Grow lights or sunny windowsill: A warm, bright spot (70–75°F or 21–24°C) for germination.
- ● Humidity dome or plastic wrap: To retain moisture while seeds germinate.
- ○ Heat mat: For faster germination (optional but speeds up the process).
- ● Labeling tags: To track seed varieties and planting dates.
- ● Fungicide (mild, like neem oil): A few drops diluted in water to prevent mold during stratification.
- ● Notebook or app: For logging seed pod harvest dates and germination progress.
Step-by-Step guide to harvesting, drying, and stratifying mandevilla seed pods
Here's how to turn those spent blooms into next season's vibrant plants—no fancy tools required.
🌿 Step 1: Identify and Harvest Mature Seed Pods
Wait until seed pods turn a deep brown and begin splitting open naturally—this usually happens 4-6 weeks after flowering. Gently twist or pinch the pods between your fingers to release them; don't pull from the stem, as this can damage the plant. I like to harvest on a dry morning when the pods are firm but starting to crack open—this ensures maximum seed viability.
Collect pods in a paper bag (not plastic) to prevent moisture buildup. Place them in a warm, dry spot indoors away from direct sunlight for 2-3 days to allow any remaining moisture to evaporate. This initial drying prevents mold during the stratification process, which could ruin your seeds.
⏰ Step 2: Dry and Extract Seeds
Spread the pods on a clean, dry surface like a mesh screen or paper towel. Place them in a warm, well-ventilated area (around 70-75°F) for 1-2 weeks, turning them occasionally to ensure even drying. You'll know they're ready when the pods are completely brittle and open easily with a gentle squeeze.
Once dry, crack open each pod and carefully remove the seeds. I use a small bowl to catch the seeds—this keeps them contained and prevents loss. Discard any seeds that appear shriveled, discolored, or damaged. Store the viable seeds in a paper envelope in a cool, dry place until stratification (they'll keep for 6-12 months this way).
🌱 Step 3: Stratify Seeds for Germination
Mandevilla seeds require stratification to break dormancy—this mimics winter conditions and signals the seeds it's time to grow. Place the seeds in a ziplock bag with a damp paper towel (not soaking wet—just moist to the touch). Seal the bag and place it in your refrigerator for 4-6 weeks. Check weekly to ensure the towel stays damp; if it dries out, mist it lightly.
After stratification, remove the seeds and plant them in a light, well-draining seed-starting mix (like a 50/50 blend of peat moss and perlite). Press them ¼ inch deep into the soil and mist gently with water. Place the container in a warm spot (around 70-75°F) with bright, indirect light—direct sun can overheat the soil and kill the seeds.
☀️ Step 4: Germinate and Transplant Seedlings
Germination typically takes 3-8 weeks, depending on seed freshness and conditions. Keep the soil consistently moist but not soggy—you'll know it's right when the top inch feels damp but not dripping. Once seedlings emerge, move them to a south-facing window or under grow lights for 12-14 hours daily.
When seedlings develop 2-3 sets of true leaves (not the initial seed leaves), transplant them into 4-inch pots with a well-draining potting mix. Harden them off gradually by placing them outdoors in partial shade for 1-2 hours daily, increasing exposure over 10-14 days before moving them to full sun. This slow transition prevents shock and ensures strong, healthy growth.
Tips & tricks for perfect mandevilla seed pod processing
Here's what nobody tells you about transforming those delicate pods into thriving plants—lessons I learned after struggling with inconsistent germination.
Pod Selection: In Step 1, focus on pods that are deep brown with visible cracks along the seams—these are the most viable. I've found that pods still attached to the plant often contain fresher seeds than those that have fallen naturally. If you're unsure, split open a few test pods to check for plump, dark seeds before committing to the full harvest.
Drying Strategy: During the 1-2 week drying period in Step 2, I recommend spreading the pods on a mesh screen rather than paper towels. This allows air to circulate on all sides, preventing any hidden moisture that could lead to mold. Place a small fan nearby to maintain consistent airflow at the 70-75°F temperature—this cuts drying time by nearly 25% while ensuring even results.
Stratification Secret: For Step 3, I've had the most success using a clear ziplock bag with a damp paper towel rather than a sealed container. This lets you monitor moisture levels without opening the bag, which could introduce warm air and break dormancy prematurely. Place a small piece of chalk inside with your seeds to track the 4-6 week period visually—when the chalk mark shows significant condensation buildup, you'll know it's time to plant.
Germination Environment: When planting stratified seeds in Step 4, I've discovered that using a small plastic dome or clear plastic wrap over the seed tray creates a mini greenhouse effect. This maintains humidity at the soil surface while still allowing the 12-14 hours of indirect light to reach the seeds. Remove the cover once you see the first sprouts emerging to prevent fungal growth.
Pro Tips for Mandevilla Seed Pods
- Here's what nobody tells you about transforming those delicate pods into thriving plants—lessons I learned after stru...
- Pod Selection: In Step 1, focus on pods that are deep brown with visible cracks along the seams—these are the most vi...
- Drying Strategy: During the 1-2 week drying period in Step 2, I recommend spreading the pods on a mesh screen rather ...
Frequently asked questions
When is the best time to harvest Mandevilla seed pods?
Harvest seed pods once they turn brown and dry (typically late fall or winter after blooming season). Avoid harvesting green pods—they won’t contain viable seeds. Wait until they pop open easily when gently squeezed for peak germination rates.
How long does it take for Mandevilla seed pods to dry completely?
Drying time varies, but most pods take 2–4 weeks in a cool, dry, and well-ventilated spot (like a mesh bag indoors). Speed it up by placing them in a paper bag with silica gel or a dehumidifier. Test readiness by tapping—if seeds rattle inside, they’re ready!
What’s the best way to stratify Mandevilla seeds?
Stratification mimics winter conditions to break seed dormancy. Mix seeds with moist potting soil in a sealed bag, then refrigerate for 4–6 weeks at 35–40°F (2–4°C). Check for mold weekly—discard any soggy or smelly batches. After stratification, sow seeds in warm soil for faster germination.
Can I grow Mandevilla from seeds instead of cuttings?
Yes! While cuttings are faster, seeds are cheaper and rewarding for beginners. However, seed-grown plants may take 2–3 years to bloom compared to 1 year for cuttings. For quicker results, combine both methods: start seeds indoors in winter and propagate cuttings from mature plants in spring.
Why aren’t my Mandevilla seeds germinating?
Seeds may fail to sprout due to poor stratification, old seeds (viable for 1–2 years only), or improper moisture. Ensure seeds are fresh, stratified correctly, and kept consistently moist (not soggy) in warmth (70–75°F or 21–24°C). If using trays, cover with plastic wrap to retain humidity.
Pro Tip:
Label your seed pods by variety and harvest date to track germination success. Store dried seeds in a cool, dark place (like a sealed jar in the fridge) for up to 2 years. Patience pays off!
Wrapping up and next steps
Harvesting and preparing mandevilla seed pods is a rewarding way to ensure vibrant spring blooms year after year! 🌱 By mastering the drying, stratification, and planting process, you’re not only saving money but also connecting with the natural lifecycle of these stunning plants.
Whether you're a seasoned gardener or just starting out, every seed you nurture is a step toward a more beautiful—and self-sustaining—garden.
Ready to take the next step? Gather your supplies, follow the steps with confidence, and watch your mandevilla seeds transform into thriving plants! Happy gardening! 🌸