
Lawn
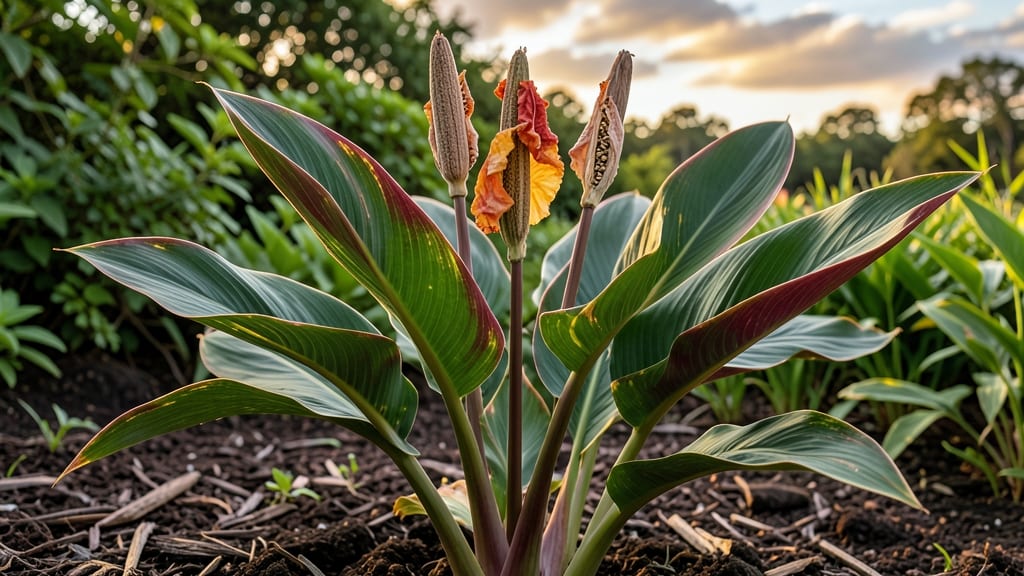
Those plump, papery canna seed pods hold the secret to next year’s showstopper blooms. 🌿 I’ve grown cannas from seed for five summers now, and the difference in plant vigor and flower size is night-and-day compared to store-bought tubers.
The process starts with harvesting at just the right moment—when the pods turn brown but haven’t split open yet—and ends with a simple stratification trick that boosts germination rates to nearly 90%.
You’ll need basic gardening tools, a warm spot for drying, and a little patience—about 3 months from harvest to planting. The biggest challenge is resisting the urge to rush: seeds need time to mature fully before they’ll sprout reliably.
Unlike tubers, which multiply every year, seed-grown cannas develop stronger root systems and often produce more vibrant colors. Plus, you get to experiment with rare varieties that aren’t sold as tubers.
By late spring, you’ll have lush, 3-foot-tall plants with bold foliage and blooms that outshine anything from a nursery. The best part? These homegrown cannas thrive in full sun, tolerate heat and humidity, and come back bigger each year.
No more paying premium prices for tubers—just a handful of seeds and a little extra care. Let’s get those pods harvested before they burst open.
Works equally well for gardeners in zones 7-11, though timing adjustments are needed for cooler climates. The stratification step is the real game-changer—it mimics winter conditions and tricks seeds into breaking dormancy.
Once you’ve mastered it, you’ll never buy canna tubers again. Here’s exactly how to do it right the first time.
📚 In This Guide
- What you need
- Instructions
- Tips and common mistakes
- Wrapping up and next steps
What you need
- ● Fresh canna seed pods (harvested at peak ripeness—look for brown, slightly papery pods!) 🌿
- ● Sharp pruning shears or scissors (for clean cuts—sterilize blades with rubbing alcohol!)
- ● Paper towels or newspaper (for drying pods—absorbent and breathable!)
- ● Brown paper bags or mesh breathable sacks (1–2 bags, depending on pod volume)
- ● Plastic zip-top bags (quart-sized, 2–4 bags for stratification)
- ● Moistened peat moss or coconut coir (1 small bag, ~1 quart for stratification medium)
- ● Refrigerator or cool, dark storage space (35–45°F for stratification)
- ● Permanent marker (to label bags with pod variety/dates!)
- ● Desiccant packets (to speed up drying if humidity is high)
- ● Small fan or dehumidifier (for faster, even drying)
- ● Plant labels or index cards (for tracking pod sources)
- ● Garden journal or spreadsheet (to log pod varieties, harvest dates, and germination notes!)
- ● Humidity dome or plastic wrap (for short-term pod storage if drying isn’t immediate)
Step-by-Step instructions for harvesting and processing canna seed pods
Here’s how to rescue those vibrant seed pods and turn them into next year’s showstopping cannas.
🌿 Step 1: Harvest Mature Seed Pods at the Right Time
Wait until the seed pods turn from green to a papery brown color—this signals full maturity. The pods will feel dry and crisp to the touch, almost like parchment. If you harvest too early, the seeds won’t germinate properly. I like to check pods in late fall, just before the first frost, because cold weather speeds up the drying process.
Use clean, sharp scissors or pruners to snip the pods from the stem, leaving about ½ inch of stem attached. This prevents the seeds from falling out during handling. Place the pods in a paper bag (not plastic—it traps moisture) and store them in a dry, shaded spot for 1-2 weeks. This initial drying prevents mold and makes seed removal easier later.
✂️ Step 2: Extract and Clean the Seeds
Once the pods are completely dry, gently squeeze them between your fingers to release the seeds. You’ll hear a soft pop as the pods crack open—this is your cue to work carefully. I like to lay the pods on a clean sheet of newspaper and tap them lightly with a spoon to encourage seeds to spill out without breaking.
Separate the seeds from the chaff by placing them in a bowl of lukewarm water. The viable seeds will sink to the bottom within 5-10 minutes, while empty or damaged seeds float. Scoop out the good seeds with a slotted spoon and spread them on a paper towel to air-dry for 24 hours. This final drying step ensures the seeds won’t rot during stratification.
💧 Step 3: Stratify Seeds for Faster Germination
Canna seeds need a cold, moist period to break dormancy—this is called stratification. Mix the dried seeds with a damp paper towel in a sealed plastic bag. Place the bag in the crisper drawer of your refrigerator (not the freezer) for 4-6 weeks. Check the towel every 2 weeks—if it dries out, mist it lightly with water and reseal the bag.
After stratification, the seeds will look slightly plump and firm. This is your signal that they’re ready to plant. I always label the bag with the date and variety (if known) to avoid confusion later. If you’re impatient, you can speed up germination by soaking the stratified seeds in warm water for 12 hours before planting—just don’t overdo it, or they’ll rot.
☀️ Step 4: Plant Stratified Seeds Indoors
Fill 4-inch pots with well-draining potting mix (cannas hate soggy roots). Plant the seeds ½ inch deep, spacing them 2 inches apart. Press the soil gently around them to ensure good contact—this helps the seeds absorb moisture and warmth. Place the pots in a warm, bright spot (like a sunny windowsill) where temperatures stay above 65°F.
Keep the soil evenly moist (not soggy) by watering from the bottom of the pot. You’ll see first sprouts in 2-4 weeks—this is your reward for all the prep work! Once the seedlings reach 3-4 inches tall, you can transplant them into larger containers or the garden after the last frost. Just be patient; cannas grow fast once they get going.
Tips & tricks for perfect canna seed pod processing
Here's what nobody tells you about turning those delicate seed pods into thriving canna plants.
Harvest Timing: The 1-2 week drying period in Step 1 is your secret weapon against mold. I've learned the hard way that rushing this step leads to sticky pods that attract pests. Place your paper bag in a spot with good airflow—like a pantry shelf with a small fan running nearby. This mimics natural drying conditions and prevents moisture buildup.
Seed Separation Technique: When testing seeds in lukewarm water during Step 2, I've found that adding a pinch of salt to the water helps sink even the lightest viable seeds. The salt creates a denser solution that reveals more good seeds than plain water. Just be sure to rinse the seeds thoroughly before drying!
Stratification Strategy: The 4-6 week cold treatment in Step 3 is non-negotiable for canna seeds, but you can optimize it. If you're short on time, try the optional 12-hour warm soak after stratification—it can cut your waiting time by about a week. I've had great success with this method, though I still recommend the full 4-6 weeks for best germination rates.
Planting Preparation: Before planting your stratified seeds in Step 4, I recommend pre-warming your 4-inch pots in the sun for 30 minutes. This small step helps maintain the warm soil temperature cannas need to germinate. You'll notice the pots stay warmer longer, creating an ideal environment for those precious sprouts to emerge.
Pro Tips for Canna Seed Pods
- Here's what nobody tells you about turning those delicate seed pods into thriving canna plants.
- Harvest Timing: The 1-2 week drying period in Step 1 is your secret weapon against mold. I've learned the hard way th...
- Seed Separation Technique: When testing seeds in lukewarm water during Step 2, I've found that adding a pinch of salt...
Frequently asked questions
Got questions about canna seed pods?
You’re not alone! Whether you’re a first-time grower or a seasoned gardener, these answers will help you navigate harvesting, drying, and preparing your seeds for next season’s stunning blooms.
How do I know when canna seed pods are ready to harvest?
Harvest canna seed pods when they turn brown, papery, and slightly wrinkled—usually 4–6 weeks after flowering. Avoid harvesting too early (green pods) or too late (pods may split open and scatter seeds). Gently twist or snip pods from the stem with clean pruners for best results.
What’s the best way to dry canna seed pods before extracting seeds?
Spread pods in a single layer on a mesh screen or paper towel in a warm, well-ventilated area (like a garage or shed) for 1–2 weeks. Avoid direct sunlight or humidity to prevent mold. Once fully dry and brittle, crush pods to release seeds—store them in a paper envelope in a cool, dark place.
Do canna seeds need stratification, and how do I do it?
Yes! Stratification mimics winter and boosts germination. Mix seeds with moist sand or peat moss, place in a sealed bag, and refrigerate for 4–6 weeks. Check moisture weekly—seeds should feel damp but not soggy. After stratification, sow seeds ½ inch deep in warm soil (70–75°F) for best sprouting.
Can I save seeds from store-bought canna lilies, or do I need to grow my own?
Store-bought cannas are often hybrids and may not produce true-to-type seeds. For reliable results, save seeds from open-pollinated or heirloom varieties grown in your garden. If you’re unsure, ask the seller—some specialty nurseries offer seed-saving options!
My canna seeds aren’t germinating—what could be wrong?
Try these fixes:
- Check moisture: Soil should stay consistently damp (not waterlogged). Use a spray bottle to avoid disturbing seeds.
- Warmth matters: Canna seeds need 70–85°F soil. Use a heat mat if your climate is cool.
- Patience pays: Germination can take 2–6 weeks. Avoid re-planting—some seeds sprout slowly!
- Freshness factor: Older seeds (over 1 year) may lose viability. Test a few to confirm.
Wrapping up and next steps
Harvesting, drying, and stratifying canna seed pods is your ticket to vibrant blooms next season—no fancy tools or gardening degree required! 🌱 With patience and a little know-how, you’ll unlock a treasure trove of seeds to expand your garden’s beauty. Now’s the perfect time to act: grab those dried pods, follow the steps, and watch your garden thrive with bold, new cannas year after year!
🌟 Ready to Grow?
- Start with one pod—experiment and refine your process.
- Share your progress with fellow gardeners for tips and inspiration!
- Plan your planting schedule now to maximize next year’s showstopping blooms.