
Lawn
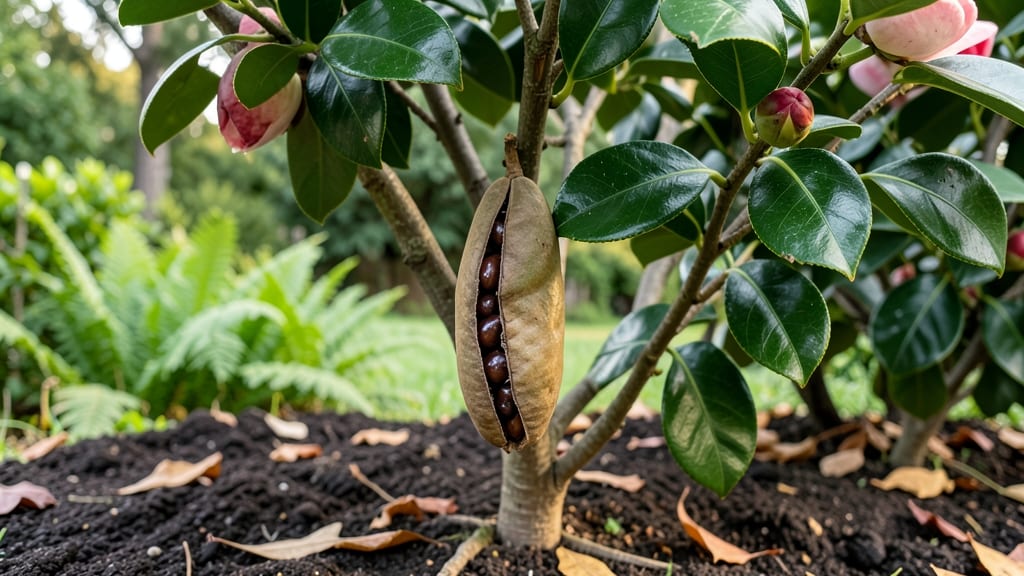
Growing camellias from seed pods lets you nurture a tree that could live for centuries—if you get the first steps right. 🌱 The key is timing: harvest those plump, green pods when they turn brown and papery, usually in late fall or winter, because fresh seeds germinate far better than dried ones left on the ground.
You'll need a warm, humid spot to break dormancy—think of a sealed container with damp paper towels where you can keep the seeds at 70°F for about 6 weeks. Most seeds need this warm treatment to mimic the natural process of rotting slightly in the soil before sprouting.
Patience here pays off: skipping this step means waiting months, if they ever wake up at all.
Once sprouted, those tiny seedlings need bright, indirect light and a moist but not soggy mix of peat and perlite. They grow slowly at first, but within a year you'll see sturdy stems ready for transplanting.
The real magic happens when you move them outdoors—your future shade tree starts taking shape.
This method works best in zones 7-9, where camellias thrive, but even in cooler areas, the warm-start technique improves your odds. The payoff? A tree with glossy leaves and delicate blooms that could outlive you—and your neighbors' envy. Let's get those seeds sprouting!
📚 In This Guide
- What you need
- Instructions
- Tips and common mistakes
- Wrapping up and next steps
What you need
- ● Fresh camellia seed pods – Harvested from a healthy, mature camellia plant (aim for fully ripe, brown pods). Collect 3-5 pods for better success rates.
- ● Well-draining potting mix – A blend of 50% peat moss or coco coir, 30% perlite or coarse sand, and 20% compost. Avoid heavy garden soil.
- ● Small seed-starting trays or pots – Use 2-3 inch diameter containers with drainage holes (biodegradable pots work great!).
- ● Plastic wrap or a humidity dome – To maintain moisture and warmth during germination.
- ● Spray bottle – For gentle watering to avoid disturbing seeds.
- ● Grow lights or a sunny windowsill – Camellia seeds thrive in bright, indirect light (6-8 hours daily).
- ● Labeling tags & marker – To track planting dates and seed varieties.
- ○ Seed stratification setup – A refrigerator (for cold stratification) or a warm water soak (optional for breaking dormancy).
- ● Fungicide (mild) – Like neem oil or hydrogen peroxide (3%) to prevent mold if humidity is high.
- ● Larger nursery pots (6+ inches) – For transplanting seedlings once they sprout.
- ● Acid-loving plant fertilizer – A balanced, water-soluble fertilizer (e.g., 10-10-10) diluted to half-strength for young seedlings.
- ○ Heat mat (optional) – Speeds up germination if your space is cool (70-75°F is ideal).
Step-by-step instructions for growing camellia trees from seed pods
Here's how to turn those beautiful camellia seed pods into thriving young trees—no nursery needed.
🌱 Step 1: Extract and Prepare the Seeds
Collect mature camellia seed pods when they turn brown and open naturally. Inside, you'll find large, glossy seeds. Remove them carefully with clean fingers or tweezers—don't let them dry out. Place the seeds in a bowl of lukewarm water for 24 hours to soften the hard outer shell. This soaking mimics natural rainfall and speeds up germination.
After soaking, gently rub the seeds between your palms to remove any remaining pulp. Rinse them under running water to clean off debris. You'll notice the seeds feel smoother and lighter. This preparation is key—skipping it can delay germination by months because the seed coat is naturally thick and slow to break down.
💧 Step 2: Plant the Seeds in Moist, Well-Draining Soil
Fill small pots or seed trays with a mix of 50% peat moss and 50% perlite to create a light, airy medium that prevents rot. Camellia seeds dislike soggy conditions, so drainage is critical. Plant the seeds ½ inch deep—just enough to cover them lightly. Space them 2 inches apart if using a tray.
Water gently until the soil feels evenly moist but not saturated. Place the pots in a warm, shaded area where temperatures stay between 65-75°F. Keep the soil consistently moist by misting daily or covering with plastic wrap to retain humidity. You'll see tiny sprouts within 4-8 weeks, though some seeds may take longer—patience is key here.
☀️ Step 3: Provide Gradual Light and Care for Young Seedlings
Once seedlings emerge with their first true leaves, move them to a spot with bright, indirect light for a few hours daily. Avoid direct sun at first—young camellias are sensitive to intense light. Gradually increase sunlight exposure over 2 weeks until they tolerate morning sun for 4-6 hours.
Water when the top inch of soil feels dry, but never let the roots sit in water. Fertilize lightly with a diluted balanced fertilizer (10-10-10) once a month during the growing season. By 6-12 months, your seedlings should be sturdy enough to transplant into individual pots. Prune leggy growth to encourage bushier development—this is where your tree's shape begins to form.
Tips & tricks for perfect camellia seedling growth
Between us, growing camellias from seed pods is easier than you think—once you know these game-changing tips.
Seed Prep Secret: That 24-hour soak in lukewarm water isn't just about softening the shell—it's mimicking nature's rainfall cycle. Use a bowl wide enough to hold the seeds in a single layer, and change the water halfway through if it cools. I've found that adding a pinch of cinnamon to the soaking water can prevent mold, especially in humid climates.
Soil Mix Matters: The 50-50 peat moss and perlite ratio is perfect, but if you're in a dry climate, swap 10% of the perlite for coarse sand to improve drainage. Press the soil gently around each seed after planting to ensure good contact—this helps prevent air pockets that could delay germination. A light misting with water after planting keeps the soil evenly moist without oversaturating.
Light Transition Strategy: When you're ready to move seedlings to brighter light after 2 weeks, do it gradually—start with just 2 hours of morning sun and increase by 30 minutes daily. I've seen seedlings get sunburned when moved too quickly to full sun. If your seedlings start looking pale or stretched, they're not getting enough light yet.
Pro Tips for Camellia Seed Pod
- Between us, growing camellias from seed pods is easier than you think—once you know these game-changing tips.
- Seed Prep Secret: That 24-hour soak in lukewarm water isn't just about softening the shell—it's mimicking nature's ra...
- Soil Mix Matters: The 50-50 peat moss and perlite ratio is perfect, but if you're in a dry climate, swap 10% of the p...
Frequently asked questions
Got questions about growing camellia seed pods or nurturing them into thriving trees? You’re not alone! Here are answers to the most common queries—so you can skip the guesswork and focus on growing that stunning camellia.
When is the best time to harvest camellia seed pods?
The ideal time to harvest camellia seed pods is when they turn brown and dry (usually late summer to early fall). Avoid harvesting too early—the seeds won’t be fully mature. Wait until the pod splits open naturally or gently pry it open to check for plump, dark seeds inside. Pro tip: Harvest on a dry day to prevent mold!
How often should I water camellia seed pods or seedlings?
Keep the soil consistently moist but not soggy—especially during germination (first 4-6 weeks). Water lightly when the top inch of soil feels dry. Once seedlings sprout, reduce frequency to every 5-7 days, letting the soil dry slightly between waterings. Overwatering can cause root rot, so drainage is key!
Can I grow a camellia tree from a store-bought seed pod?
Yes! Store-bought camellia seed pods work, but germination rates may vary. For best results, stratify the seeds (mix with damp sand, refrigerate for 30-60 days) before planting. Alternatively, collect pods from a healthy, mature camellia tree for higher success. Patience is key—germination can take 2-6 months!
What should I do if my camellia seedlings develop yellow leaves?
Yellow leaves often signal overwatering, nutrient deficiency, or pests. Check the soil moisture first—let it dry slightly. If the issue persists, test for nutrient deficiencies (like nitrogen) and amend with a balanced fertilizer. Inspect for aphids or spider mites; treat with neem oil if needed. Pro tip: Ensure pots have drainage holes!
How long does it take for a camellia seed pod to grow into a mature tree?
Camellia trees grown from seed are slow growers—expect 3-5 years for a small sapling (3-5 feet) and 10+ years for a mature tree (15-25 feet). Patience pays off! Grafted camellias (from nurseries) mature faster, but seed-grown varieties offer unique, hardier traits. Bonus: Prune lightly to encourage bushier growth!
Wrapping up and next steps
Growing a camellia seed pod into a thriving tree is a rewarding journey that blends patience with nature’s beauty! 🌱 From selecting the right pod to nurturing your sapling, each step brings you closer to a stunning, long-lived plant that adds elegance to your garden. Remember: consistency in care and a little creativity can turn even a tiny pod into a majestic camellia.
Ready to take the next step? Start by planting your first pod today—your future camellia tree is just waiting to bloom! 🌸 For extra tips, explore local gardening forums or connect with fellow plant enthusiasts to share your progress. Happy growing!