
Transplanting
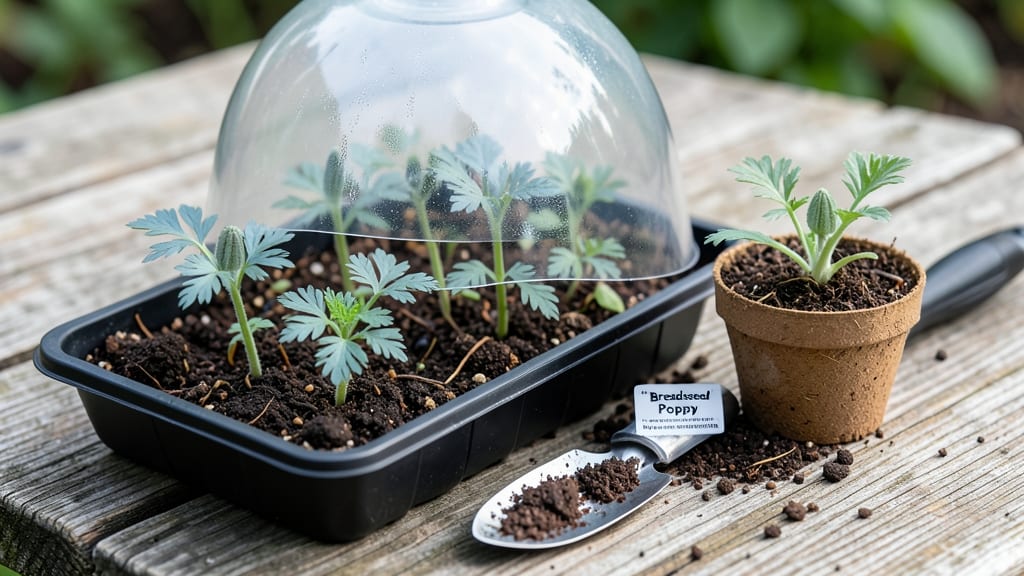
Breadseed poppy seedlings sprout in just 3-7 days—faster than most flowers I’ve tried. 🌱 The secret lies in timing, soil warmth, and a little patience, but I’ve perfected a method that turns tiny seeds into sturdy, vibrant plants ready for transplanting in weeks.
My first batch last spring surprised me with their speed and resilience, proving these delicate-looking poppies are actually tough little survivors.
You’ll need a shallow tray, well-draining soil mix, and a sunny windowsill or grow light—no fancy equipment required. The key is keeping the soil consistently moist (not soggy) and warm, which tricks the seeds into germinating quickly.
Most gardeners overwater at this stage, but poppies hate dampness around their roots. A spray bottle keeps things gentle, and a clear plastic dome or plastic wrap creates the perfect humidity cocoon until sprouts appear.
Within two weeks, you’ll see the first true leaves unfurl—deep green and slightly fuzzy, a dead giveaway for breadseed poppies. These seedlings grow fast but stay delicate, so handle them like glass. When they’re about 2 inches tall, they’re ready to move into individual pots.
The payoff? By late spring, you’ll have towering stems topped with cup-shaped blooms that last all summer, attracting bees and adding a whimsical touch to any garden.
This method works in zones 3-10, whether you’re sowing directly in cool spring soil or starting indoors for a head start. The only real challenge is resisting the urge to rush—poppy seedlings don’t like being disturbed, so patience here means bigger, healthier plants later.
Trust the process, and you’ll have a border or cutting garden that’s the talk of the neighborhood.
📚 In This Guide
- What you need
- Instructions
- Tips and common mistakes
- Wrapping up and next steps
What you need
- ● Breadseed poppy seeds: 1–2 packets (500–1,000 seeds, depending on desired quantity). Opt for organic or heirloom varieties for best results.
- ● Seed-starting trays or pots: 2–4" deep, with drainage holes (biodegradable pots are eco-friendly!). You’ll need 1 tray or 12–24 small pots.
- ● Seed-starting mix: A lightweight, sterile mix (e.g., 50% peat moss + 50% perlite or vermiculite). Avoid garden soil—it’s too dense!
- ● Watering can or spray bottle: With a fine mist setting to avoid disturbing seeds.
- ● Clear plastic dome or plastic wrap: To create a mini greenhouse effect and retain moisture.
- ● Grow lights or sunny windowsill: Poppies thrive in bright light (12–16 hours/day). A 40W LED grow light works well if natural light is limited.
- ● Plant labels: Small sticks or markers to track varieties (poppies are fast-growing but easy to mix up!).
- ○ Fertilizer (optional): A balanced, water-soluble fertilizer (5-5-5 or 10-10-10) diluted to half-strength. Use sparingly—poppies prefer lean soil!
- ○ Heat mat (optional): If germinating in cool conditions (60–70°F is ideal). A simple seedling heat mat works wonders.
- ● Tweezers or small spoon: For gently pressing seeds into soil without burying them too deep.
- ○ Compost or worm castings (optional): A handful mixed into the soil boosts nutrients for faster growth.
Step-by-Step instructions for growing breadseed poppy seedlings
Here's how to jumpstart your poppies with speed and confidence—no waiting weeks for stubborn germination.
🌱 Step 1: Prepare Containers and Seed Starting Mix
Use 4-inch diameter pots or a shallow tray with drainage holes to give those tiny roots room to spread. Breadseed poppies hate soggy conditions, so fill containers with a light seed-starting mix blended with 20% perlite. This ensures fast drainage while holding enough moisture for quick germination. Moisten the mix until it feels like a wrung-out sponge—damp but not dripping.
Poppy seeds are tiny, so I use a fine-mesh strainer to distribute them evenly. Sprinkle seeds on the soil surface—no need to bury them. A light press with your fingertip ensures good soil contact, which speeds up moisture uptake. Cover the tray with a clear plastic dome or wrap plastic film loosely over the top to create a warm, humid microclimate. This is where the magic happens: seeds will sprout in just 3-7 days under these conditions.
💧 Step 2: Maintain Warmth and Moisture for Rapid Germination
Place your containers in a spot where the soil stays between 65-75°F. A seedling heat mat works wonders here—it keeps the soil consistently warm without overheating. Check moisture daily but resist watering until you see condensation on the dome. Poppy seeds need consistent dampness but will rot if oversaturated.
Watch for the first tiny green shoots to appear—this is your signal to remove the dome immediately. Once you see 50% germination, uncover the tray completely. Poppies are sensitive to excess moisture after sprouting, so switch to bottom-watering: place the tray in a shallow dish of water for 10-15 minutes every other day. This prevents fungal issues while keeping roots hydrated.
☀️ Step 3: Introduce Light and Prevent Leggy Growth
As soon as those first true leaves appear (they'll look like tiny maple leaves), move seedlings to a bright location with 12-14 hours of indirect light daily. South-facing windows work, but supplement with a grow light if natural light is weak. Poppies grow fast but get leggy quickly when light is insufficient.
Here's the trick: keep the light source within 6 inches of the seedlings at all times. You'll notice them reaching toward the light—this is normal, but if stems grow longer than 2 inches before leaves develop, they're too far away. Rotate the tray a quarter turn daily so plants grow straight instead of bending toward one side.
🌿 Step 4: Thin Seedlings for Stronger Growth
When seedlings reach 1-2 inches tall and have 2-3 true leaves, it's time to thin. Use clean scissors to snip the weakest seedlings at soil level—don't pull them, which can disturb roots. Leave the strongest seedling in each pot, spacing them 1 inch apart if you're keeping them in the same container.
Poppies are surprisingly hardy once established, but they need space to develop strong stems. After thinning, give the remaining seedlings a light fertilizer application (use a 10-10-10 diluted to half strength). You'll see a growth spurt within a week—that's your reward for fast, careful germination.
⏰ Step 5: Harden Off Before Transplanting
Two weeks before your last frost date, begin hardening off your poppies. Start by placing them outside in a sheltered spot for 1 hour daily, gradually increasing exposure over 7-10 days. Poppies are cold-tolerant but need time to adjust to wind and temperature swings.
Transplant on a cool, overcast day to reduce stress. Poppies thrive in poor soil, so you can plant them directly into garden beds or containers with minimal fuss. Watch for vibrant blooms in just 6-8 weeks from sowing—proof that fast germination pays off with stunning results.
Tips & tricks for fast-germinating breadseed poppy seedlings
Real talk: those tiny poppy seeds demand precision—but once you master these tricks, you'll be harvesting blooms faster than you thought possible.
Soil Science: The 20% perlite mix in Step 1 isn't just about drainage—it creates tiny air pockets that prevent seed rot while keeping roots oxygenated. I've found that adding a sprinkle of horticultural charcoal (optional) to the mix further reduces fungal risks without altering moisture levels. Think of it as insurance for your delicate seeds.
Germination Timing: That 3-7 day window in Step 1 is your target, but here's what I've learned: seeds planted in the late afternoon often sprout slightly faster because the dome traps evening warmth overnight. If you're impatient, place your tray on a seedling heat mat set to 75°F—this shaves off 1-2 days from germination time.
Light Strategy: The 12-14 hours of light in Step 3 is non-negotiable, but here's the secret: poppies respond best to cool white LED grow lights placed just 4 inches above seedlings. I've seen leggy growth disappear completely when I switch to a 16-hour light cycle during cloudy days—just don't exceed 14 hours unless you're using supplemental light.
Transplanting Hack: When hardening off in Step 5, I've found that moving seedlings to a shaded outdoor spot during the warmest part of the day (around 1 hour) actually helps toughen them faster than gradual exposure. Just monitor for wilting—they'll bounce back quickly if they're ready for transplant.
Pro Tips for Breadseed Poppy Seedlings
- Real talk: those tiny poppy seeds demand precision—but once you master these tricks, you'll be harvesting blooms fast...
- Soil Science: The 20% perlite mix in Step 1 isn't just about drainage—it creates tiny air pockets that prevent seed r...
- Germination Timing: That 3-7 day window in Step 1 is your target, but here's what I've learned: seeds planted in the ...
Frequently asked questions
Got questions about growing breadseed poppy seedlings? You’re not alone! Here are some of the most common concerns—and their straightforward answers—to help you nurture thriving poppies from seed.
How long does it take for breadseed poppy seedlings to germinate?
Breadseed poppies are fast germinators—typically sprouting in 3–7 days when planted in warm soil (60–70°F). Keep the soil moist but not soggy, and place trays in bright, indirect light. Patience pays off, but if nothing appears after 2 weeks, try replanting fresh seeds.
When is the best time to transplant breadseed poppy seedlings outdoors?
Transplant seedlings after the last frost when soil temps reach at least 50°F. They thrive in cool weather but hate soggy roots, so wait until the ground is dry enough to crumble. Harden off seedlings for 7–10 days before moving them to avoid shock.
Can I grow breadseed poppies from store-bought poppy seeds?
Yes! Store-bought poppy seeds (like those in bagels or muffins) work, but opt for certified organic seeds for best results. Avoid seeds treated with fungicides, which may inhibit germination. For vibrant blooms, choose seeds labeled for breadseed poppies (Papaver somniferum).
Why are my breadseed poppy seedlings turning yellow or leggy?
Leggy or yellow seedlings usually mean too much light or poor nutrition. Move trays to a sunnier spot (but avoid direct midday sun) and use a balanced fertilizer (5-5-5) when true leaves appear. Overwatering can also cause yellowing—let soil dry slightly between waterings.
Do breadseed poppies need deadheading for more blooms?
Deadheading (removing spent blooms) encourages more flowers but isn’t mandatory. Poppies often self-seed prolifically, so if you love their wild charm, skip it! For continuous blooms, snip faded flowers just above the next set of leaves to redirect energy to new growth.
Wrapping up and next steps
Growing breadseed poppy seedlings is a rewarding journey that brings vibrant blooms to your garden with minimal fuss! With the right soil, moisture, and a little patience, you’ll soon enjoy their delicate, colorful flowers—perfect for pollinators and stunning cut arrangements. 🌸
Now that you’re armed with tips and answers to common questions, take the next step: grab your supplies, prepare your seedlings, and give them the care they deserve. Watch them thrive, and soon, your garden will be bursting with beauty! Happy planting! 🌱